GIS Layers
Maptaskr provides the ability to upload GIS file and web services to allow GIS layers to be utilised withing the Maptaskr solution.
Layers are managed via the Layers panel which is accessible via the top navigation.
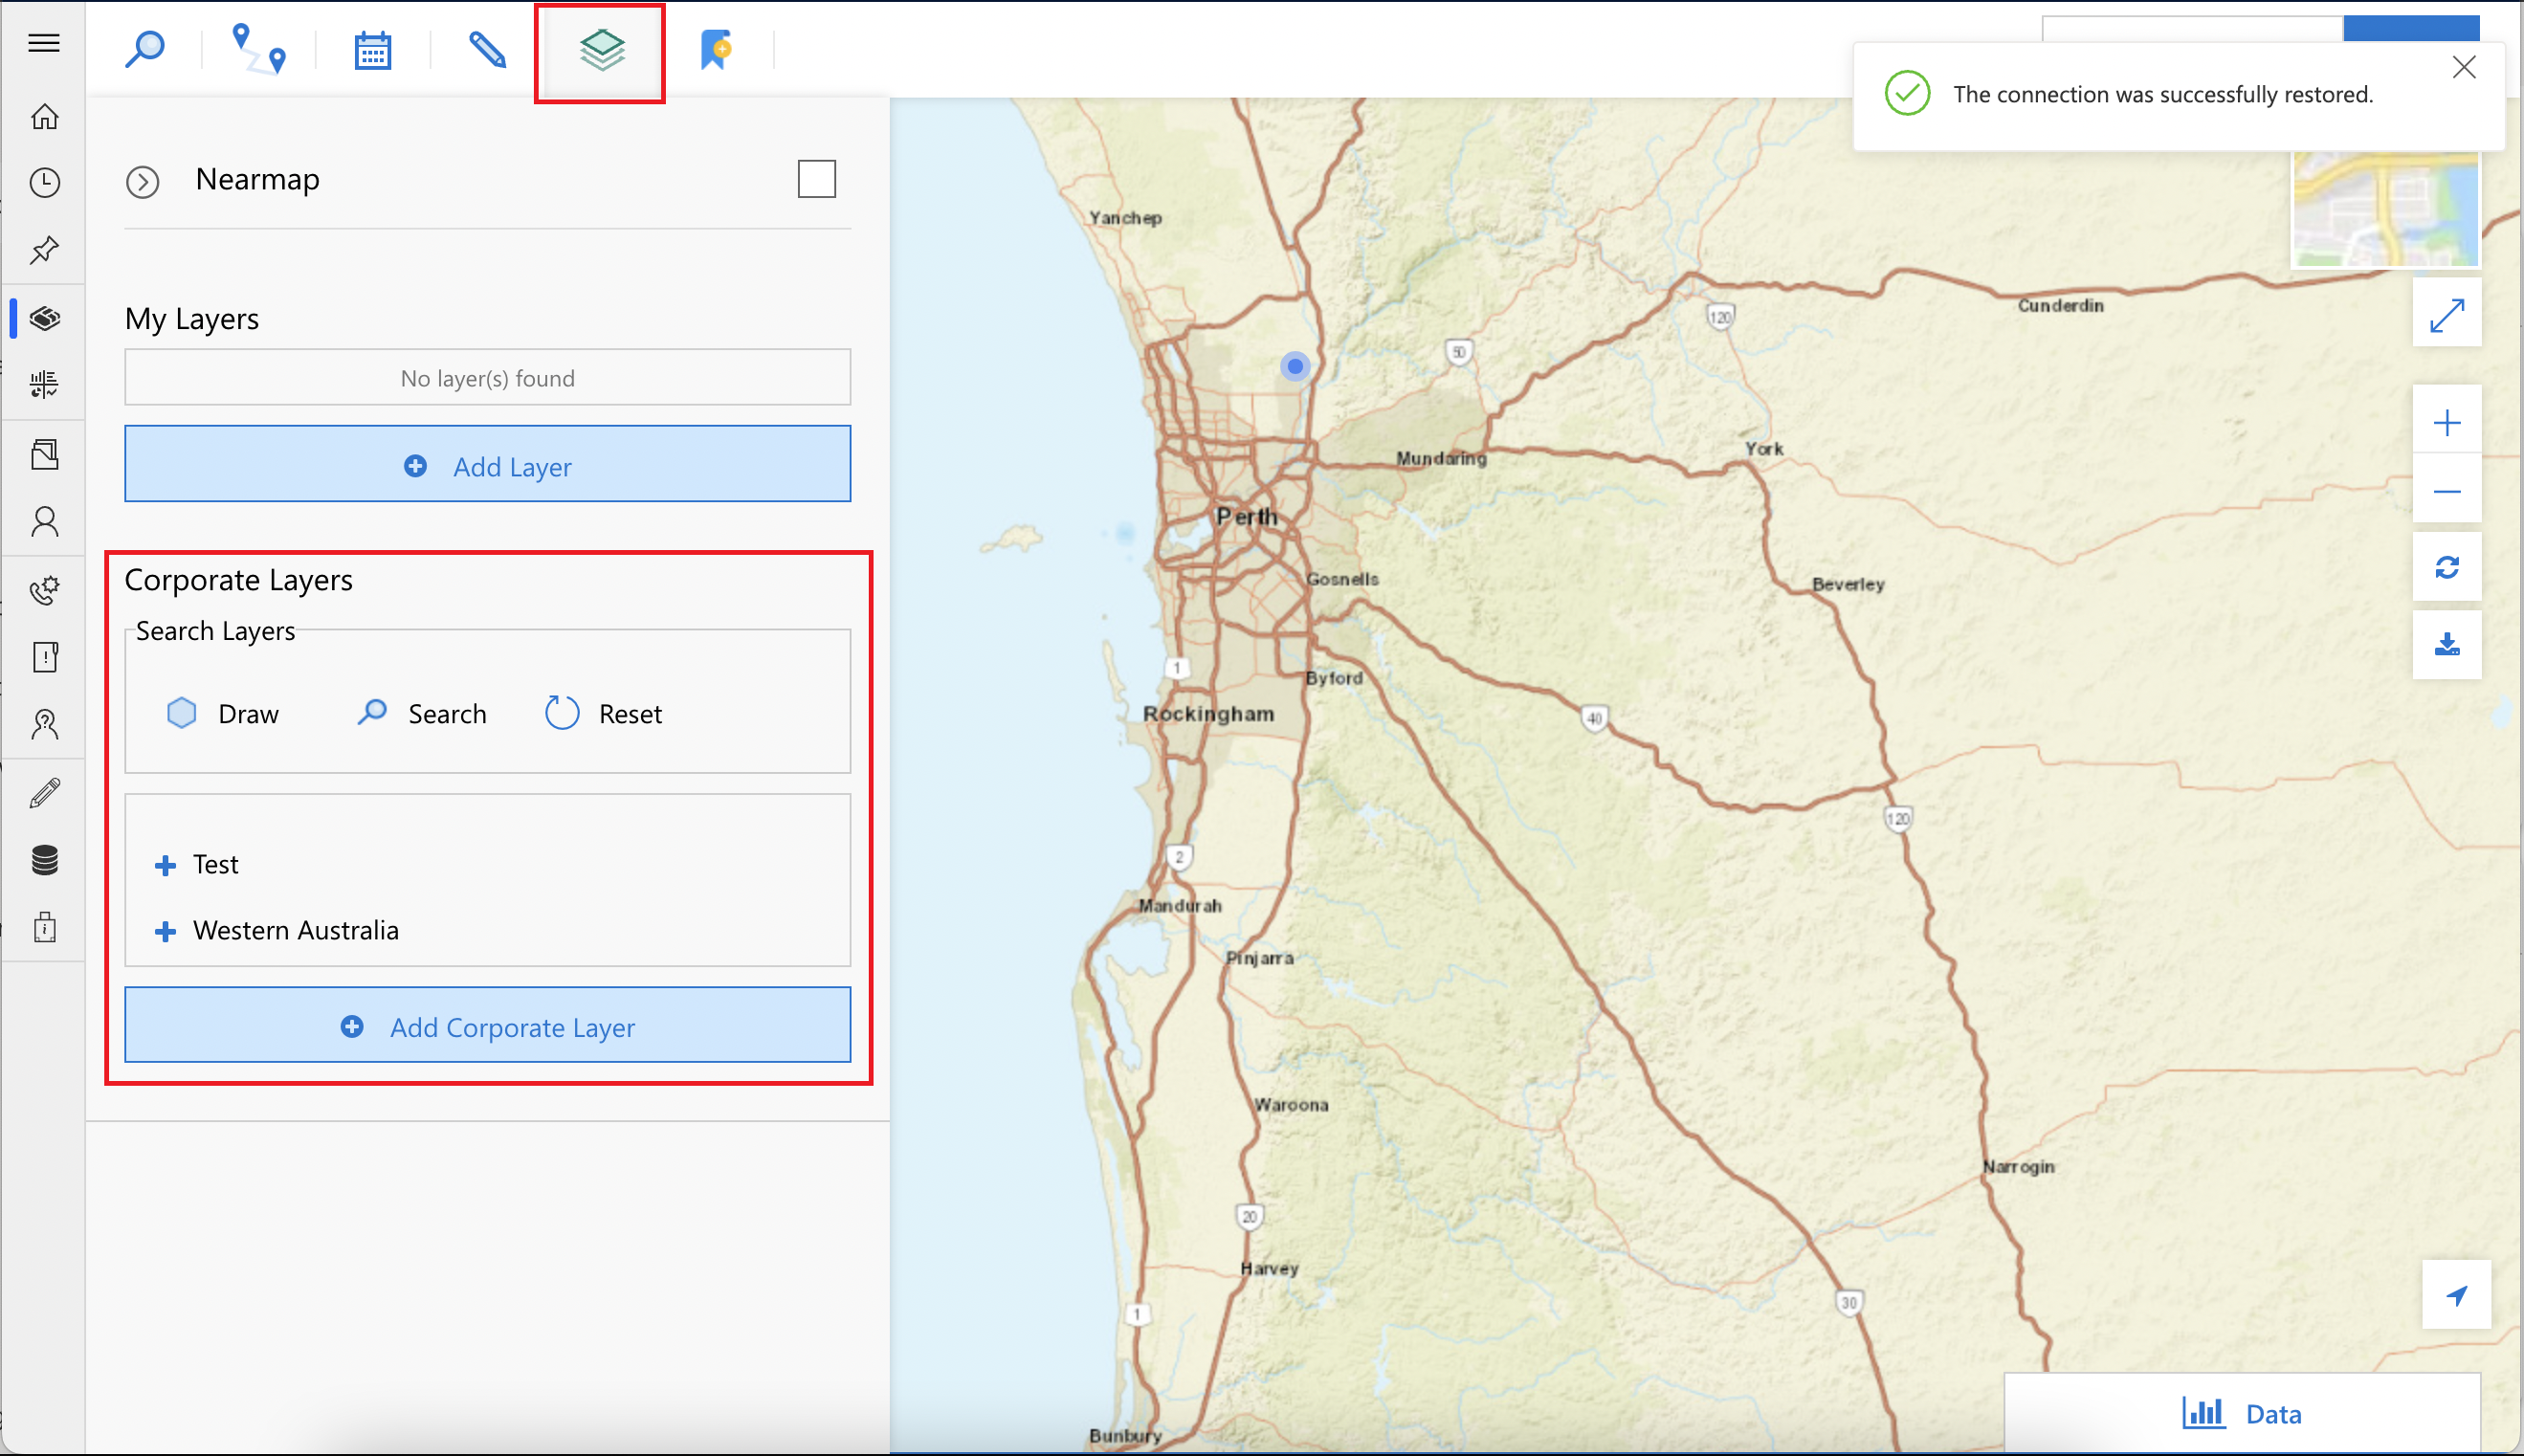
Corporate layers are arranged by the administrator for global access to all licensed Maptaskr users.
To add a File as a layer, click Add Corporate Layer and you see the Add Layer modal dialog.
Figure 77: Add Corporate Layer.

Add a File Layer
Click on the File tab to show the settings to configure a layer service.
Figure 78: Add File Layer.
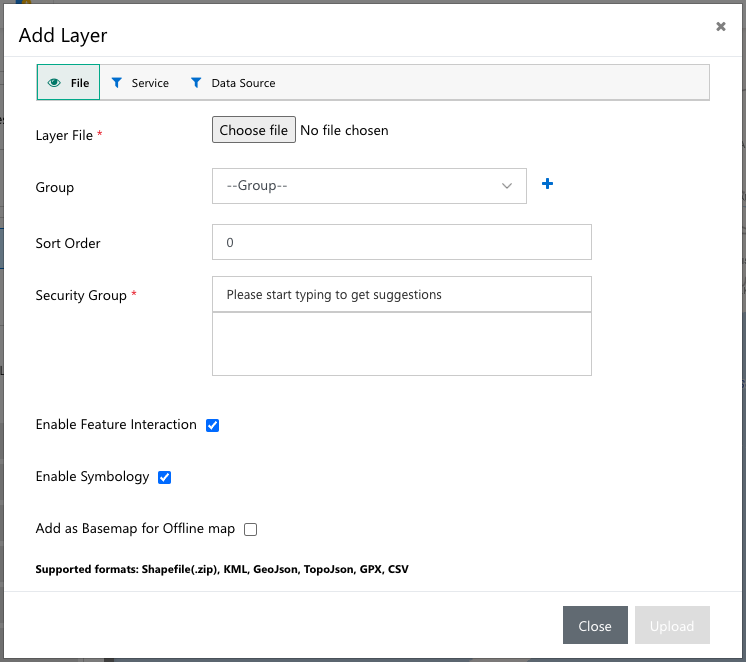
Once all mandatory and appropriate fields have been configured for the layer in question, click Upload to add the layer to the list of layers available to the appropriate Maptaskr users. These layers can be turned on to provide overlays on the Maptaskr map.
The following table provides a detail overview of the fields associated with adding a file layer to Maptaskr.
| FIELDS | DESCRIPTION |
|---|---|
| Layer file | User can select to upload a layer directly from a file (.zip Shapefile, KML, GeoJSON, TopoJSON, GPX or CSV) or from a service such as WFS |
| Group | By adding a group to a layer, user can bundle other layers into an expandable group to reduce screen real estate usage. |
| Security group | By adding a security group to a layer, user can set permission for the layer to be viewed if the end user is a part of certain team or has a specific role. |
| Sort Order | Specific the order in which this layer will display in the Layers list. |
| Enable feature interaction | Feature interaction allows clicking on features to display attribute data (if applicable to the layer) |
| Enable symbology | Enable Symbology respects the symbology given by a layer (if applicable) |
| Add as a Basemap for Offline map | Enable this choice to set up the relationship between configured data sources. E.g., Accounts with Appointments |
Add a Service Layer
Click on the File tab to show the settings to configure a layer service.
Figure 79: Add a Service Layer.
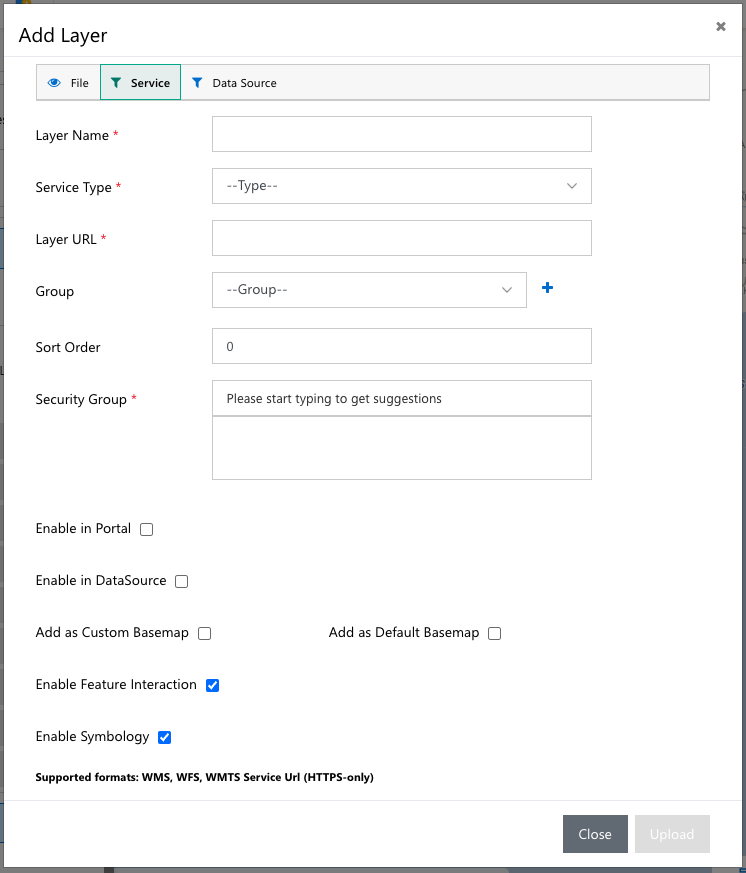
Once all mandatory and appropriate fields have been configured for the layer in question, click Upload to add the layer to the list of layers available to the appropriate Maptaskr users. These layers can be turned on to provide overlays on the Maptaskr map.
The following table provides a detail overview of the fields associated with adding a file layer to Maptaskr.
| FIELDS | DESCRIPTION |
|---|---|
| Layer name | Layer Name will be the display name for the layer in your layer menu |
| Service type | Service Type is to determine where this layer is coming from. |
| Layer URL | Layer URL is the URL to retrieve the Layer from |
| Group | By adding a group to a layer, user can bundle other layers into an expandable group to reduce screen real estate usage. |
| Sort Order | Specific the order in which this layer will display in the Layers list. |
| Security group | By adding a security group to a layer, user can set permission for the layer to be viewed if the end user is a part of certain team or has a specific role. |
| Add as a custom base map | Will allow you to change the Maptaskr base map to load this layer instead (only available to admin users) |
| Add as a default base map | Will change the Maptaskr Base map to load this layer instead (only available to admin users) |
| Enable Feature Interaction | Allows clicking on features to display attribute data (if applicable to the layer) |
| Enable Symbology | Respects the symbology given by a layer (if applicable) |
Add an ArcGIS Service Layer
Note: ArcGIS Service integrations are only available with the Enterprise version of Maptaskr for D365.
For details on supported ArcGIS versions, and prerequisites that are required to be in place before Maptaskr configuration can occur please refer to the Maptaskr ArcGIS Configuration Guide or contact Maptaskr Support (support@maptaskr.com).
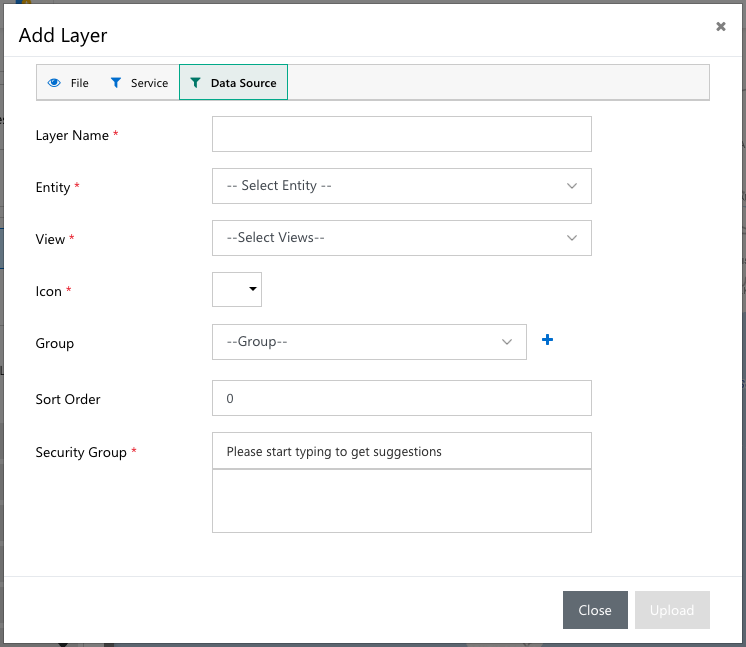
Add a Data Source Layer
User can configure any data source entity as a layer by filling in the form below.
Click on the Data Source tab to show the settings to configure a layer service.
Once all mandatory and appropriate fields have been configured for the layer in question, click Upload to add the layer to the list of layers available to the appropriate Maptaskr users. These layers can be turned on to provide overlays on the Maptaskr map.
Figure 80: Data source as a layer.
The following table provides a detail overview of the fields associated with adding a file layer to Maptaskr.
| FIELDS | DESCRIPTION |
|---|---|
| Layer name | Will be the display name for the layer in your layer menu |
| Entity | Will allow to select data source entity |
| View | Will set the view of data source accordingly |
| Icon | Will add custom icon from the icon library |
| Group | By adding a group to a layer, user can bundle other layers into an expandable group to reduce screen real estate usage. |
| Security group | By adding a security group to a layer, user can set permission for the layer to be viewed if the end user is a part of certain team or has a specific role. |
| Sort Order | Specific the order in which this layer will display in the Layers list. |