Data Source Configuration
Data Sources are the key part within Maptaskr that is used to set up the mapping of tables within the platform that are used for search and other activities. Maptaskr includes default data source mappings which can be updated as needed.
Create a new Data Source
-
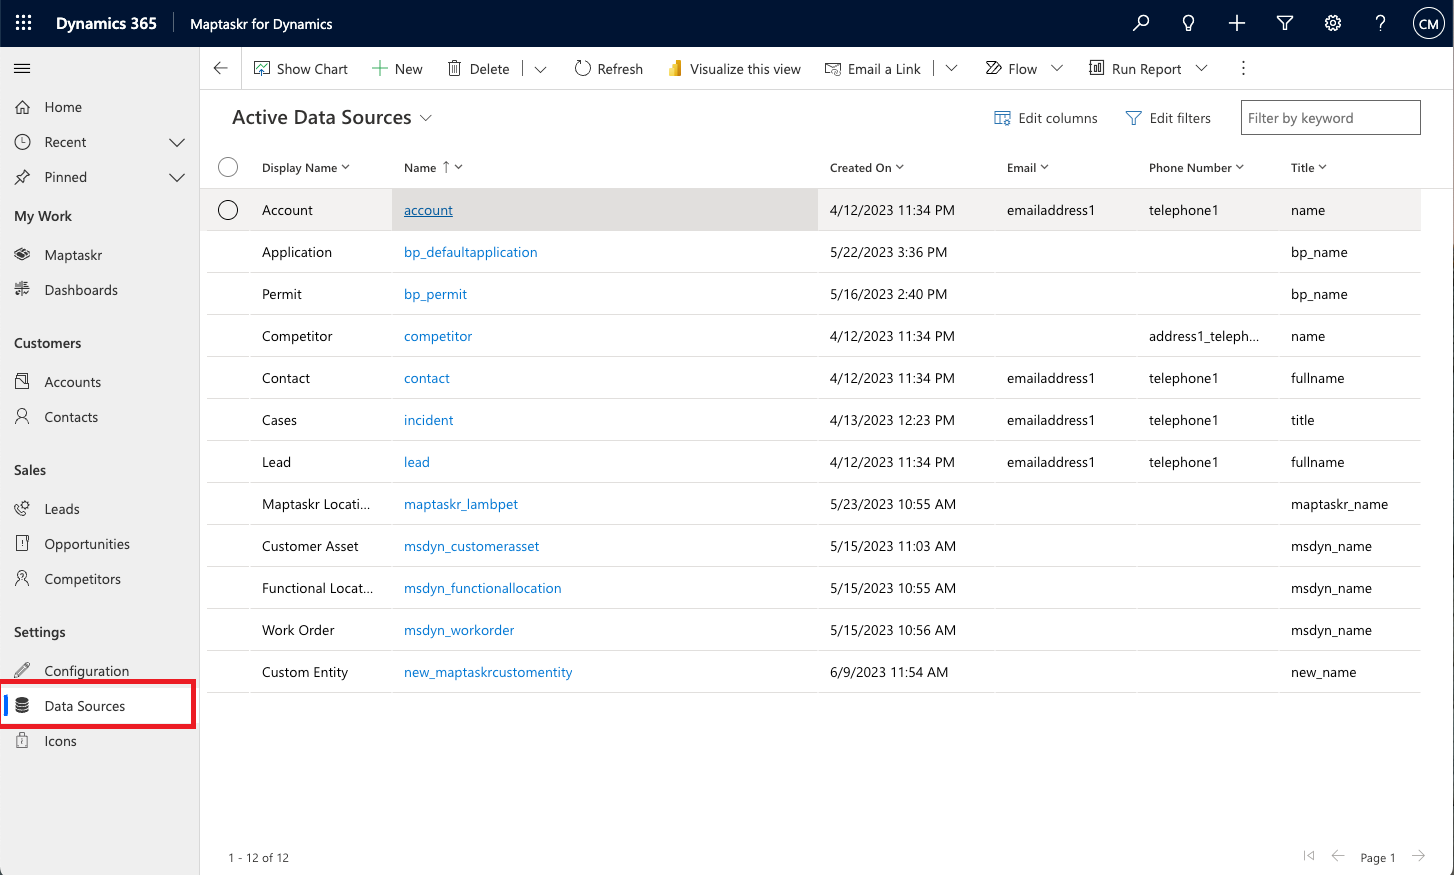
Navigate to the data sources tab under Settings from the left navigation bar.
Figure 81: Maptaskr Settings menu.

-
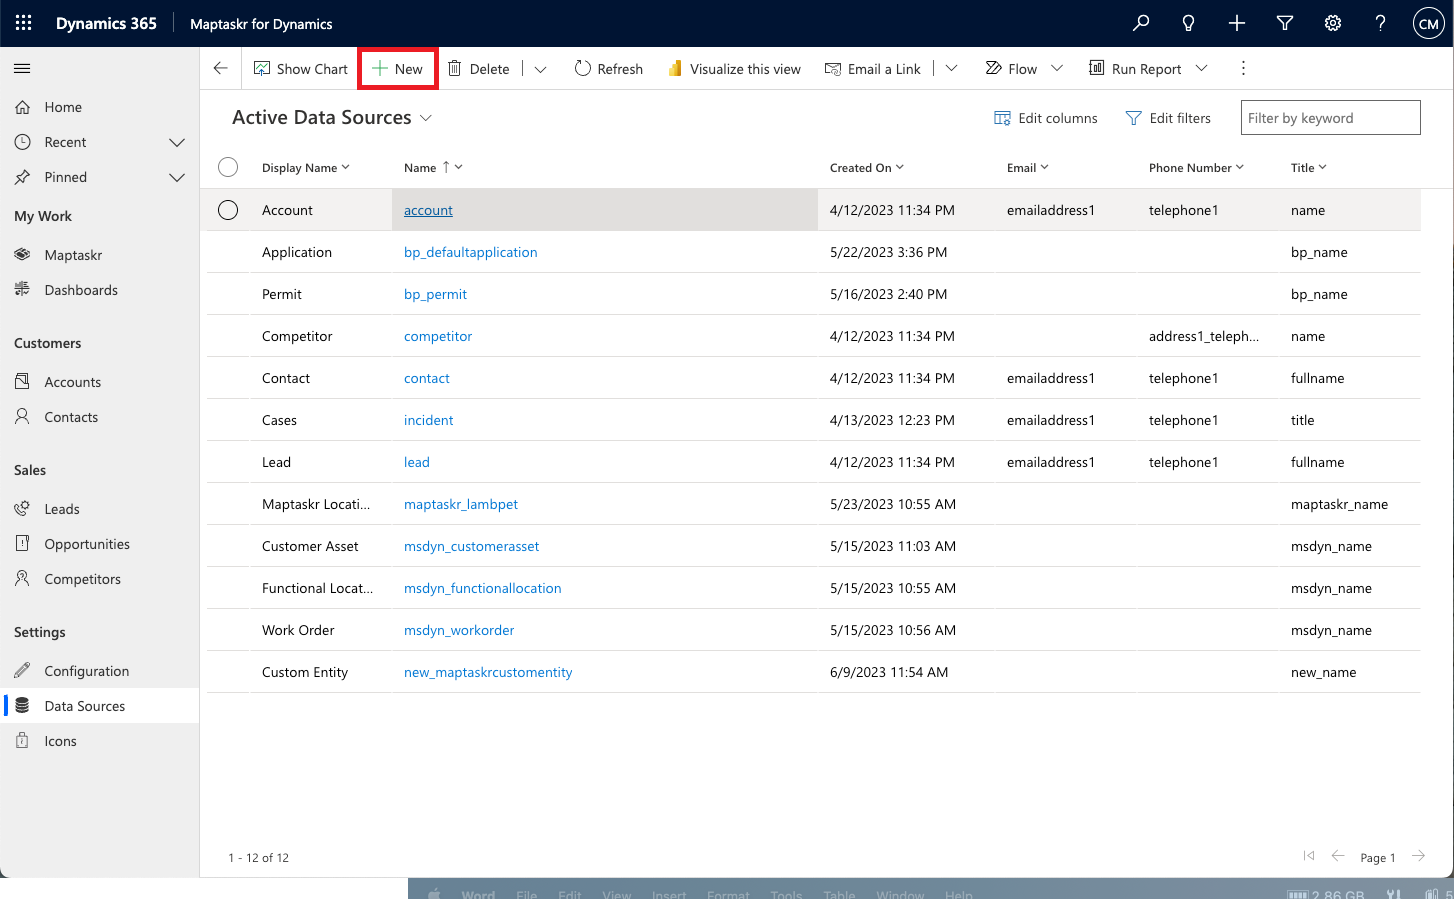
On the data source tab to add a new entity, click on new and it shall redirect to next step.
Figure 82: Maptaskr Settings menu.
-
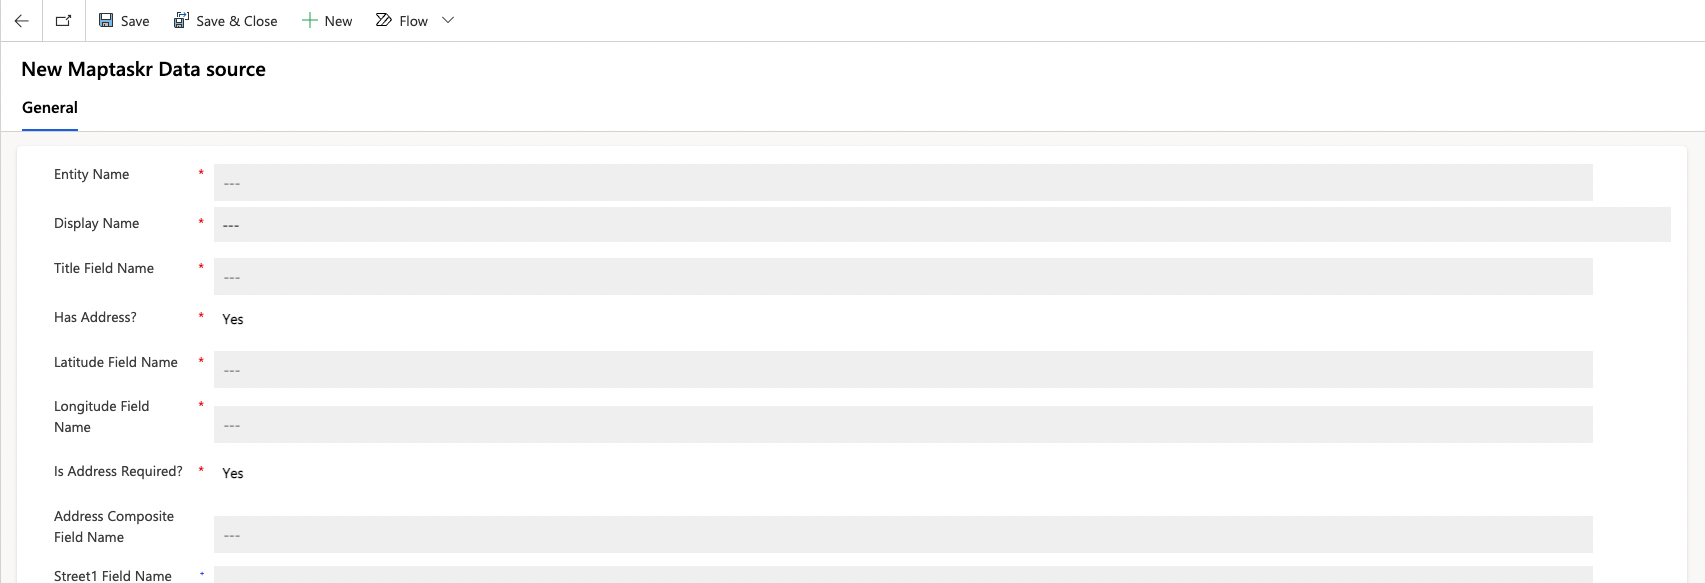
Enter the following required data to create the entity.
Figure 83: New Data Source Form.
The following table provides an overview of the data source list attributes.
| FIELDS | DESCRIPTION |
|---|---|
| Entity Name | The internal name of the entity. |
| Display Name | The display name for the data source |
| Title Field Name | The Title field displayed in the Infobox. Figure 84: Title field name. |
| Has address | The choice to decide whether the entity has address attributes. If the entity does not have address fields, select No. |
| Related Entity with address | If Has address is set to No, a related entity with address must be selected. For example, you want to search appointments based on contact's location, set the Has Address to No and select Contact in the Related Entity with Address. |
| Latitude Field Name | The internal latitude field name. |
| Longitude Field Name | The internal longitude field name. |
| Is Address Required? | Set to Yes for entities that have full address attributes that can be mapped. For custom entities that do not have address attributes, the field can be set to no. |
| Address Composite Field Name | Internal composite address field. |
| Street1 Field Name | Internal address 1 field (will be automatically mapped for core entities) |
| Street2 Field Name | Internal address 2 field (will be automatically mapped for core entities) |
| Street3 Field Name | Internal address 3 field (will be automatically mapped for core entities) |
| City Field Name | Internal City field (will be automatically mapped for core entities) |
| State Field Name | Internal State field (will be automatically mapped for core entities) |
| Postcode Field Name | Internal postcode field (will be automatically mapped for core entities) |
| Country Field Name | Internal Country field (will be automatically mapped for core entities) |
| Email Field Name | Internal email field |
| Phone No. Field Name | Internal phone number field |
| Relationship Color | Internal multiselect colour field that maps internal colour option set for all the child records of the entity |
| Custom Icon | Upload image to set it up as default throughout the system. Figure 85: Custom icon |
| Enabled | Whether the data source is enabled within Maptaskr search. Figure 86: Enabled.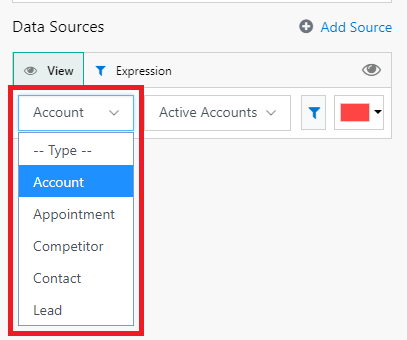 |
| Allow Relationship | Enable this choice to set up the relationship between configured data sources. E.g., Accounts with Appointments |
| Allow Invalid Address | Enable to include results that do not have valid address attributes (latitude & longitude). Invalid results are included in the data tab results |
| Allow Routing | Enables the Route button in the D365 ribbon for the table records, and table list views. |
| Show Phone Number in Infobox | Enable to include the phone number (if exists) below the main header in the Infobox |
| Show Notes | Enable to include Notes (if exists) as a tab within the Infobox |
Configuring a Data Source
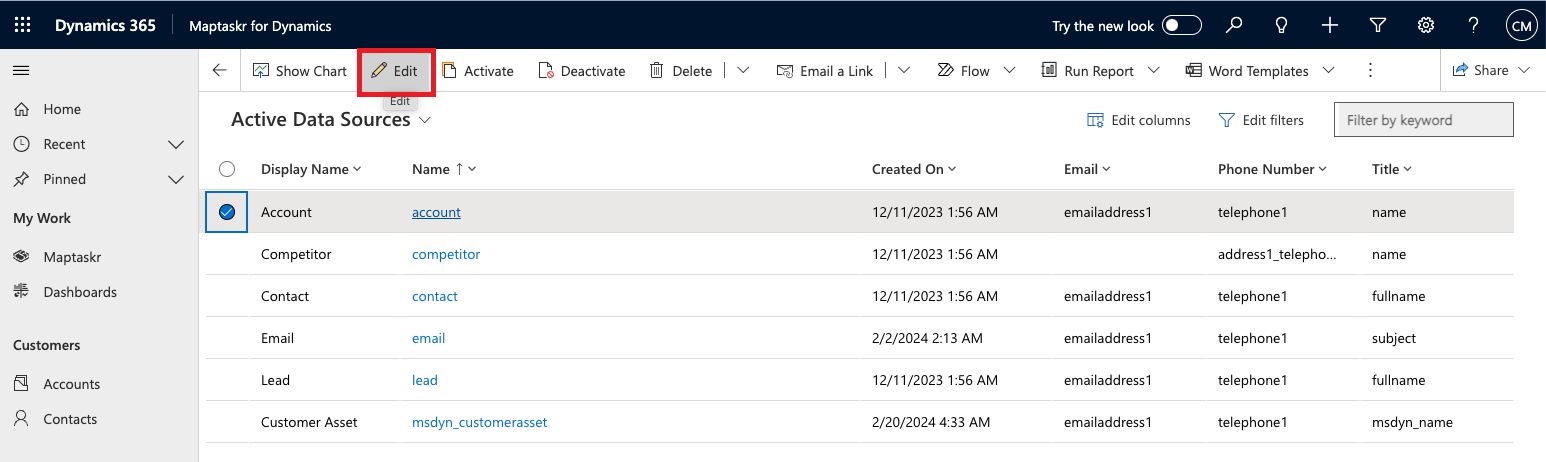
Once a Datasource has been added as per the above instructions, an additional configuration area will become available when you edit the entry.
Figure 87: Edit a Data Source configuration.
At the bottom of the Datasource listing, you will find several tabs which provide additional advanced configuration capability. The following sections will describe each of these configuration sections in detail.
Figure 88: Data Source advanced configuration.
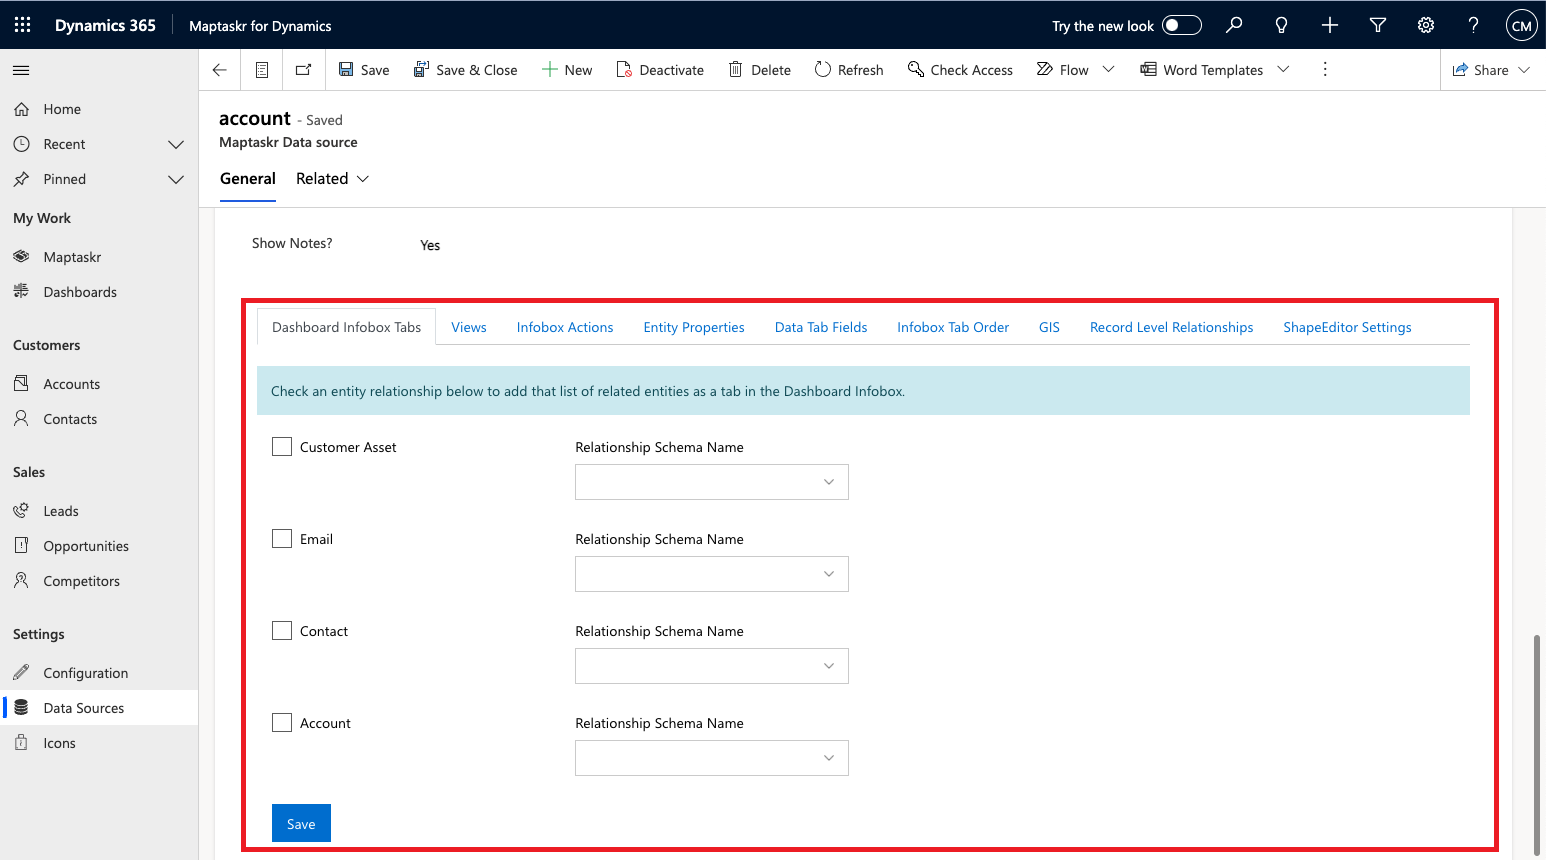
Dashboard Infobox Tabs
Provided the Allow Relationship setting is enabled on a related entity, this section enables the ability to list related records as a tab on the Dashboard search result Infobox.
Figure 89: Data Source Relationship List.
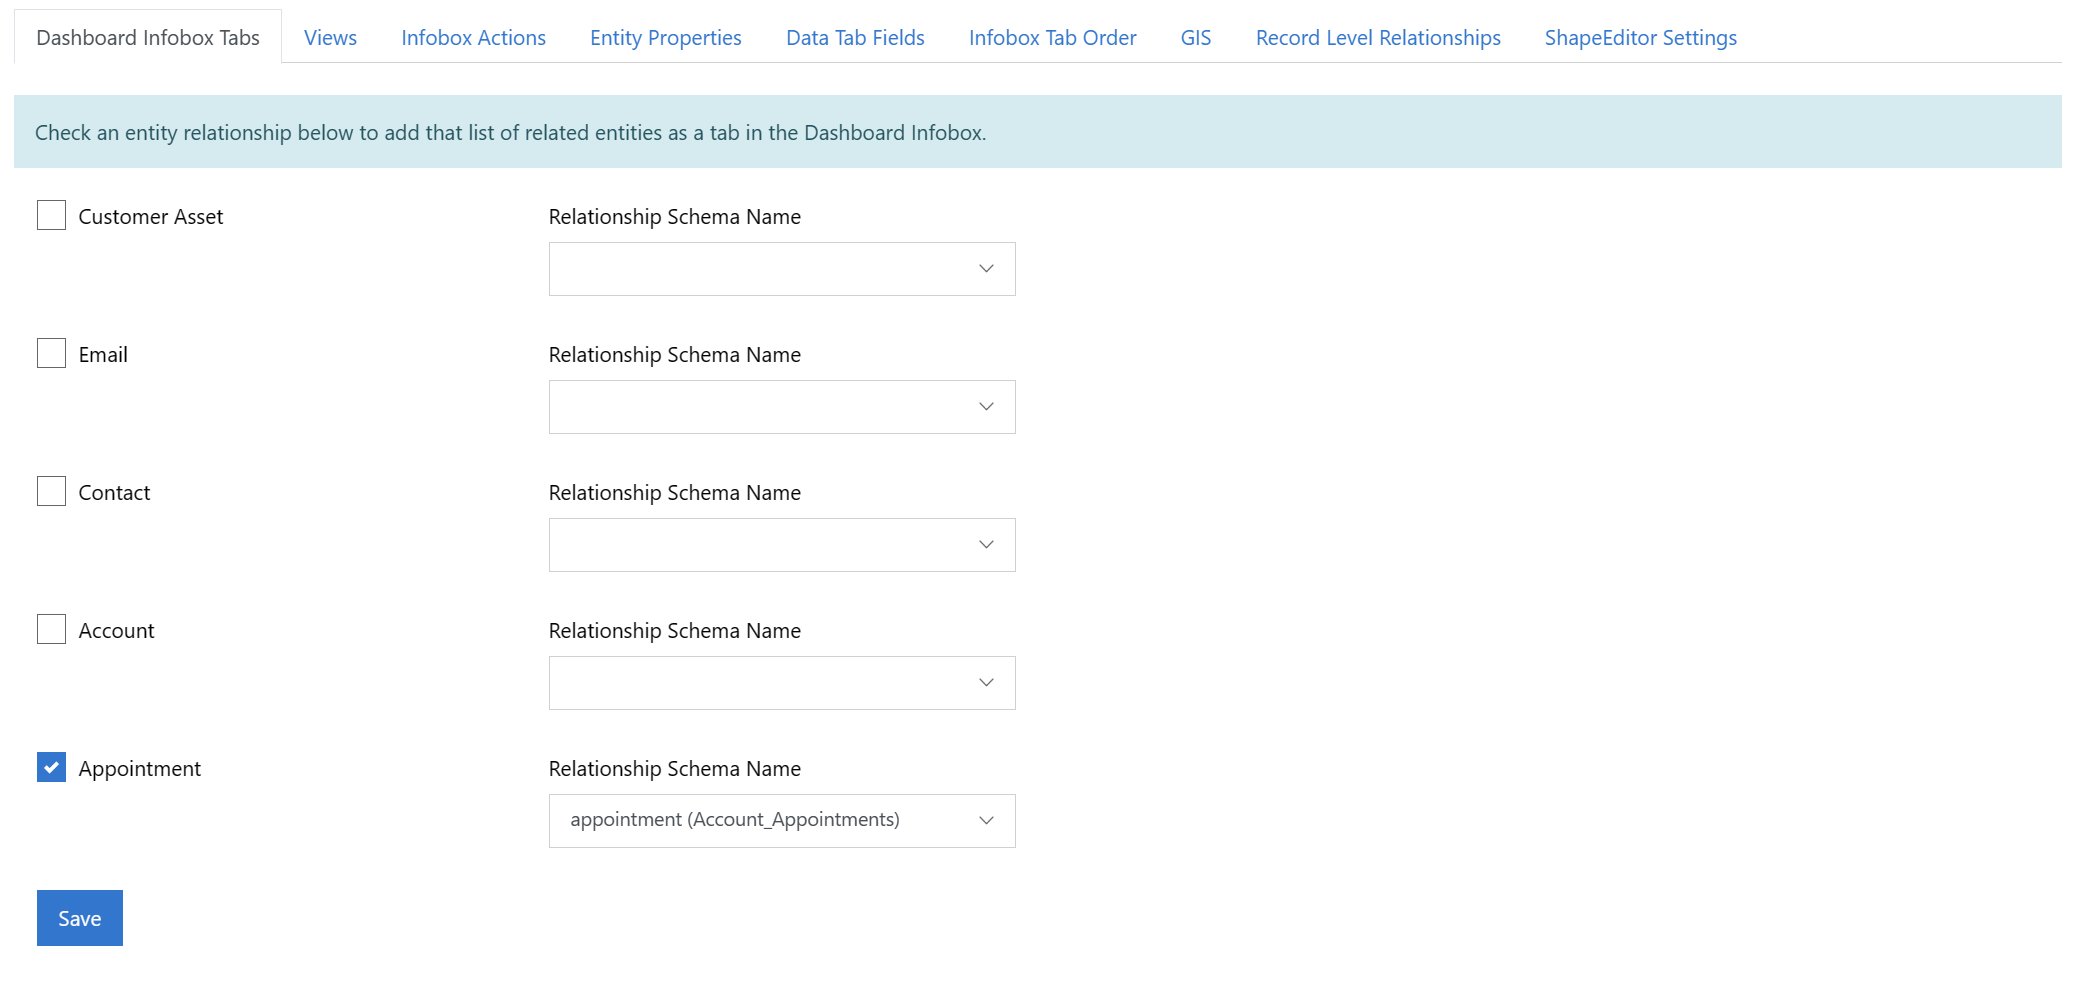
Figure 90: Related Appointment tab in Account Infobox.

Views
The views tab is used to configure the views that are available for users, this includes setting the view for specific security groups. This can also be accessed as a list from the query builder on the search panel.
Figure 91: Views.
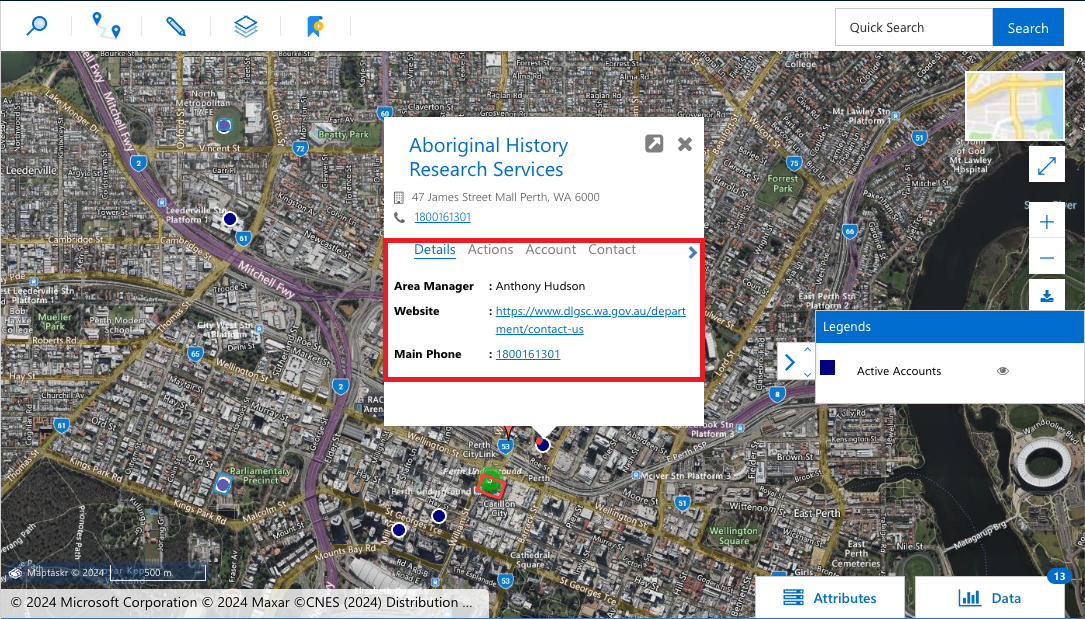
Infobox Actions
Data source results returned via search, or related records displayed on record level maps can include specific actions that the user can take as icons on the popup info box.
Figure 92: Example Infobox Actions.
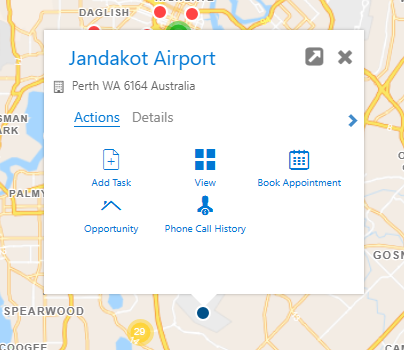
Figure 93: Infobox Actions.
Infobox actions can be configured to display different actions based on where the Infobox is displayed. The actions are separated by the following categories -
- Dashboard Actions
- Record Level: Related Entity Actions
- Record Level: Related GIS Layer Actions
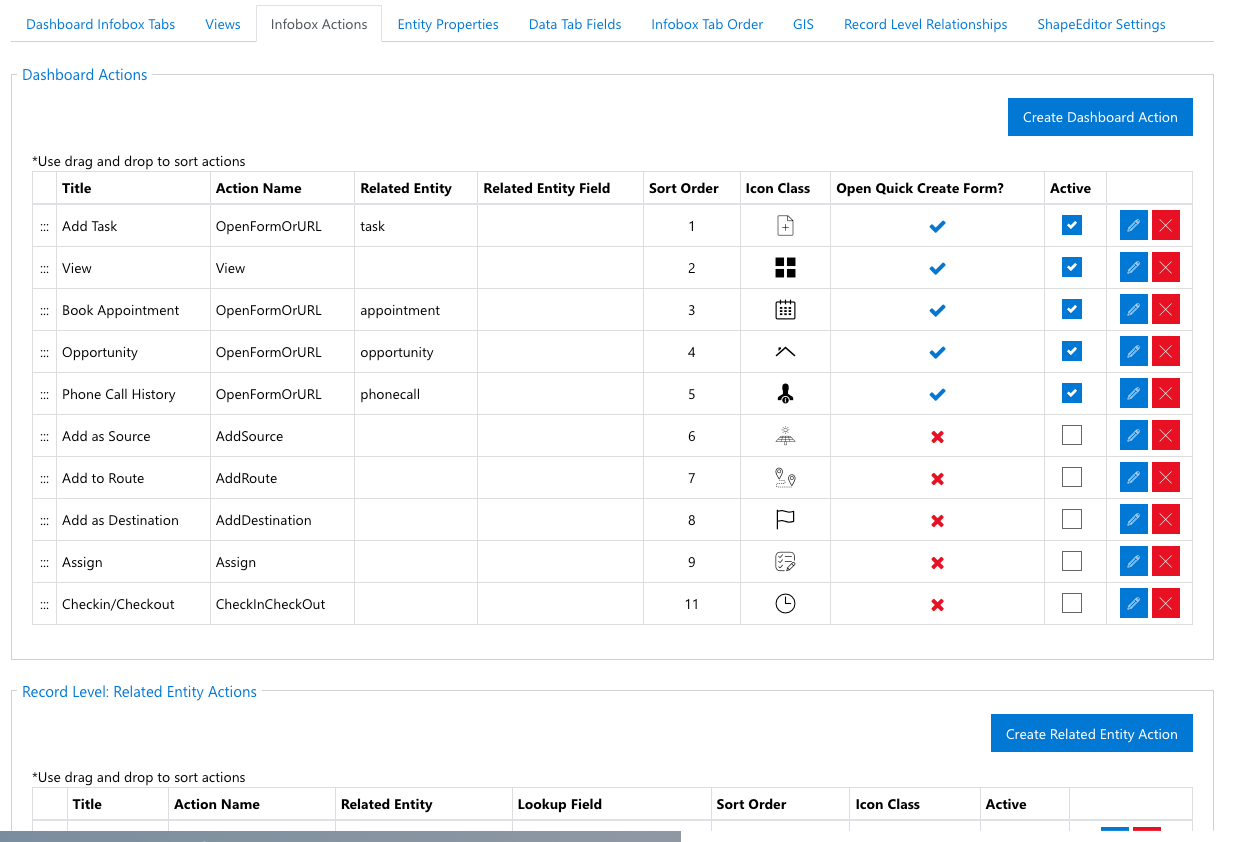
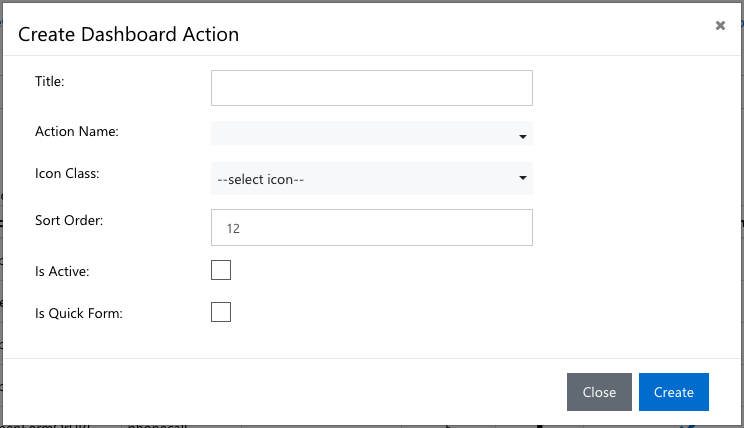
Dashboard Actions
Figure 94: Dashboard Actions.
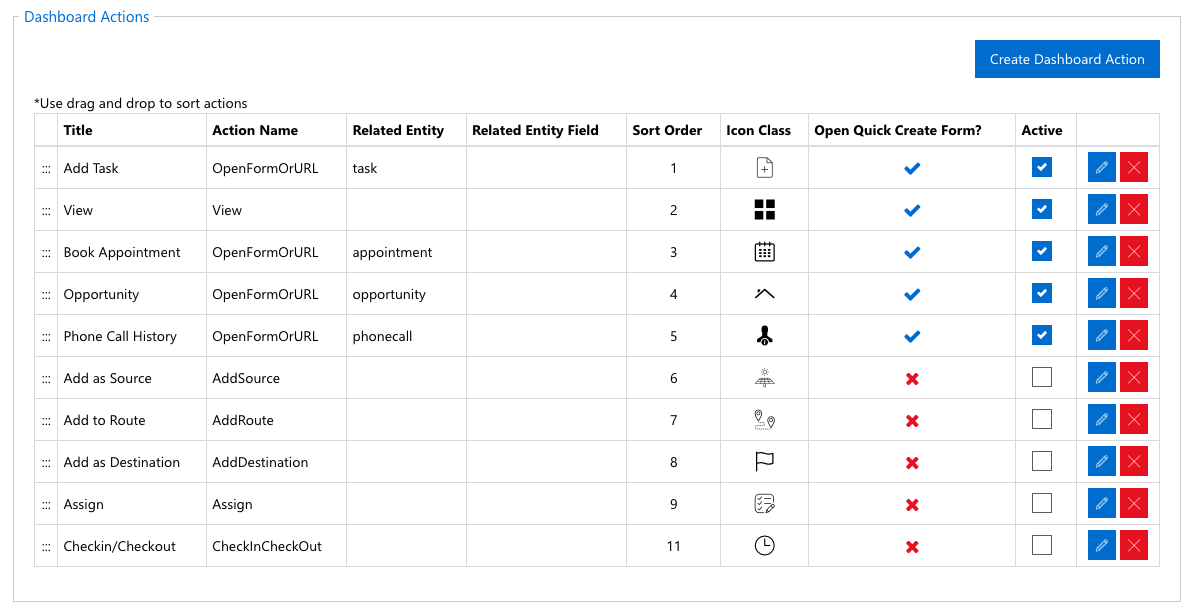
Dashboard Action configuration is used to determine what actions to show when interacting with the Infobox of a search result record on the Dashboard.
Figure 95: Example Dashboard Actions.
Dashboard Actions can be added or updated according to the options outlined in the table below.
For the out of the box tables, i.e. Account & Contact, Maptaskr will setup some default actions available on installation.
Figure 96: Create new Dashboard Action form.
| Setting | Type | Description |
|---|---|---|
| Title | Text | Set the Name of the action to display in the Infobox. |
| Action Name | Dropdown | Select the action type you wish to trigger with this action. Can be one of the following options.  Note: Open Form or URL will show a Related Entity Name or URL field which allows admin to add in either a related entity associated with a form, or a URL. |
Related Entity Name or URL (Only if adding Open Form or URL Action) | Text | Enter the name of the related entity or Enter the HTTPS URL you wish to launch. URL entries can also be dynamic in nature, i.e. they can be set to dynamically include a record specific field using the {field} syntax. For example - https://exampleurl.com?ID={applicationid} where applicationid is a field on the table being configured. You can apply however many dynamics parameters to your URL as required. Note: HTTPS Must be used as only secure links are supported. |
| Icon Class | Dropdown | Sets the icon to be used when showing the action within the Action tab of the Infobox.  |
| Sort Order | Integer | Sets the order in which actions are displayed when showing the action within the Action tab of the Infobox. |
| Is Active? | Checkbox | Sets whether the action is available to end users or not. |
| Is Quick Form | Checkbox | Set whether any action launches a quick form. Note: Only applicable when loading related entity quick create forms that have an associated quick form. |
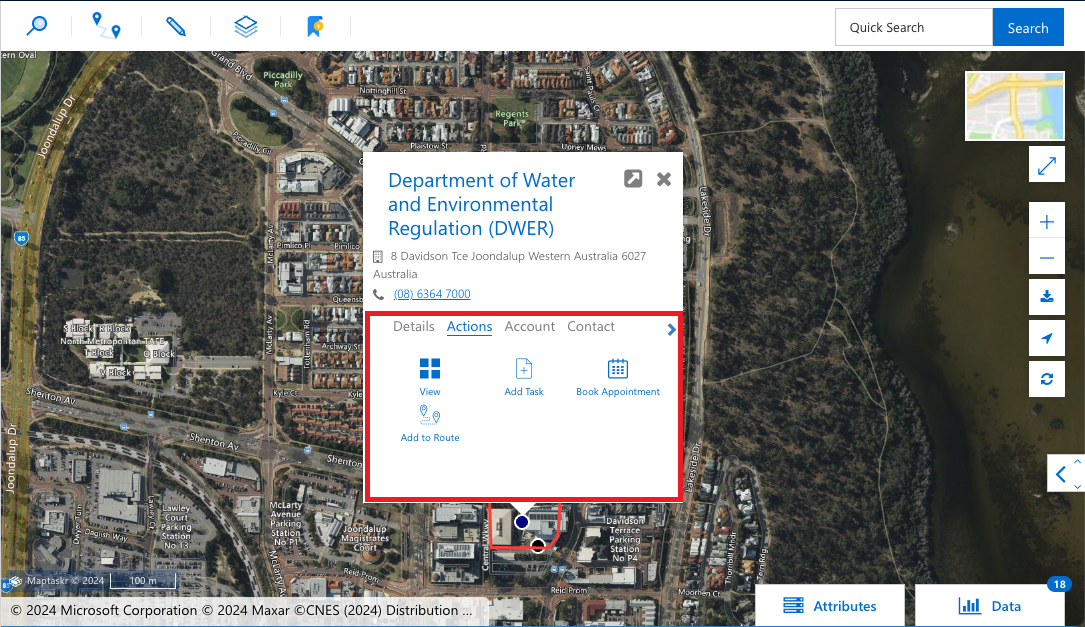
Record Level: Related Entity Actions
Figure 97: Record Level Related Entity Actions.
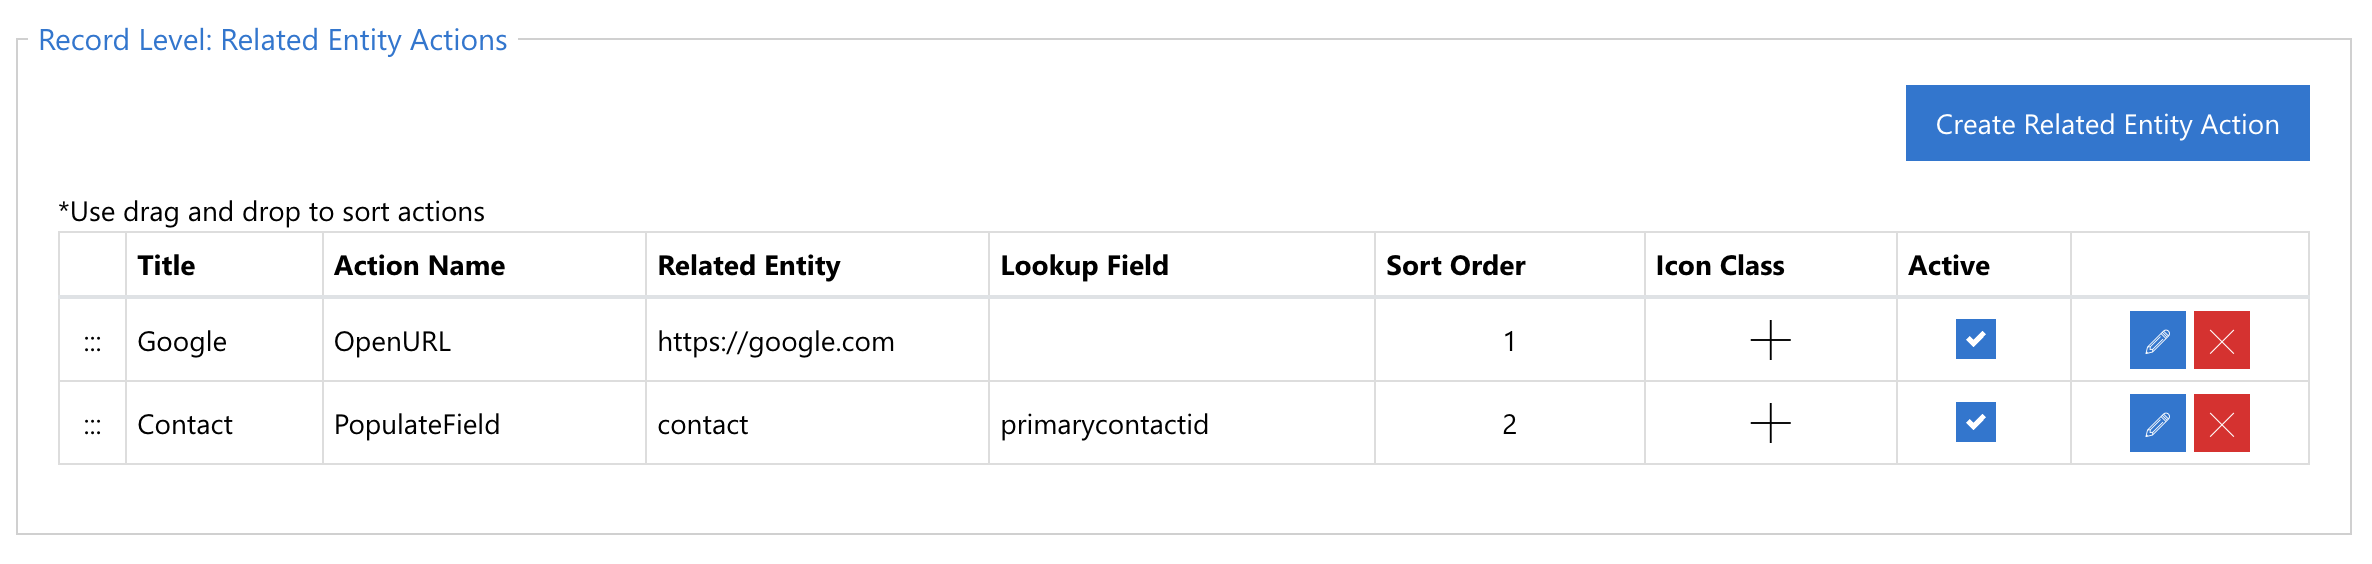
Record Level Related Entity Action configuration is used to determine what actions to show when interacting with the Infobox of a related record being shown at on the record level map.
Figure 98: Example Record Level Related Entity Actions.
Record Level Related Entity Actions can be added or updated according to the options outlined in the table below.
Figure 99: Create new Record Level Related Entity Action form.

| Setting | Type | Description |
|---|---|---|
| Title | Text | Set the Name of the action to display in the Infobox. |
| Action Name | Dropdown | Select the action type you wish to trigger with this action. Can be one of the following options.  Note: Open URL will show a URL field which allows admin to add in a URL. |
URL (Only if adding Open URL Action) | Text | Enter the HTTPS URL you wish to launch. URL entries can also be dynamic in nature, i.e. they can be set to dynamically include a record specific field using the {field} syntax.For example - https://exampleurl.com?ID={applicationid}where applicationid is a field on the table being configured. You can apply however many dynamics parameters to your URL as required. Note: HTTPS Must be used as only secure links are supported. |
| Related Entity Name | Text | |
| Lookup Field Name | Text | |
| Icon Class | Dropdown | Sets the icon to be used when showing the action within the Action tab of the Infobox. 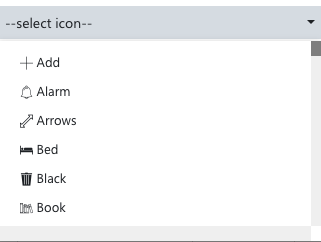 |
| Sort Order | Integer | Sets the order in which actions are displayed when showing the action within the Action tab of the Infobox. |
| Is Active? | Checkbox | Sets whether the action is available to end users or not. |
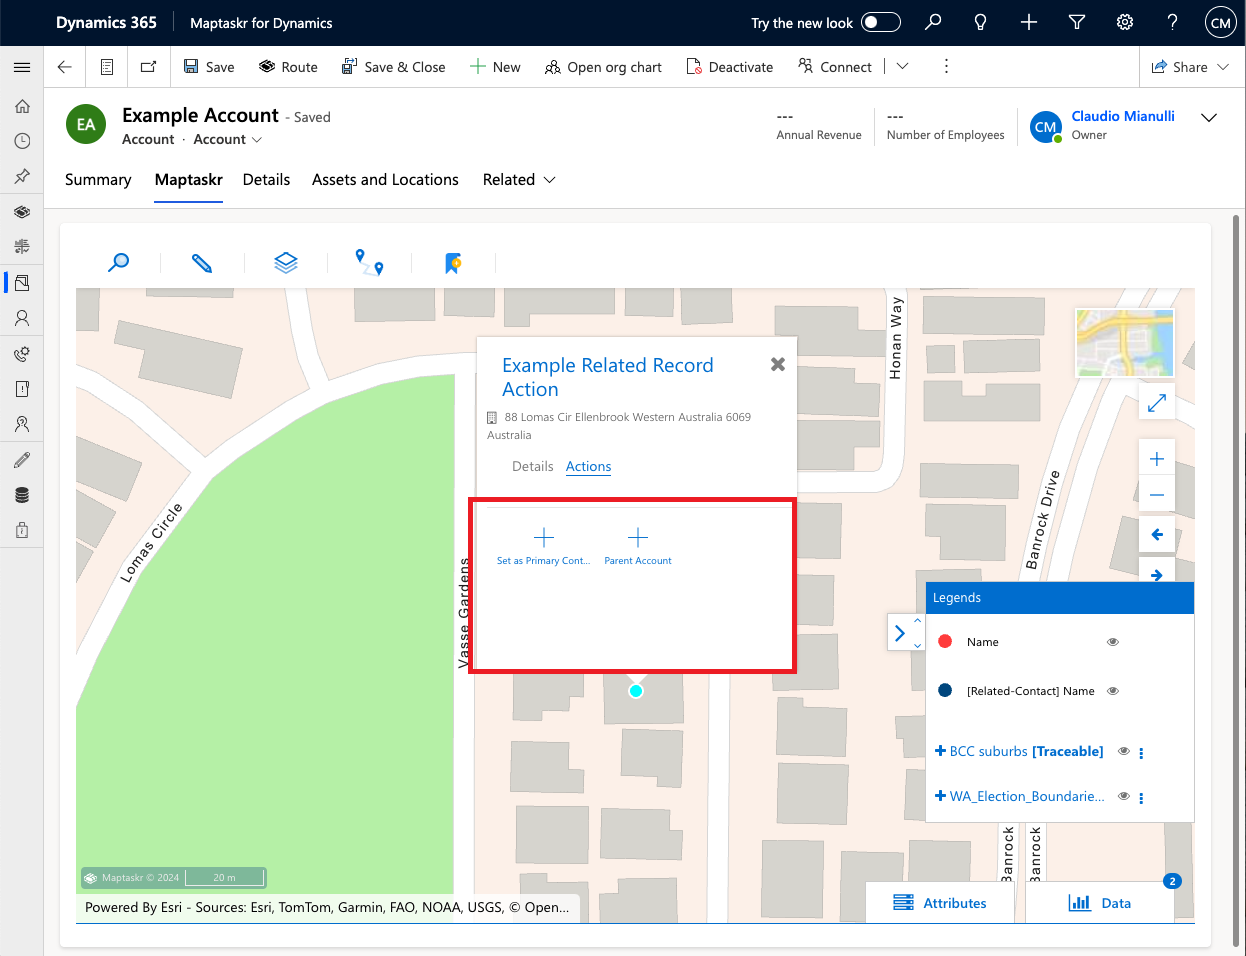
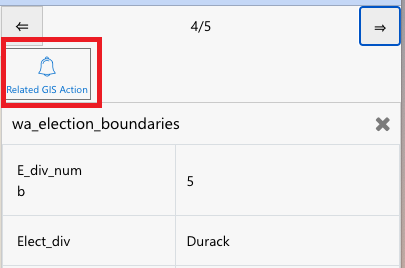
Record Level: Related GIS Layer Actions
Related GIS Layer Actions enable to configuration of user actions on layer features. This allows the population of fields or a record according to user interaction and selection i.e. add an Asset to a Work Order.
Figure 100: Related GIS Layer Action example.
Record Level Related GIS Layer Actions can be added or updated according to the options outlined in the table below
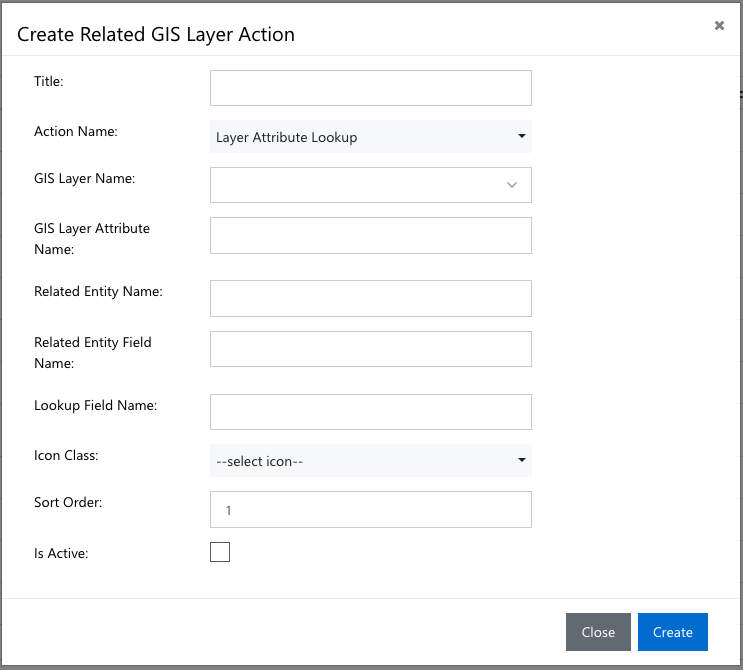
| Setting | Type | Description |
|---|---|---|
| Title | Text | Set the Name of the action to display in the Infobox. |
| Action Name | Dropdown | Select the action type you wish to trigger with this action. Can be one of the following options.  |
| GIS Layer Name | Dropdown | Select the GIS layer that you want to configure a Related GIS Layer Action for. Note: Layer must be configured to an Esri ArcGIS layer and be set to Enable in Datasource.  |
| GIS Layer Attribute Name | The internal name of the attribute you wish to utilise with the action. Typically, a unique identifier to be used as a look up. | |
| Related Entity Name | Text | The internal name of the related entity you wish to map the action to. |
| Related Entity Field Name | Text | The internal name of the field within the entity you wish to match with the Attribute. |
| Lookup Field Name | Text | The internal name of the field within the entity you wish to match with the Attribute. |
| Sort Order | Integer | Sets the order in which actions are displayed when showing the action within the Action tab of the Infobox. |
| Icon Class | Dropdown | Sets the icon to be used when showing the action within the Action tab of the Infobox.  |
| Is Active? | Checkbox | Sets whether the action is available to end users or not. |
Entity Properties
Entity properties are the fields visible in the detail tab in the Infobox. New properties can be added that are specific to the entity and can be for specific security groups. User can have this eniity editable or locked as well as change the display name.
Figure 101: Data Source - Entity Properties.
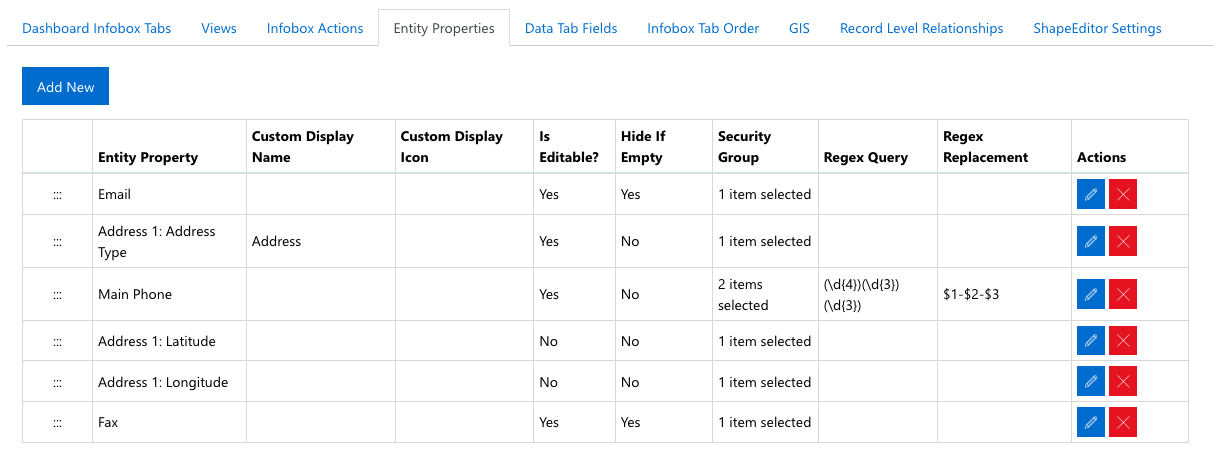
Figure 102: Data Source - Entity Properties example.
Properties can be added as required to each Datasource as per the following Add Property form.
Figure 103: Add Property form.
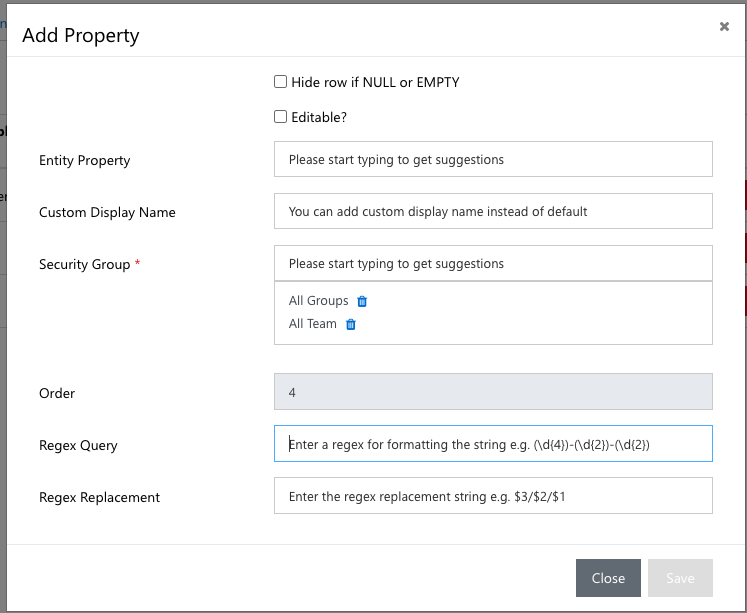
| Setting | Type | Description |
|---|---|---|
| Hide row if NULL or EMPTY | Checkbox | Sets whether to hide the Property in the event it is NULL or empty. |
| Editable? | Checkbox | Sets whether to hide the Property able to be edited by an end user via the side panel. |
| Entity Property | Text | Set the Entity property you wish you map to this. |
| Custom Display Name | Text | Overwrites the properties display name. |
| Security Group | Multi-Select | By adding a security group to a layer, user can set permission for the layer to be viewed if the end user is a part of certain team or has a specific role. |
| Order | Number | Indicates the order of this field relative to other fields. This option is greyed out, and can instead be adjusted by dragging and dropping the individual rows on the Entity Properties table |
| Regex Query | Text | Accepts a Regex query string to target specific capture groups. Using this will target the column's raw value. E.g. 2025-02-18T00:00:00Z for a Date type column |
| Regex Replacement | Text | Accepts a literal string replacement or Regex capture groups. When using capture groups, you can use the $n notation mixed with regular text. For example changing date format can be done with $3 - $2 - $1 assuming that the year, month and day are in capture groups 3, 2 and 1 respectively. |
Data Tab Fields
Data Tab includes fields visible in the data tab section within Maptaskr. New properties can be added that are specific to the entity and can be for specific security groups.
Figure 104: Data Tab Fields example.
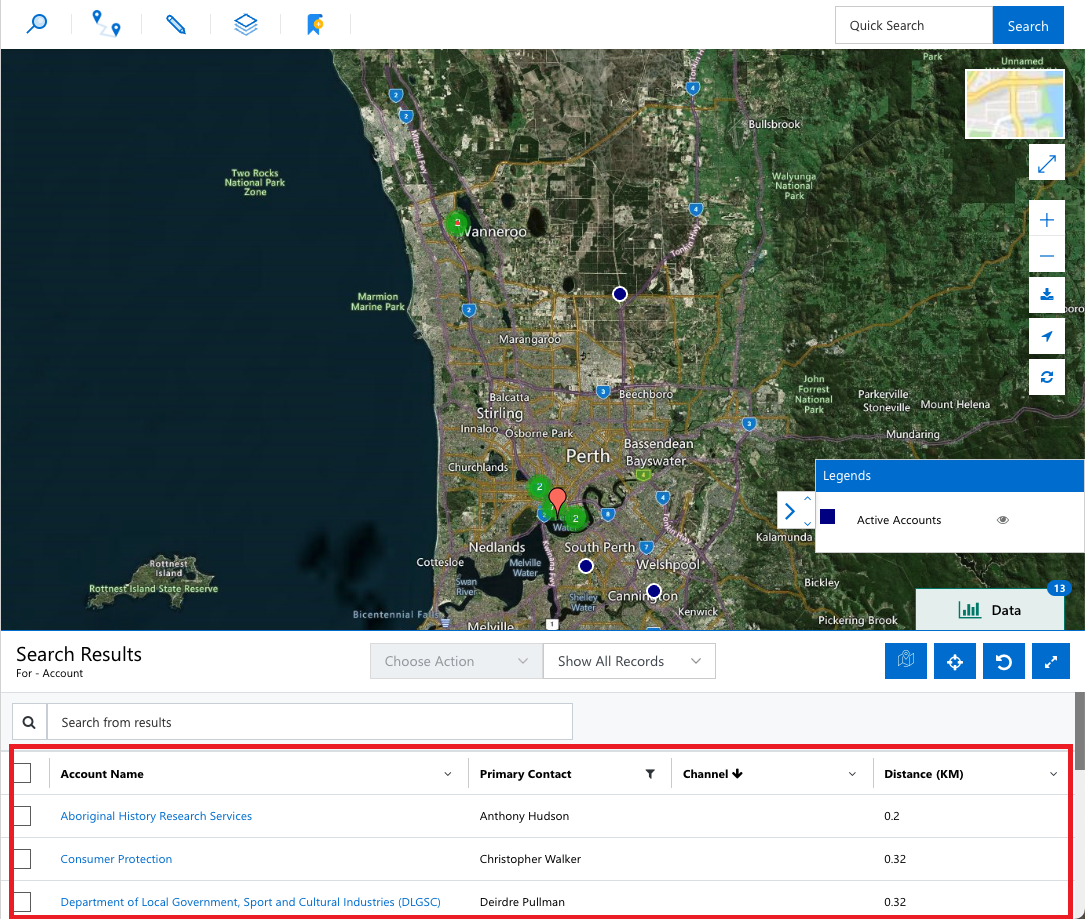
Figure 105: Data Tab Fields.

The figure below shows the options available for setting which fields get displayed on the Data Tab.
Figure 106: Add Data Tab Field form.
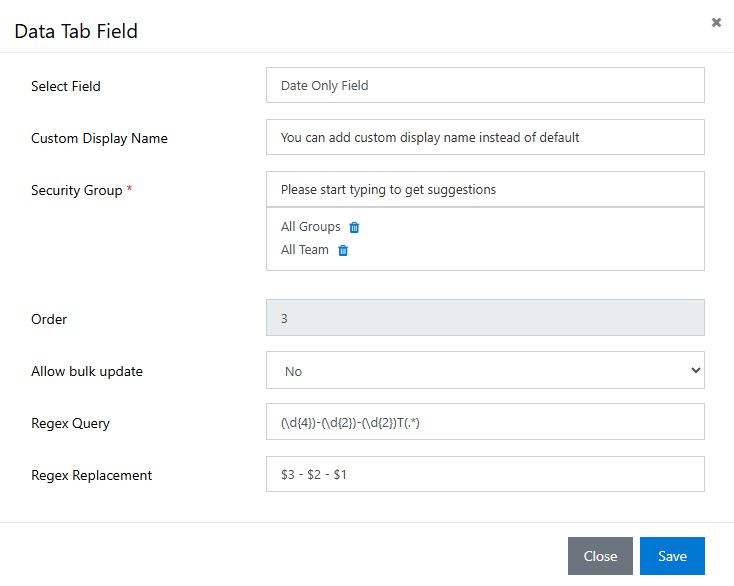
| Setting | Type | Description |
|---|---|---|
| Select Field | Checkbox | Sets whether to hide the Property in the event it is NULL or empty. |
| Custom Display Name | Checkbox | Sets whether to hide the Property able to be edited by an end user via the side panel. |
| Security Group | Multi-Select | Set the Entity property you wish you map to this property. |
| Order | Number | Indicates the order of this field relative to other fields. This option is greyed out, and can instead be adjusted by dragging and dropping the individual rows on the Data Tab Fields table |
| Allow bulk update | Dropdown | Determine if you wish to allow users to bulk update this displayed field.  |
| Regex Query | Text | Accepts a Regex query string to target specific capture groups. Using this will target the column's raw value. E.g. 2025-02-18T00:00:00Z for a Date type column |
| Regex Replacement | Text | Accepts a literal string replacement or Regex capture groups. When using capture groups, you can use the $n notation mixed with regular text. For example changing date format can be done with $3 - $2 - $1 assuming that the year, month and day are in capture groups 3, 2 and 1 respectively. |
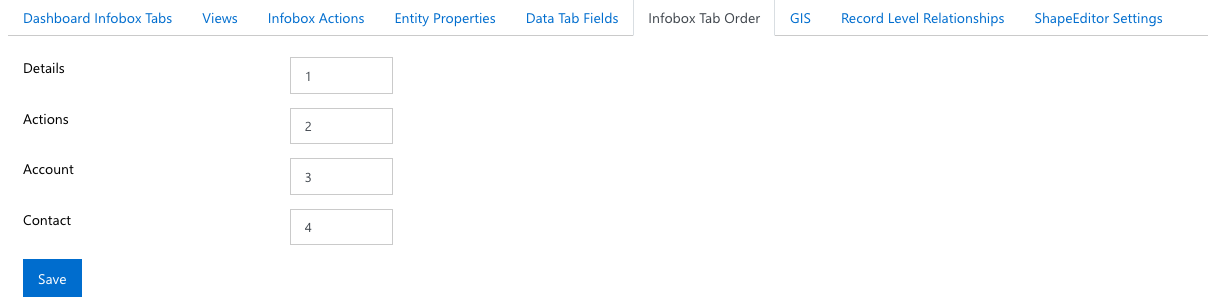
Infobox Tab Order
Allows the user to configure the order of the visible tabs in the Infobox and can be rearranged using the number system shown in the figure below.
Figure 107: Infobox Tab order example.
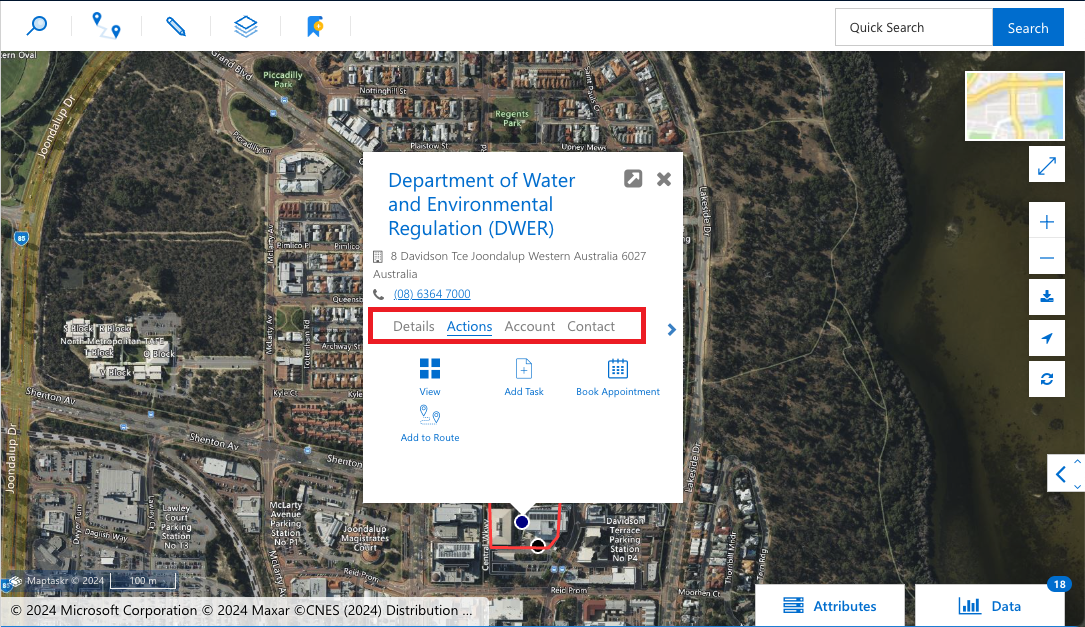
Figure 108: Infobox Tab order settings example.
GIS
Note: ArcGIS Service integrations are only available with the Enterprise version of Maptaskr for D365.
For details on supported ArcGIS versions, and prerequisites that are required to be in place before Maptaskr configuration can occur please refer to the Maptaskr ArcGIS Configuration Guide or contact Maptaskr Support (support@maptaskr.com).
Record Level Relationships
Allows the user to configure a relationship between two data sources which allows the user to view related records on the record level map. These related records can then display an Infobox when clicked allow the user to perform tasks on the related data source. The following example show an Account record (red pin) also configured to display related Contacts (blue pins).
Figure 109: Record Level Relationships example.
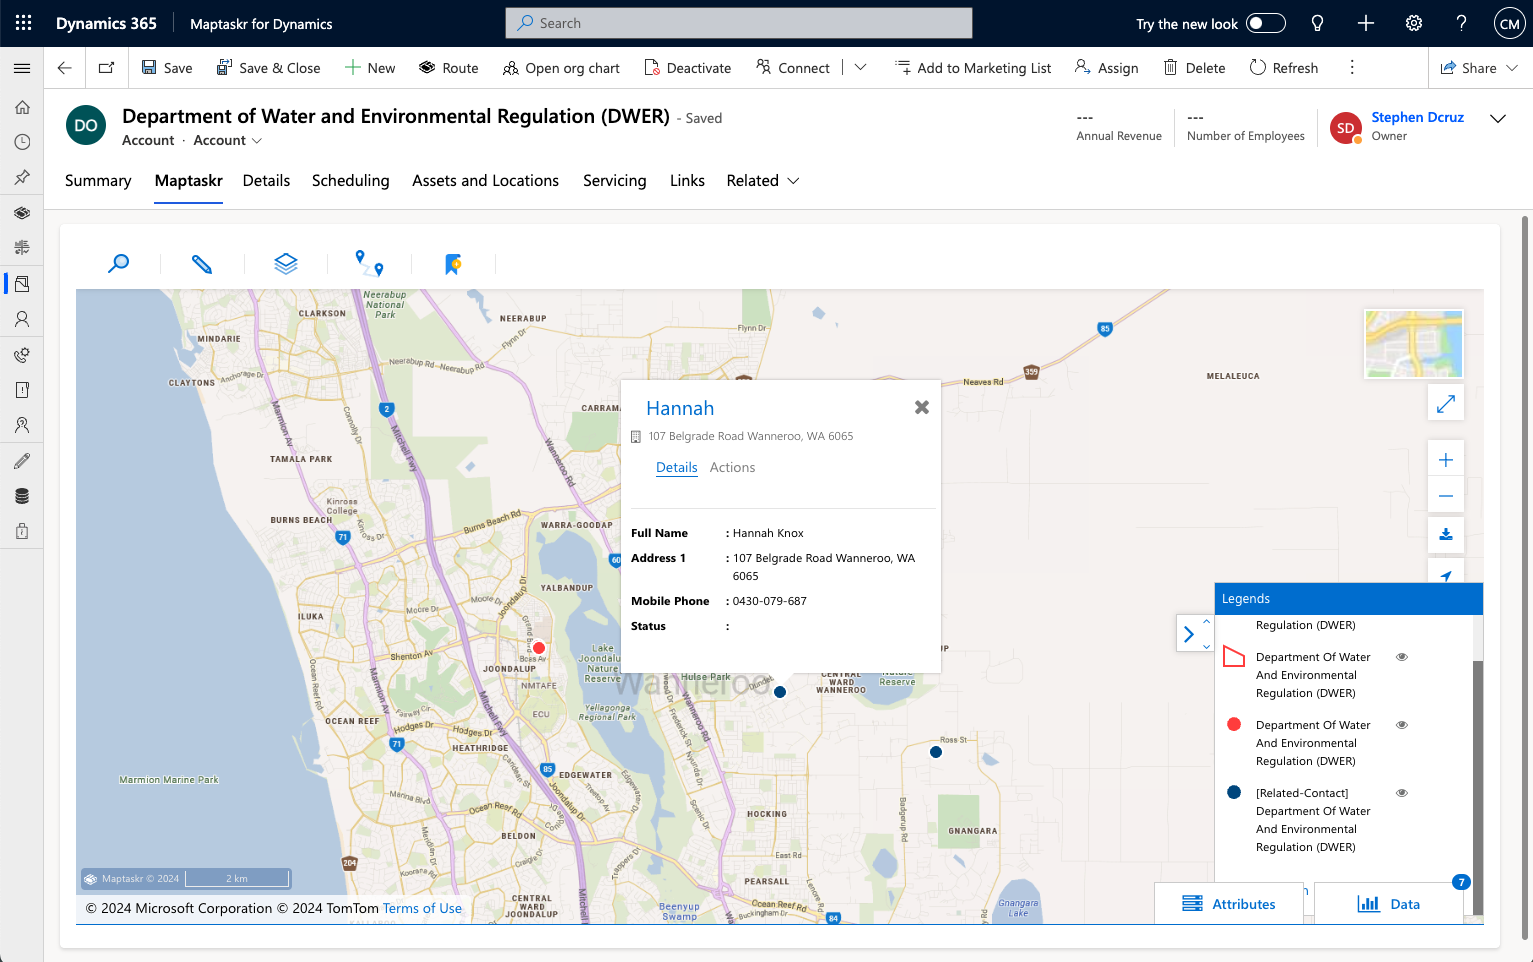
Figure 110: Record Level Relationships example.
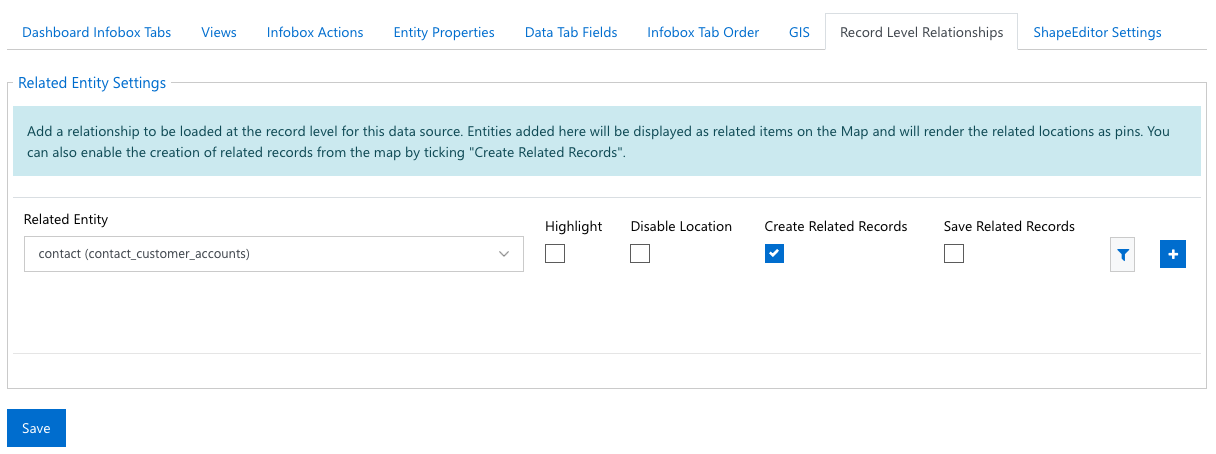
| Setting | Type | Description |
|---|---|---|
| Related Entity | Dropdown | Allows you to select any of the entities available to set as a related record to display on the record level map. |
| Highlight | Checkbox | Sets whether you wish related records get highlighted when first loaded. 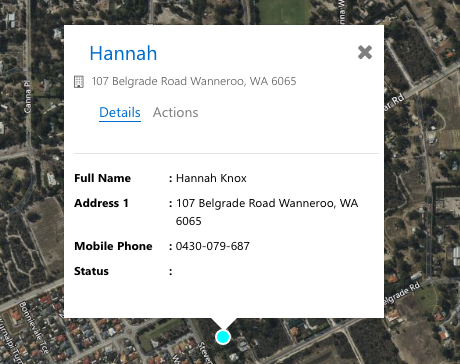 |
| Disable Location | Checkbox | Sets whether the records are displayed on the map on load. |
| Create Related Records | Checkbox | Sets the ability for creation of this type of record from the right click context menu.  |
| Save Related Records | Checkbox | Determine if you wish to allow users to bulk update this displayed field. |
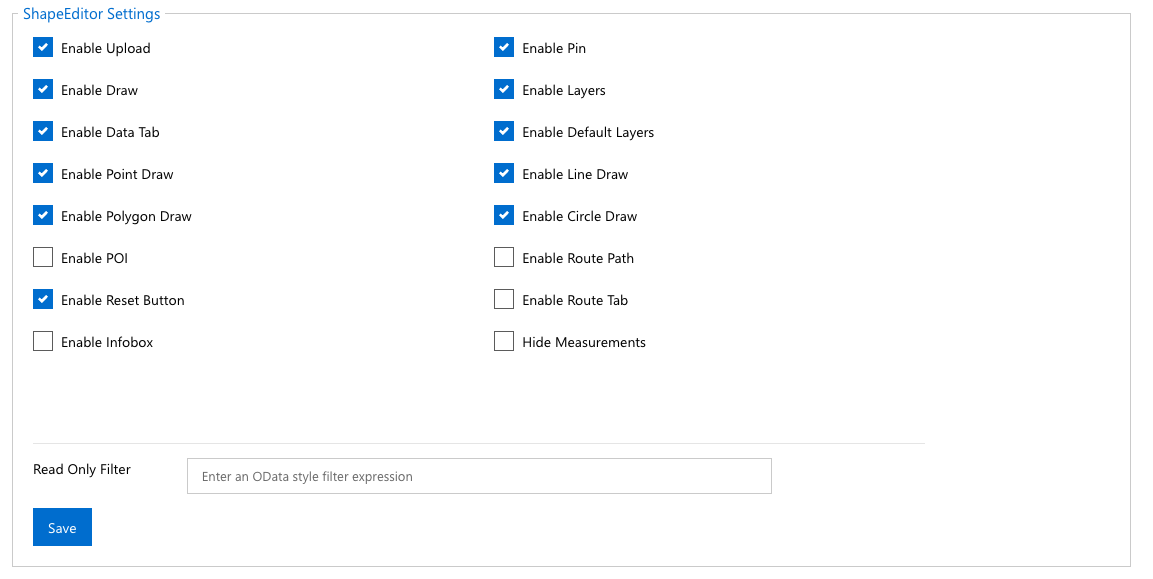
ShapeEditor Settings
User can perform the following tasks or access the features if enabled from the list below from the Data Source configuration page.
Figure 111: ShapeEditor Settings.
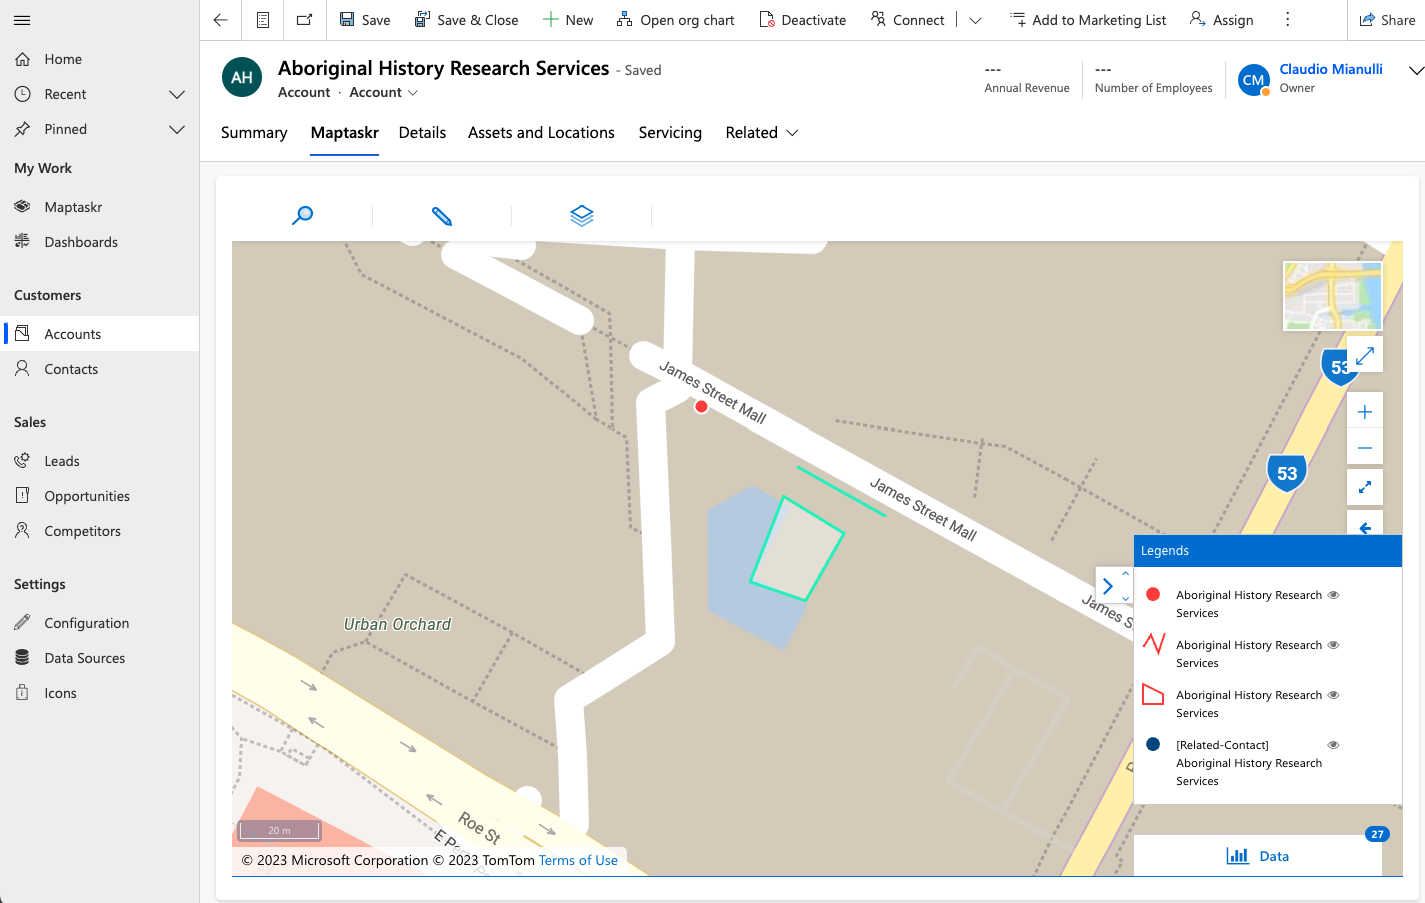
These settings apply to the record level map.
Figure 112: Record Level map example.
| SHAPEEDITOR SETTINGS | DESCRIPTION |
|---|---|
| Enable Upload | Select this option to enable or disable upload (Shapefile(.zip), KML, GeoJson) feature from annotations tab in the record level |
| Enable Draw | Select this option to enable or disable Draw option from annotations panel in the record level |
| Enable Data Tab | Select this option to enable or disable data panel from the record level |
| Enable Point Draw | Select this option to enable or disable Point Draw option from annotations panel in the record level |
| Enable Polygon Draw | Select this option to enable or disable Polygon Draw option from annotations panel in the record level |
| Enable POI | Select this option to enable or disable POI (Point of interest) in the record level |
| Enable Reset button | Select this option to enable or disable reset button option from annotations tab in the record level |
| Enable Pin | Select this option to enable or disable Pin (pushpin/object library) option from annotations tab in the record level |
| Enable Layers | Select this option to enable or disable layers panel in the record level |
| Enable Default layers | Select this option to enable or disable default layer visible on the record level |
| Enable Line Draw | Select this option to enable or disable Line Draw option from annotations panel in the record level |
| Enable Circle Draw | Select this option to enable or disable Circle Draw option from annotations panel in the record level |
| Enable Route Path | This is a deprecated feature, and is in the process of being removed. |
| Enable Infobox | Enables the Infobox for the record map elements. |
| Hide Measurements | Select to hide any measurements that might be usually seen on the map, such as area and length. |
| Read Only Filter | Record level map becomes read-only when this field is set appropriately. E.g., status eq 'approved' |
ShapeEditor Advanced Options
An overview of each of the available settings and description of what they entail is found in the below table.
| Setting | Description | Type |
|---|---|---|
| Allowed Shapefile Projections | Allowed Shapefile Projections, please provide in latest WKID format (e.g. 7844) and comma separated to allow multiple projections. | Free text – CSV format of WKID projections to be allowed. In the following format. wkidformat, wkidformat, … e.g. 7844, … Where 7844 is the code for GDA2020. See https://epsg.io/ for more projections listing. |
| Names of Uploads | Enables the predefined setting of the shape names. | Free text – CSV format. e.g. Permit Boundary, Footprint, … Note: Names for the shapes will be loaded from the name CSV and if there are not enough names, the control will use the name Shape X where X is the shape number. |
| Line Color of Uploads | Enables the predefined setting of the shape stroke color. Maps directly to the shape names that are preconfigured. | Free text – CSV format of HEX colors to be used. e.g. #A020F0, #B0B0F0, … Note: Alpha Hex can also be used: e.g. #A020F0**88** |
| Line Style of Uploads | Enables the predefined setting of the stroke line to be dashed or solid for shapes. Maps directly to the shape names that are preconfigured. | Free text – CSV format of Boolean values to determine if lines will be dashed or not. True indicating lines will be dashed. False indicating lines will be solid. e.g. true, false, true |
| Fill Color of Uploads | Enables the predefined setting of the shape fill color. Please note that this automatically applies an opacity of 10%. If no fill is required, then simply leave this field blank. Maps directly to the shape names that are preconfigured. | Free text – CSV format of HEX colors to be used. e.g. #A020F0, #B0B0F0, … Note: Alpha Hex can also be used: #A020F0**88** |
| Pre-Selected Layers | Allows the setting of preselected layers to activate by default when the map first loads on the page. | Free text – CSV format of layers to be used. In the following format. Layer Name/Sub-layer Name, Layer Name/Sub-layer Name, ... e.g. Industry and Mining/Mining Tenements (DMIRS-003), Application Details/application_details, … For more information on layer name format, see Pre-Selected, Exclusion, and Intersection Layer Configuration |
| Snap Selected Layers | Allows the setting of preselected layers to activate snap to when drawing on the map. Note: Required to be an ArcGIS Feature Server service layer. | Free text – CSV format of layers to be used. In the following format. Layer Name/Sub-layer Name, Layer Name/Sub-layer Name, ... e.g. Industry and Mining/Mining Tenements (DMIRS-003), Application Details/application_details, … For more information on layer name format, see Pre-Selected, Exclusion, and Intersection Layer Configuration |
| Trace Selected Layers | Allows the setting of preselected layers to activate tracing when drawing on the map. Note: Required to be an ArcGIS Feature Server service layer. | Free text – CSV format of layers to be used. In the following format. Layer Name/Sub-layer Name, Layer Name/Sub-layer Name, ... e.g. Industry and Mining/Mining Tenements (DMIRS-003), Application Details/application_details, … For more information on layer name format, see Pre-Selected, Exclusion, and Intersection Layer Configuration |
| Exclusionary Selected Layers | Allows the setting of preselected layers to act as exclusion zones when drawing/uploading shapes on the map. Note: Required to be an ArcGIS Feature Server service layer. | Free text – CSV format of layers to be used. In the following format. Layer Name/Sub-layer Name, Layer Name/Sub-layer Name, ... e.g. Industry and Mining/Mining Tenements (DMIRS-003), Application Details/application_details, … For more information on layer name format and Intersection Detection, see Pre-Selected, Exclusion, and Intersection Layer Configuration _And Intersection Detection |
| Intersection Layers | Allows the setting of preselected layers to act as intersect zones when drawing/uploading shapes on the map. Note: Required to be an ArcGIS Feature Server service layer. Once a shape has either been drawn or uploaded, a validation button appears which they can use to trigger intersect detection.  | Free text – CSV format of layers to be used. In the following format. Layer Name/Sub-layer Name, Layer Name/Sub-layer Name, ... e.g. Industry and Mining/Mining Tenements (DMIRS-003), Application Details/application_details, … For more information on layer name format and Intersection Detection, see Pre-Selected, Exclusion, and Intersection Layer Configuration _And Intersection Detection |
| Warning Buffers | Sets the warning buffer, in meters, for intersection layers configured in the section above. Users will be given a warning if any shape drawn or uploaded encroaches within the defined buffer.  | Free text – CSV format. e.g. 1000, 500, … Note: Maps to layers in order set for Intersection Selected Layers property. In meters (m). For more information on layer name format and Intersection Detection, see Pre-Selected, Exclusion, and Intersection Layer Configuration _And Intersection Detection |
| Error Buffers | Sets the error buffer in meters, for intersection layers configured in the section above. Users will be given an error if any shape drawn or uploaded encroaches within the buffer set.  | Free text – CSV format. e.g. 1000, 500, … Note: Maps directly to the layer names that are preconfigured in the Intersection Layers. In meters (m). For more information on layer name format and Intersection Detection, see Pre-Selected, Exclusion, and Intersection Layer Configuration _And Intersection Detection |
| Number of Concurrent Intersection Calls | Sets the maximum number of concurrent intersect detection calls the map will be able to make. If more are required, these will be batched accordingly. E.g. If there are 2 shapes and 5 intersection layers, 10 intersection calls will be made. | Free text Default – 20 |