PCF Integration and Configuration Within Forms
Create A Solution
To facilitate the required configuration, you will need to create a Solution within your Power Platform or D365 environment, with which you can apply the Maptaskr control and apply configuration. This will require a knowledge of Microsoft's Power Platform.
For more information on the topic, please visit Microsoft's website:
Solutions in Power Apps - Power Apps | Microsoft Learn1
For the purposes of this instruction guide, we will be leveraging the following Solution as an example. Please ensure the same or similar solution has been created in your Power Platform environment.
Figure 8: Creating a new Solution.
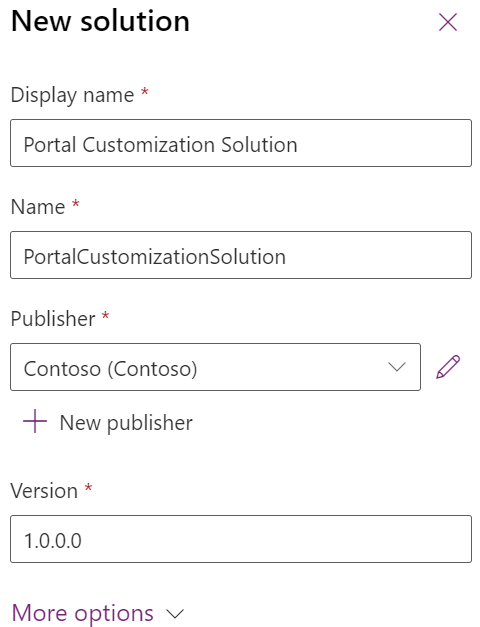
Table Setup
Prior to integrating Maptaskr for Power Pages it is essential to generate and configure some Table columns. If you intend to have multiple maps with different settings and symbology, then it's recommended to perform this setup for each Table.
Here you see an example of the Account entity being configured for the PCF Portal components:
Open your Portal Customization Solution
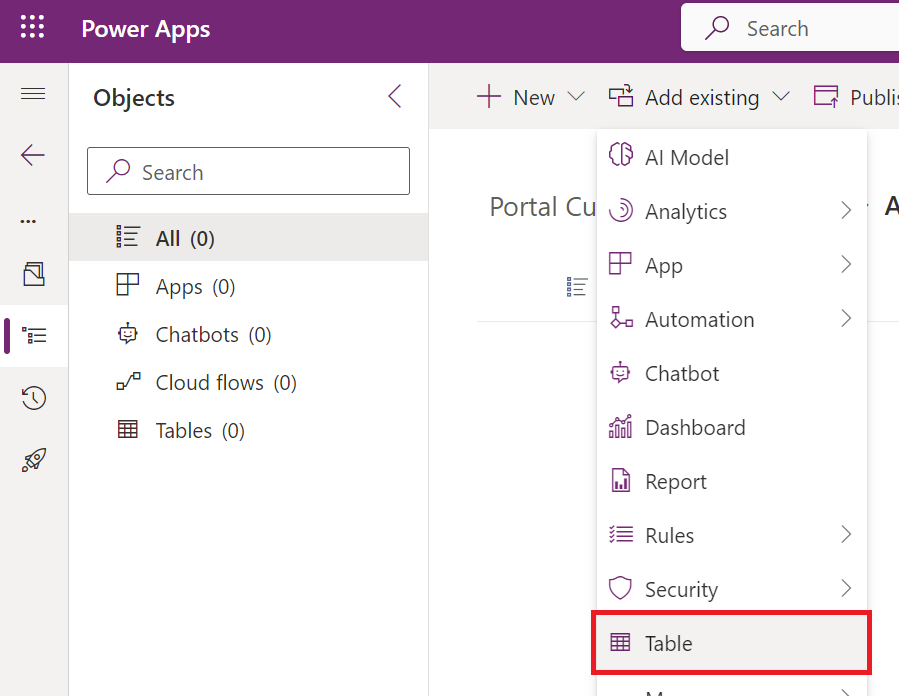
Click Add Existing -> Table.
Figure 9: Add an existing table.
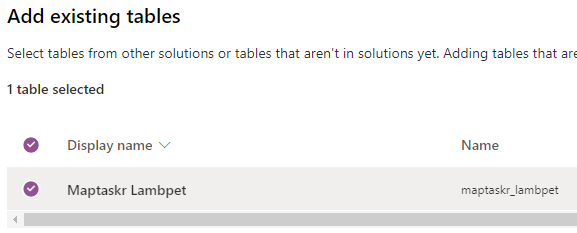
Select the Table you wish to configure.
Figure 10: Selecting the existing 'Account' table.
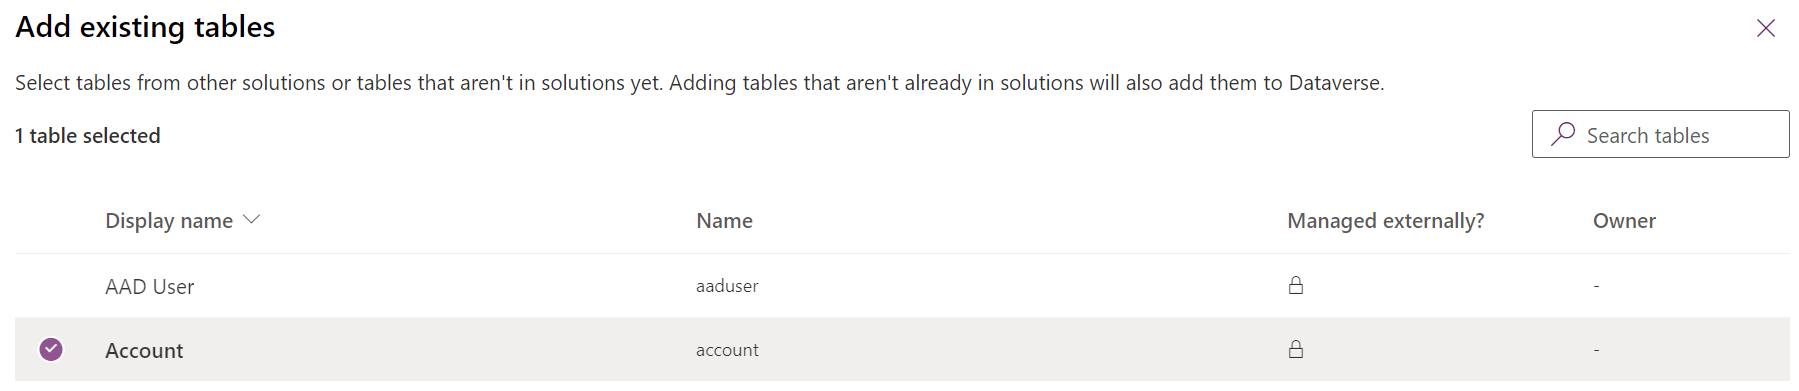
(In the example screenshot, we select the Account table.)
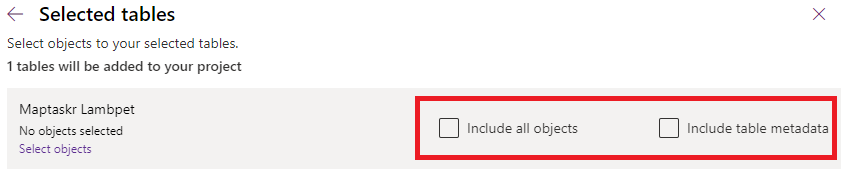
Be sure NOT to include any objects or table metadata.
Figure 11: deselecting all objects and table metadata.

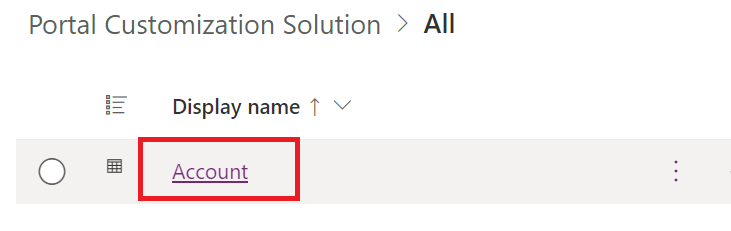
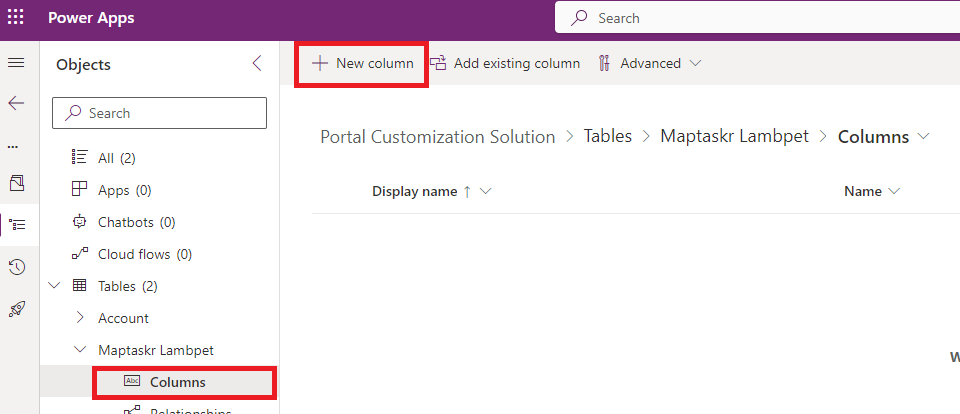
Once added, Select the Table.
Figure 12: Selecting the 'Account' table.
And under Columns Add the required columns to the entity. See figure below and in Table 1: Maptaskr PCF
Configurations.
Figure 13: New column to bind PCF.
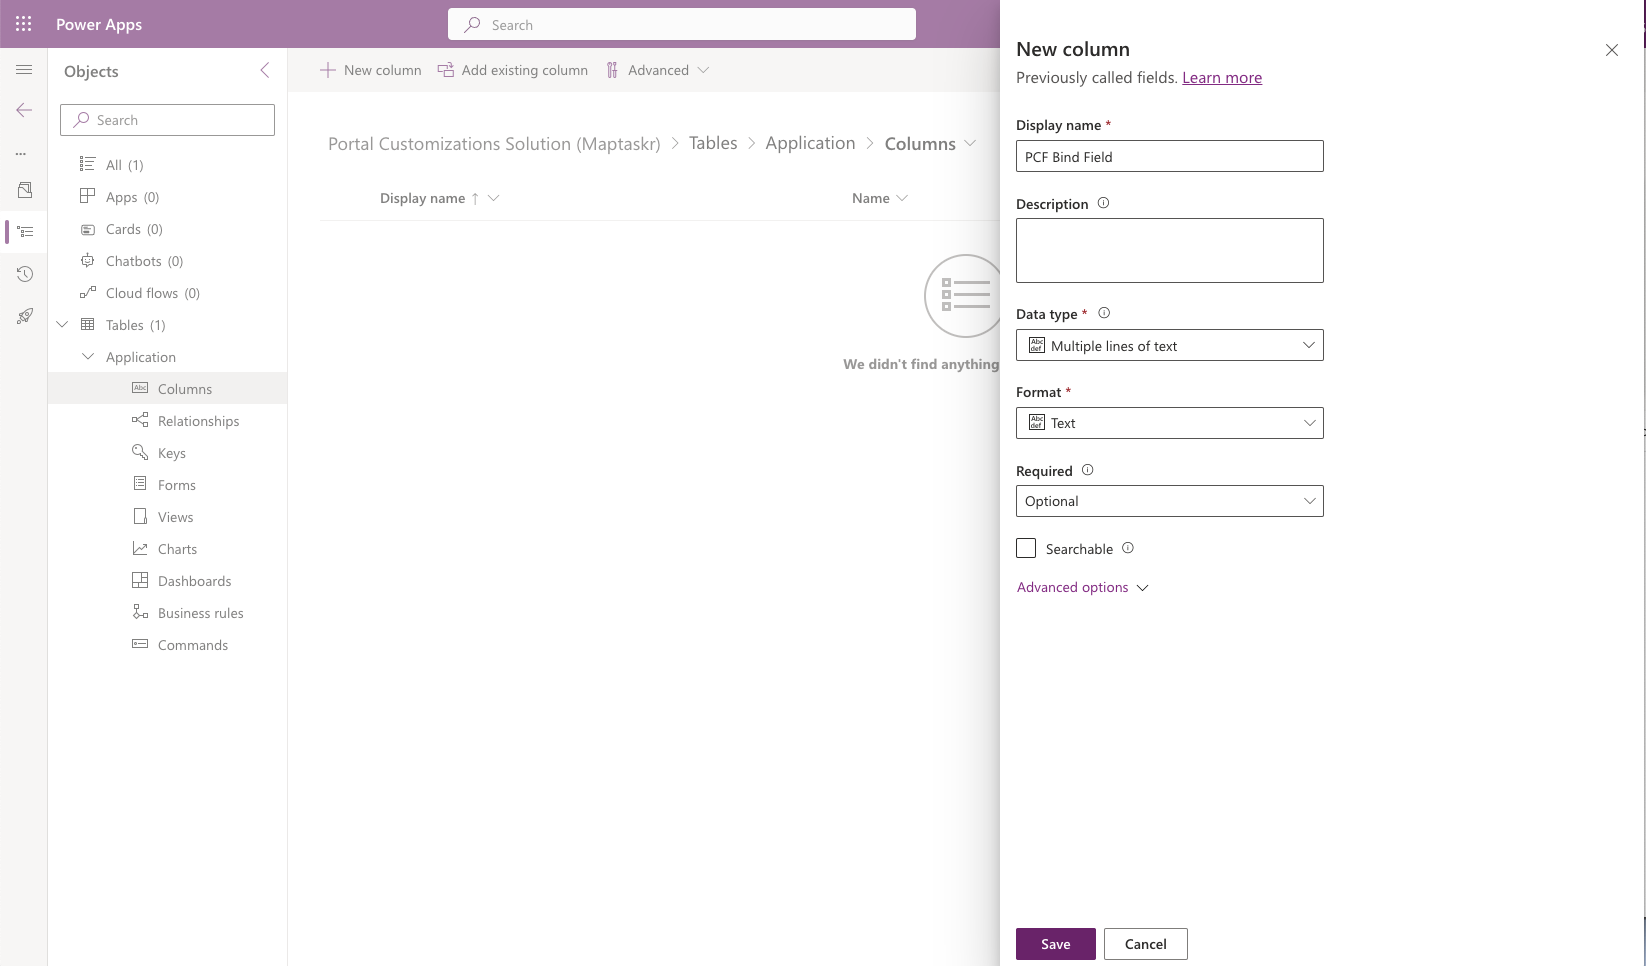
For the required column refer to Table 1: Maptaskr PCF Configurations below.
All the added columns should be Optional, and NONE of these columns should be marked as searchable.
Table 1: Maptaskr PCF Configurations
| Name | Type | Additional Options | Note |
|---|---|---|---|
| PCF Bind Field | Text -> Multiple lines of text -> Plain Text | Format: Text | Used to bind the PCF to a form |
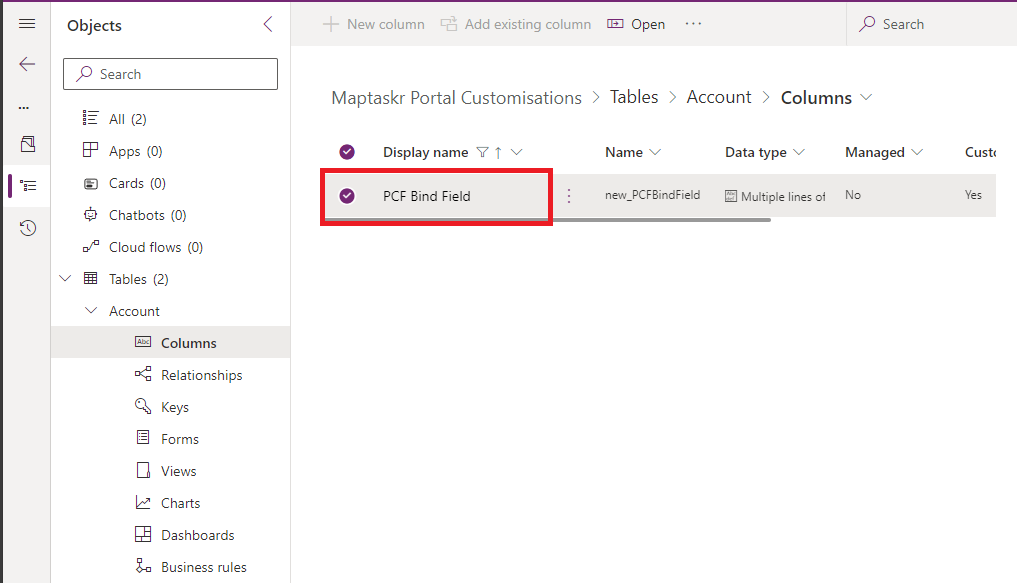
Figure 14: All columns added should be optional, and not searchable.

The name of these columns is for reference only and not crucial in this process. You can name them at your discretion, however it is suggested that you follow the guide, as these column names are referenced later in the document.
Figure 15: New column created (Example)
Establishing Relationships to Maptaskr Lambpet
It is also required that you establish lookup fields in the Maptaskr Lambpet entity to each table that you intend to use the PCF on the portal.
To do this, you will need to add the Maptaskr Lambpet table to your Portal Customization Solution.
Adding the Maptaskr Lambpet table reference
-
Firstly, add the Maptaskr Lambpet entity as an existing table to your existing solution.
Figure 16: Adding a new existing table to our custom solution.
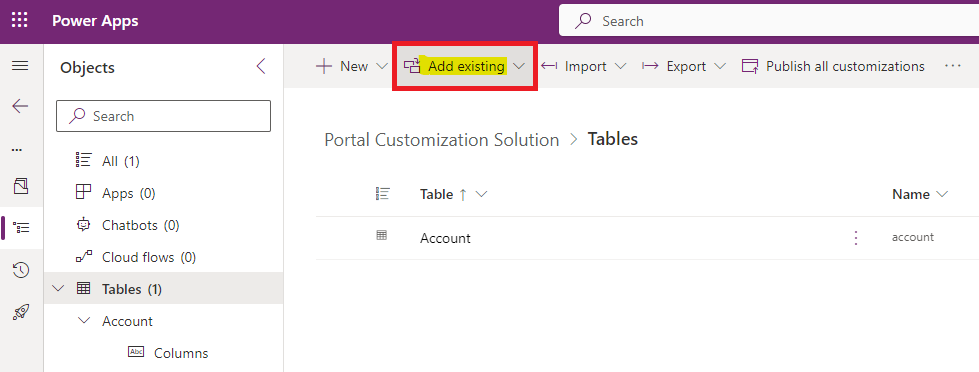
Figure 17: Selecting the Maptaskr Lambpet table.
-
Next, ensure that no other objects or table metadata is included. (To ensure that nothing pre-existing gets overwritten).
Figure 18: Removing all objects to be imported to the solution.
-
Once the table is added, we will need to add a column for each entity added in Table Setup
Adding the entity relationship columns to the Lambpet table
For each entity you added to the Portal Customization Solution, you will need to create a Lookup table in Maptaskr Lambpet to allow the map to cross reference entities at load time.
-
To do this, open the Maptaskr Lambpet table from within your Portal Customization Solution, and select Columns.
Figure 19: Heading to Maptaskr Lambpet table to add new columns.
-
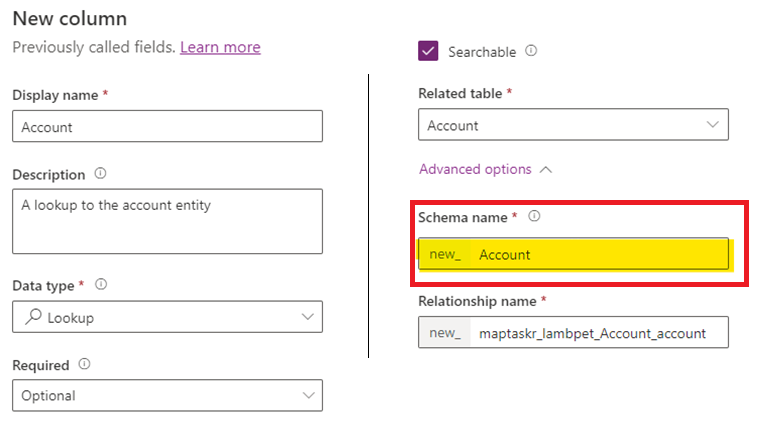
Add the new column with the display name of the entity reference.
Figure 20- Creating a lookup field. Highlighted is the schema name used in initmap.js. Please note that your column prefix could be different to "new_" depending on the selected publisher of your solution.
-
Note that the name of the Relationship and schema will change based on your company
publisherFigure 21: Adding the Relationship name.

-
Once this is complete, note down the schema name, and relationship name for later reference.
PCF Installation
To Install the PCF Component, you will need to navigate to the Power Apps2 interface and select your target environment.
-
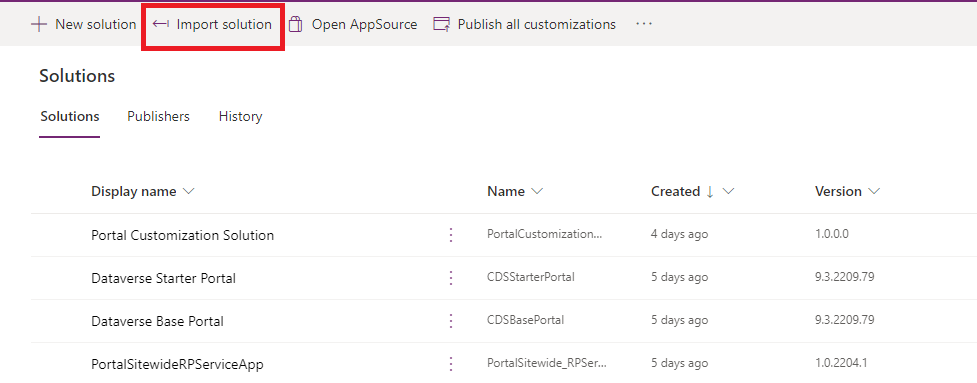
Navigate to Solutions
Figure 22: Solutions list
-
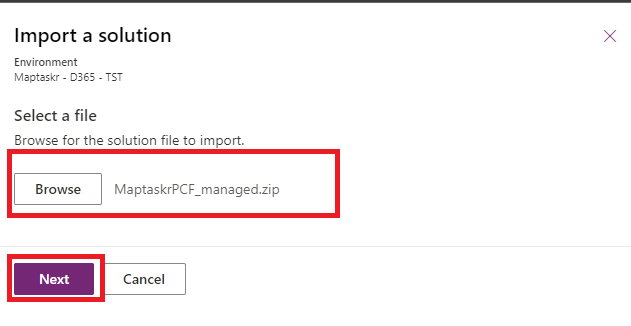
Import the MaptaskrPCF Solution into your environment.
noteThe name of the solution file below may differ from the one you have available for installation. Typically, files are named in the following format MaptaskrPCF_X.X.X.X_Managed.zip.
Figure 23: Import the Maptaskr PCF solution.
Form Integration
The PCF control can now be added to a form of your choice for configuration. The example below shows the adding of a
control to the Account PCF Form of the Account table.
-
Select the form you wish to add the control to and click
Edit.Figure 24: Edit form.

-
Add the column
PCF Bind Fieldwhere you want to display the PCF. It is recommended that this column is contained in a separate tab on the form.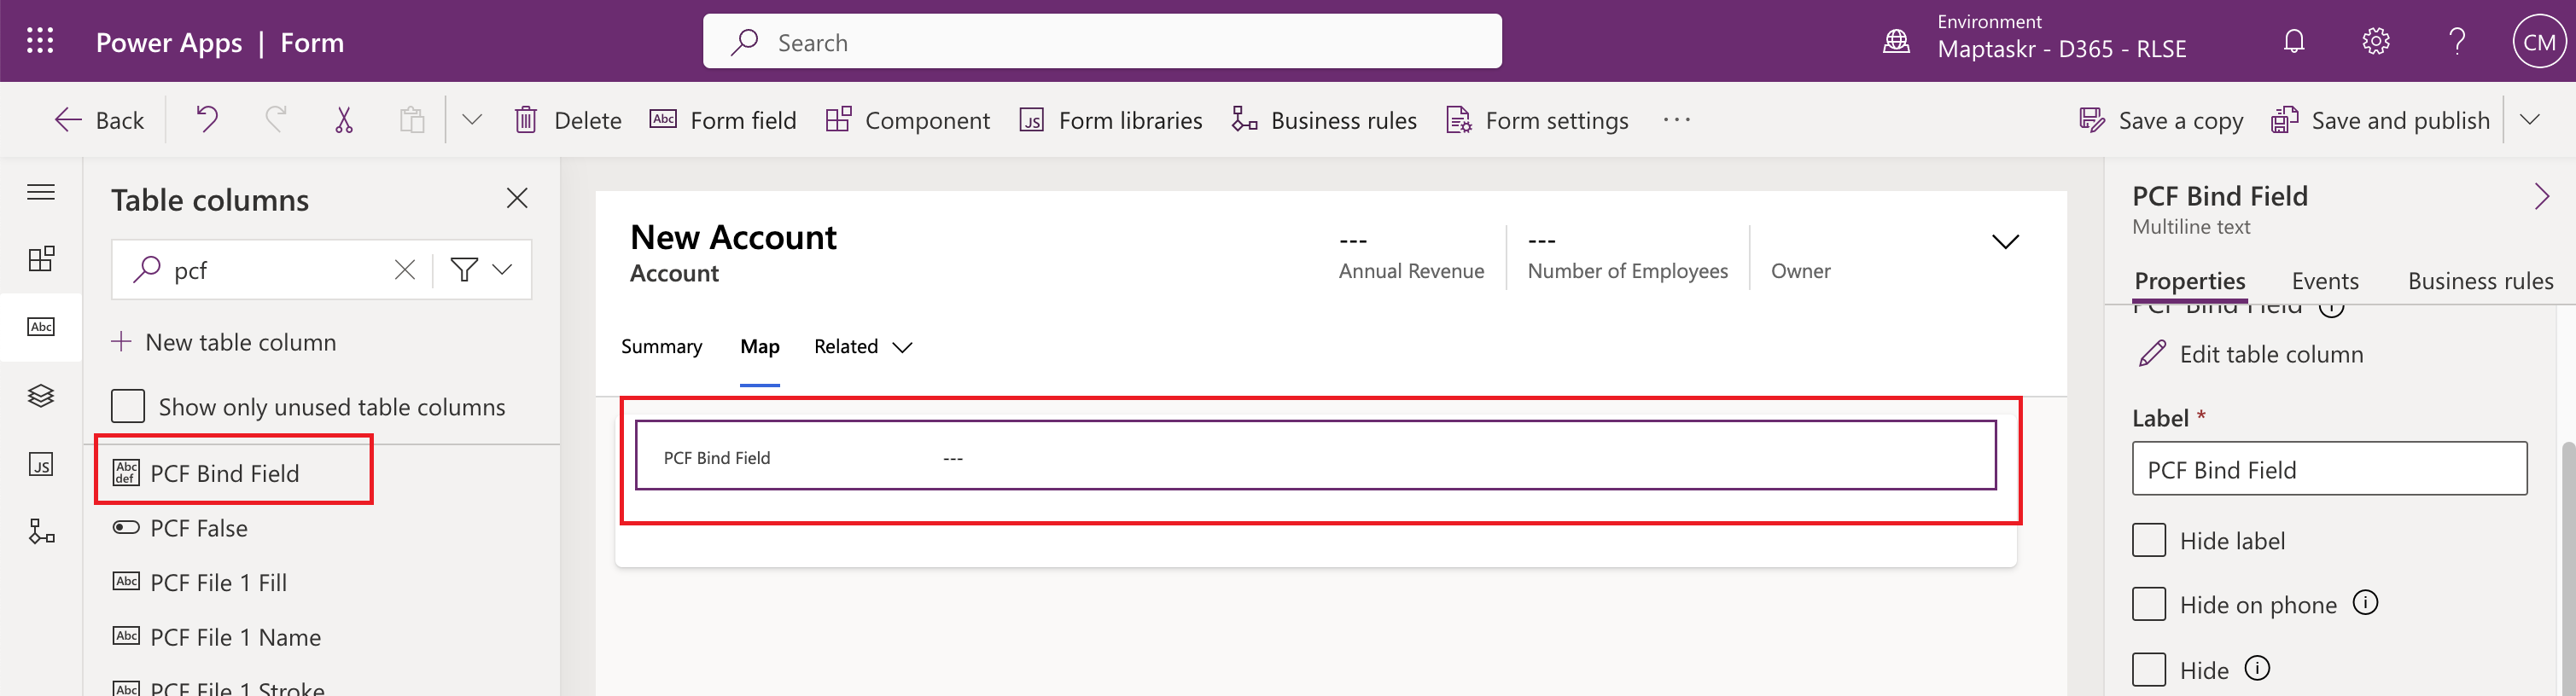
-
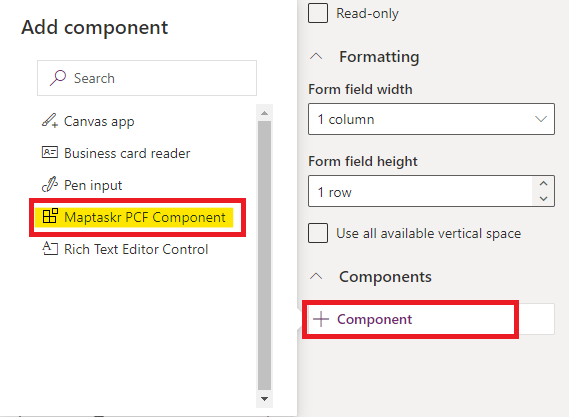
In the left navigation pane of the form editor, select
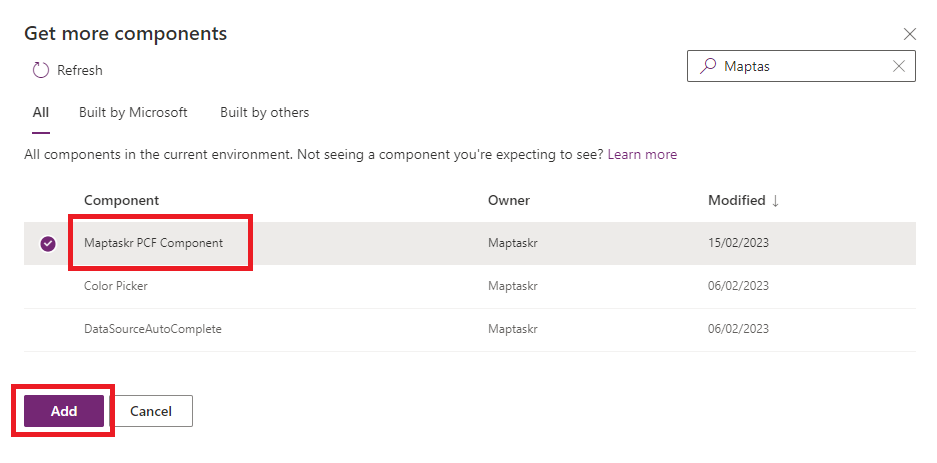
Componentsand click onGet more components. In the search bar type inMaptaskr PCF, select the result and clickAdd.Figure 25: Form Components list
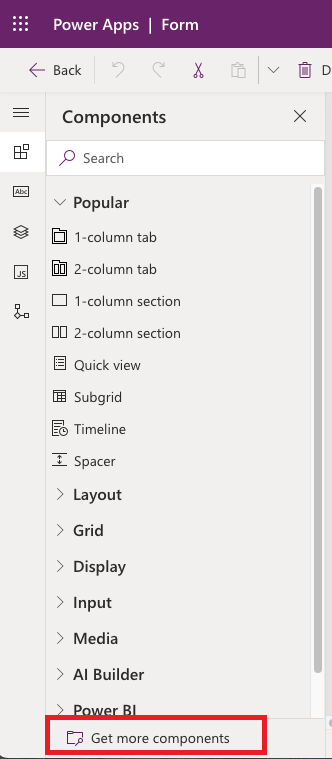
Figure 26: Get Maptaskr PCF Component
Now the PCF is added into your environment list of components!
- Click back on the
PCF Bind Fieldcolumn you have added previously and on the properties tab on the right side of the screen find the dropdown labelledComponents. Click the+ Componentbutton and select theMaptaskr PCF Component.Figure 27: Add PCF component.
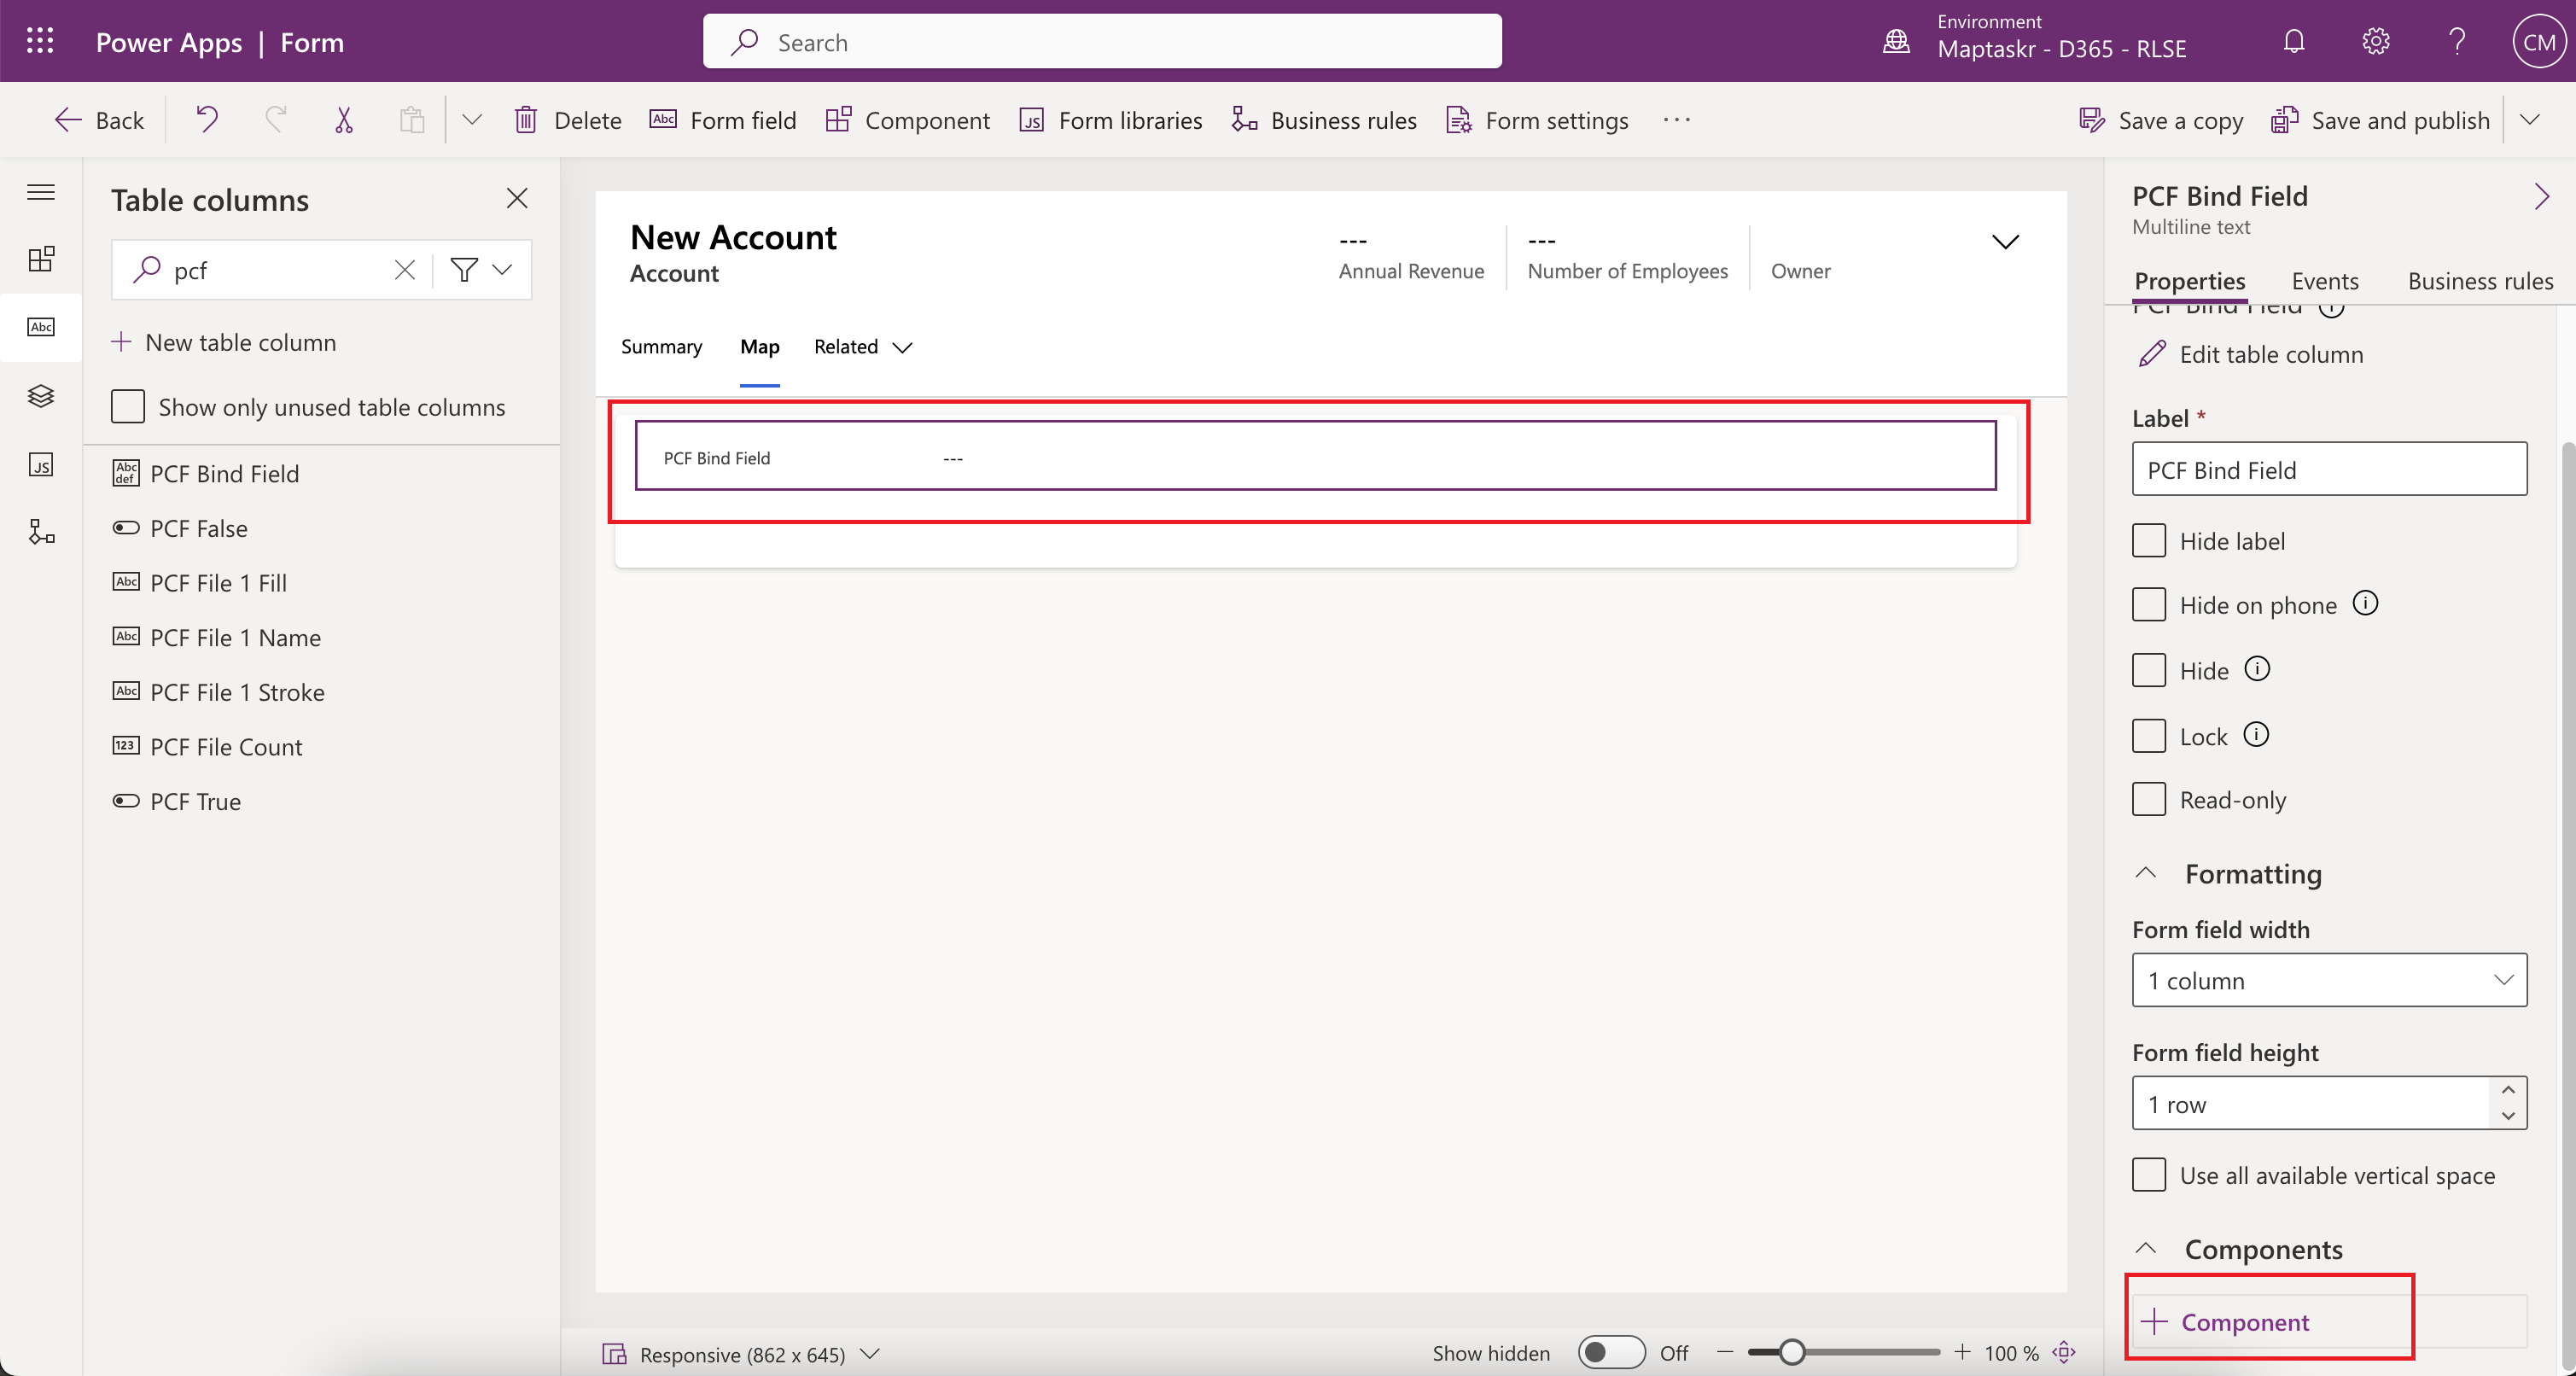
Figure 28: Add PCF Component
You will now be prompted with a popup to bind the control to columns. As per your requirements assign the columns generated in Table Setup to each respective configuration option.
PCF Component Settings
An overview of each of the PCF control available settings and description of what they entail is found in the below table.
Table 2: PCF Control Settings Overview
Group | Name | Description | Type |
|---|---|---|---|
Design | Height of Map (CSS) | Specify the height of the map container. If left empty this will default to 400px | Free text (CSS height format) e.g. 100vh or 500px. |
Features | Show Map Download? | This setting will enable/disable the ability to download a version of the map by showing or hiding the map download button. | Free text –
|
Map Download Format | This setting changes the downloadable version of the map as either a PDF or image. | Free text –
Note: Image is PNG format. | |
Show Scale Bar? | This setting will enable/disable the display of a scale bar, which provides a visual indication of distance on the map.
| Free text –
| |
Show Extent Controls? | This setting will enable/disable the display of the map extent controls. After a zoom or pan
action is complete on the map the current view is stored as an
| Free text –
| |
Show Layers Search? | Show or hide the layers search.
| Free text –
| |
Default Tab Opened | The tab that should be opened when the app loads. | Free text –
| |
Pre-Selected Layers | Allows the setting of preselected layers to activate by default when the map first loads on the page. | Free text – CSV format of layers to be used. In the following format.
e.g. For more information on layer name format, see Pre-Selected, Exclusion, and Intersection Layer Configuration. | |
Snap Selected Layers? | Allows the setting of preselected layers to activate Note: Required to be an ArcGIS Feature Server service layer. | Free text – CSV format of layers to be used. In the following format.
e.g. For more information on layer name format, see Pre-Selected, Exclusion, and Intersection Layer Configuration. | |
Trace Selected Layers? | Allows the setting of preselected layers to activate Note: Required to be an ArcGIS Feature Server service layer. | Free text – CSV format of layers to be used. In the following format.
e.g. For more information on layer name format, see Pre-Selected, Exclusion, and Intersection Layer Configuration. | |
Exclusionary Selected Layers? | Allows the setting of preselected layers to act as exclusion zones when drawing/uploading shapes on the map. Note: Required to be an ArcGIS Feature Server service layer. | Free text – CSV format of layers to be used. In the following format.
e.g. For more information on layer name format and Intersection Detection, see Pre-Selected, Exclusion, and Intersection Layer Configuration. And | |
Intersection Selected Layers | Allows the setting of preselected layers to act as intersect zones when drawing/uploading shapes on the map. Note: Required to be an ArcGIS Feature Server service layer. Once a shape has either been drawn or uploaded, a validation button appears which they can use to trigger intersect detection.
| Free text – CSV format of layers to be used. In the following format.
e.g. For more information on layer name format and Intersection Detection, see Pre-Selected, Exclusion, and Intersection Layer Configuration. And | |
Intersection Warning Buffers | Sets the warning buffer, in meters, for intersection layers set for intersection detection. Users will be given a warning if any shape draw or uploaded encroaches within the buffer set.
| Free text – CSV format. e.g. Note: Maps directly to the layer names that are preconfigured in the
For more information on layer name format and Intersection Detection, see Pre-Selected, Exclusion, and Intersection Layer Configuration. And | |
Intersection Error Buffers | Sets the error buffer in meters, for intersection layers configured in the section above. Users will be given an error if any shape drawn or uploaded encroaches within the buffer set.
| Free text – CSV format. e.g. Note: Maps directly to the layer names that are preconfigured in the
For more information on layer name format and Intersection Detection, see Pre-Selected, Exclusion, and Intersection Layer Configuration. And | |
Auto-Collapse tabs | Set the left tab pane to auto hide when user is drawing on the map. | Free text –
| |
Constraint Boundaries | Set the constraint boundary area for the map, both viewable and searchable. | Free text – CSV format of latitudes and longitudes representing the top left, and bottom right coordinates that determine the constraint boundaries. Coordinates to be provided in the following format: MINLONG,MINLAT,MAXLONG MAXLAT e.g. 115.48423048,-31.91915005, 116.17587173,-32.28607507 Note: Must not contain spaces. | |
Uploads | Show Annotation Control? | Show or hide Annotation Control within the Annotate tab.
| Free text –
|
Annotation Color | Sets the default color used for all annotations on the map.
| Free text – HEX color to be used. e.g. | |
Allowed Upload Types | Set what type of submission shapes are allowed for this map.
| Free text –
| |
Allowed Shapefile Projections | Allowed Shapefile Projections, please provide in latest WKID format (e.g. 7844) and comma separated to allow multiple projections. | Free text – CSV format of WKID projections to be allowed. In the following format.
e.g. Where 7844 is the code for GDA2020. See https://epsg.io/ for more projections listing. | |
Number of Shapes Allowed | Sets the number of allowed shapes to be either drawn or uploaded depending on how the control is configured. | Integer e.g. Setting this to NOTE: Setting this to | |
Names of Uploads | Enables the predefined setting of the shape names. | Free text – CSV format. e.g. Note: Names for the shapes will be loaded from the name CSV and if there are not enough names, the control will use the name Shape X where X is the shape number. | |
Line Color of Uploads | Enables the predefined setting of the shape stroke color. Maps directly to the shape names that are preconfigured. | Free text – CSV format of HEX colors to be used. e.g. Note: Alpha Hex can also be used: e.g. | |
Fill Color of Uploads | Enables the predefined setting of the shape fill color. Please note that this automatically applies an opacity of 10%. If no fill is required, then simply leave this field blank. Maps directly to the shape names that are preconfigured. | Free text – CSV format of HEX colors to be used. e.g. Note: Alpha Hex can also be used: | |
Line Style of Uploads | Enables the predefined setting of the stroke line to be dashed or solid for shapes. Maps directly to the shape names that are preconfigured. | Free text – CSV format of Boolean values to determine if lines will be dashed or
not. True indicating lines will be dashed. e.g. | |
Load Shapes? | Load shapes from Shape Custom Endpoint. | Free text –
| |
Tabs | Show Search Tools? | This setting will enable/disable the display of the layer search tools. This feature is an add-on
to
| Free text –
|
Show Basemap? | Show or hide the basemap selector.
| Free text –
| |
Show Measurement Tools? | This setting will enable/disable measurement tools. Measurement tools consist of line length and polygon area drawing tools that are ignored for data submission.
| Free text –
| |
Show Drawing and Upload Controls? | This setting will enable/disable the drawing and upload controls.
| Free text –
| |
Show Layer List? | This setting will enable/disable the display of layers.
| Free text –
| |
Show Legend? | Show or hide the legend.
| Free text –
| |
Show Help Guide? | This setting will enable/disable the display of the help guide. The help guide contains instructions on how to utilise the map`s features.
| Free text –
| |
Advanced | Shape Custom Endpoint | This property will determine what endpoint to hit to retrieve the shapes to load on the map. If you don't provide a custom endpoint for this option, it will default to "/maptaskr-shape-search/". | Free text Make sure to add |
Related Shape Custom Endpoint | This field will determine if the map should load shapes saved against the table record. Enabling this configuration item requires a custom endpoint, otherwise it defaults to "/maptaskr-shape-search/". It is not recommended to enable this feature unless you intend to also configure a custom endpoint. Note: Related shapes are not editable. | Free text Make sure to add | |
Load Related Shapes? | Load related shape Load shapes from Related Shape Custom Endpoint. | Free text –
| |
Load Dataverse Layers? | Load dataverse record locations and display them on the map as pins. Always uses the `/maptaskr-dataverse-layers/' by default unless a custom endpoint is provided as per below. | Free text –
| |
Load Dataverse Layers Custom Endpoint | This field will determine if the map should load dataverse layers from a different location. Enabling this configuration item requires a custom endpoint, otherwise it defaults to "/maptaskr-dataverse-layers/". It is not recommended to enable this feature unless you intend to also configure a custom endpoint. | Free text Make sure to add | |
Help Guide Custom Endpoint | This property will set a custom endpoint to use as a source for the help guide. If you don't provide an endpoint for this option, it will show the default Maptaskr help guide. | Free text Make sure to add | |
Number of Concurrent Intersection Calls | Sets the maximum number of concurrent intersect detection calls the map will be able to make. If more are required, these will be batched accordingly. E.g. If there are 2 shapes and 5 intersection layers, 10 intersection calls will be made. | Free text Default – | |
Token Refresh Interval In Minutes | Sets the token refresh interval. This is how often (in minutes) the control should query the Maptaskr Layer Group Security endpoint to get the latest tokens. Setting this value to 0 will disable token refresh intervals. | Free text Default – |


Once all items have been configured to your preference click on Done to confirm the settings of the PCF. The PCF Bind Field will then appear as shown below.
Figure 29: PCF added to form.
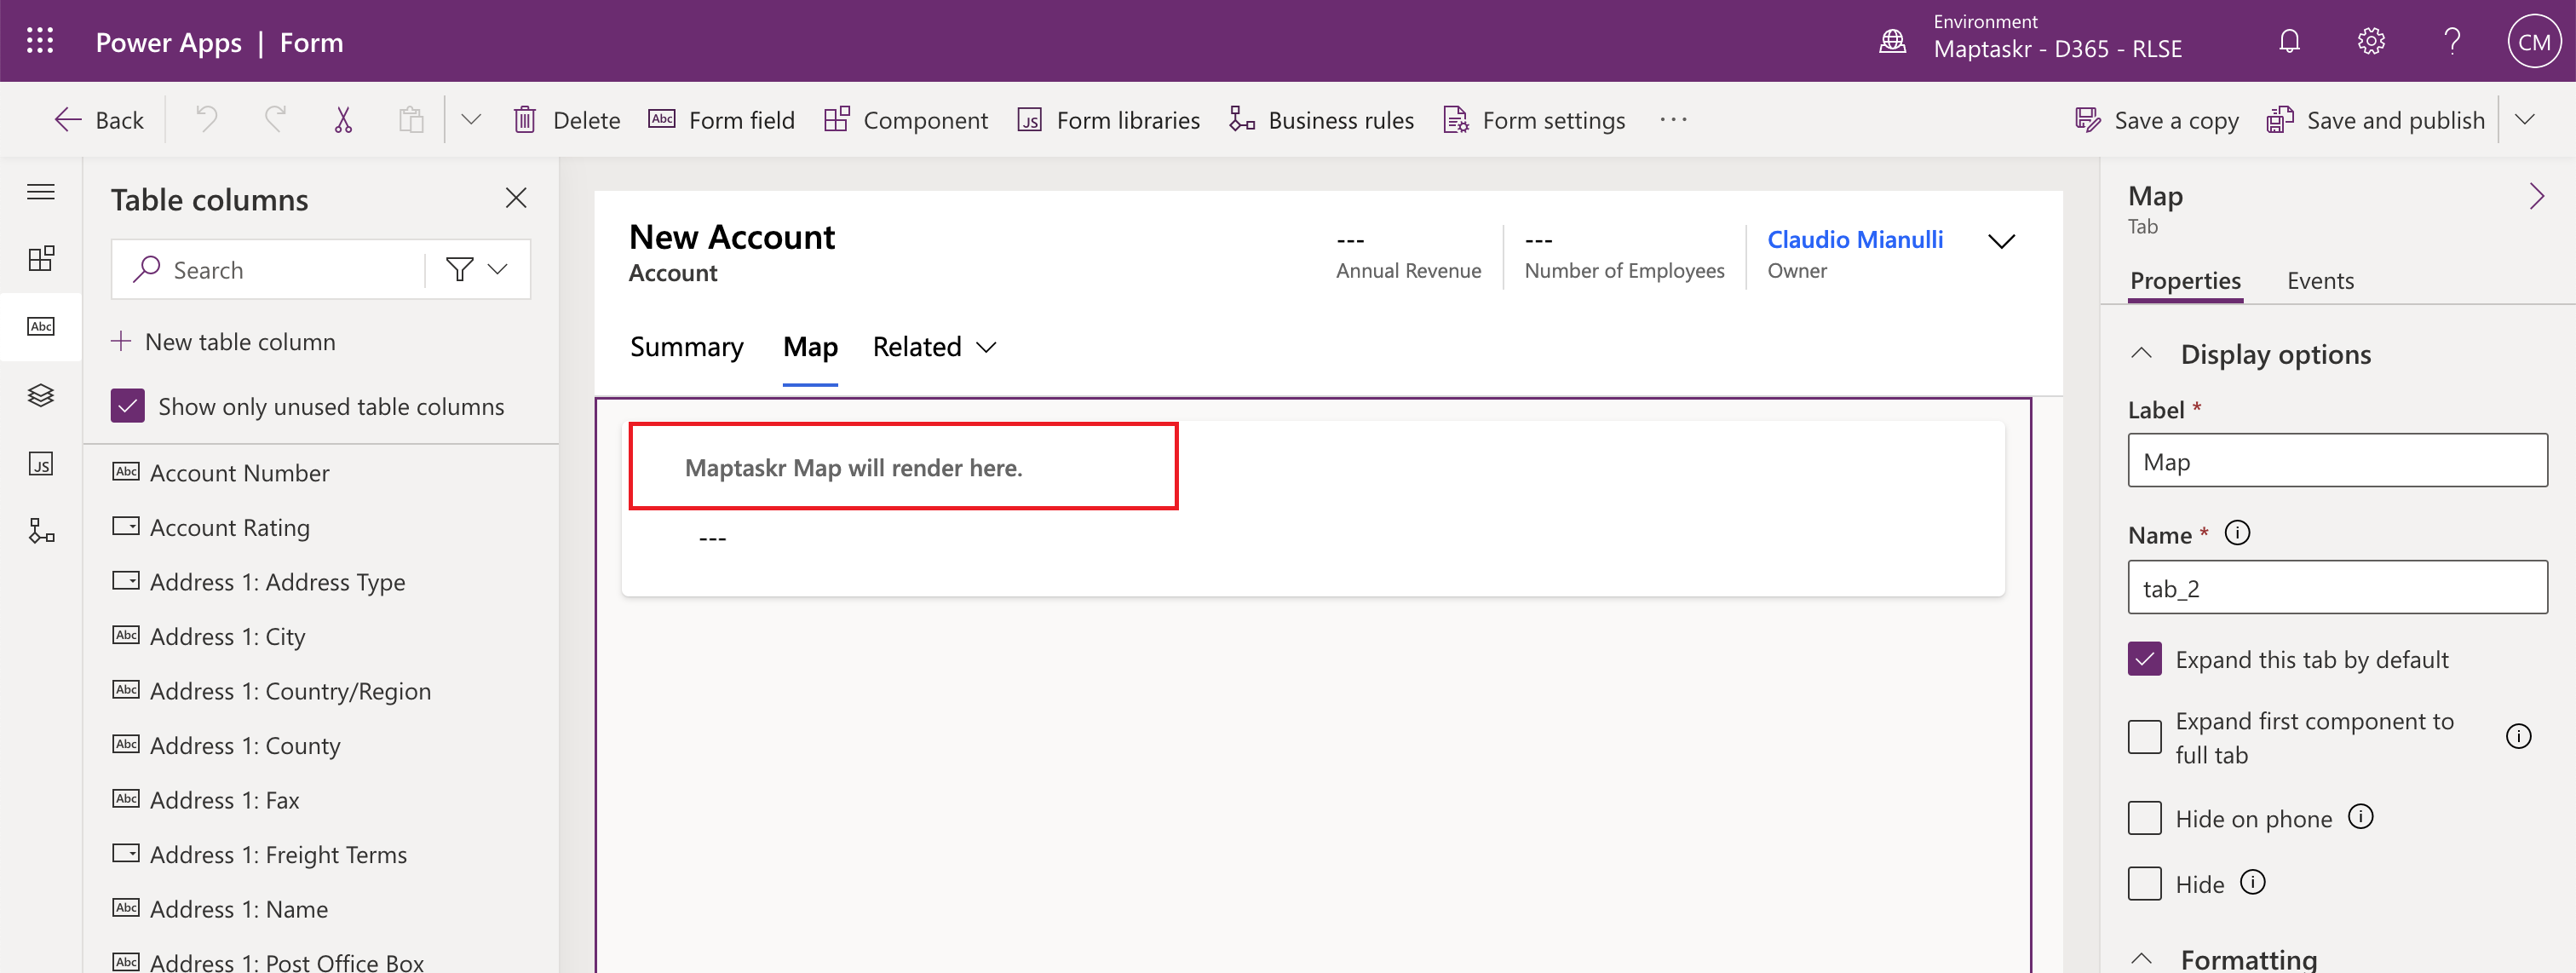
The map will not show a preview due to the nature of the PCF control. Rather, if the PCF control has been
added successfully, it will display in the form edit mode with the Maptaskr Map will render here message.