Advanced Configuration and Capability
Configuring Secure Layers for Portal
The Portal solution will support unauthenticated ArcGIS MapServer and FeatureServer layers out of the box. To allow for a secure ArcGIS MapServer or FeatureServer to be used on a public portal, a secured layer token must be provided.
Suggested entity configuration
The Maptaskr Layer Group Security Search liquid template provided by Maptaskr in Appendix A: Web Templates will return a singular token as a JSON object from a custom table called layertokens this table can be created by applying an unmanaged solution on top of your environment and creating a new table called layertokens.
Figure 62 - The portal unmanaged customization solution.
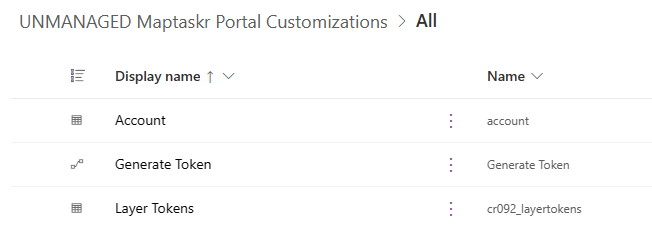
This table, along with the referenced liquid template provide a space in Dataverse to save an ArcGIS authentication token.
Figure 63 - Creating the layer token table.
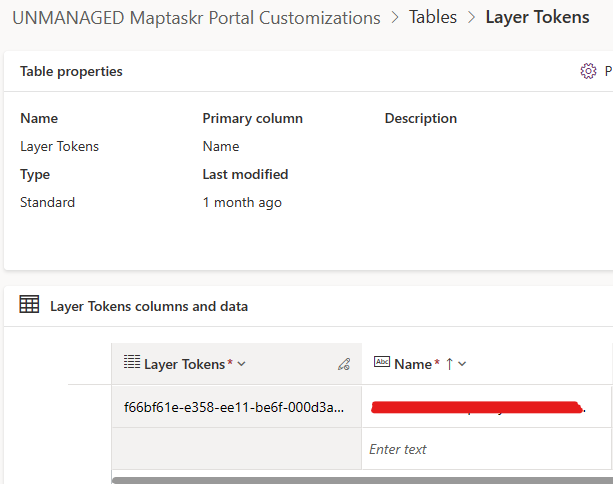
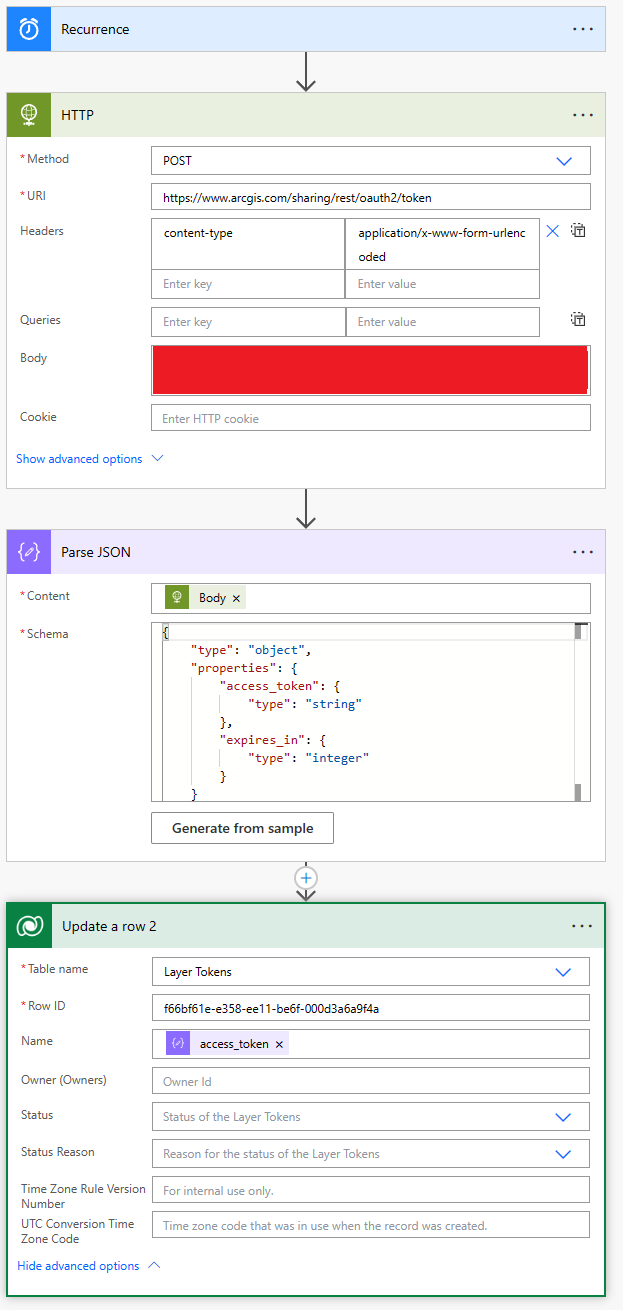
This table row can then be updated using a power automate flow, designed to authenticate to ArcGIS using a Client ID and Secret, and then write the result back to the Dataverse Table.
Figure 64 - Example flow for updating the portal token.
Required Portal/Power Pages Management configuration
You will need to create a Page template with the name Maptaskr Layer Group Security Search
Figure 65 - Example layer security group template.
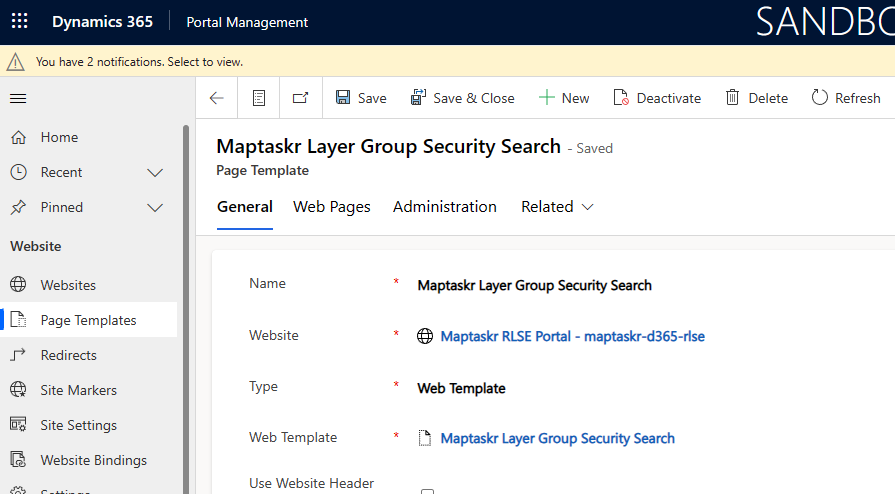
This template will use the content of the Maptaskr Layer Group Security Search template from Appendix A: Web Templates
The Maptaskr Map control will (prior to loading any layer marked secure within the Maptaskr Layer Configuration) query the endpoint /layer-group-security-search.
Figure 66 - Example layer security web page.
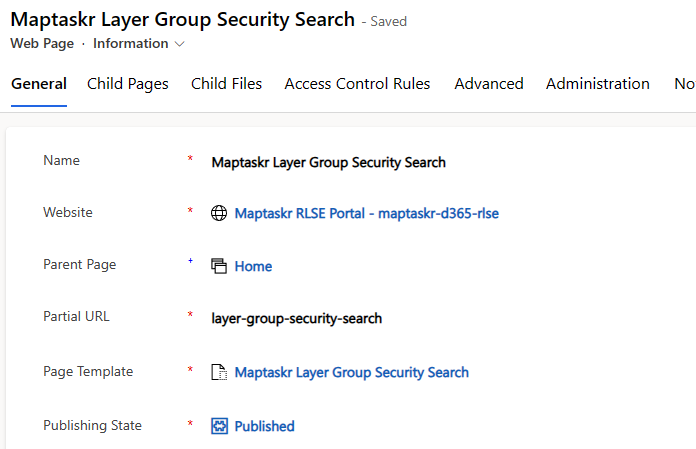
Be sure to assign to this page the web template Maptaskr Layer Group Security Search
Setting layers as Authenticated in Maptaskr D365
To set a layer as authenticated for the Portal control, you will need to head to the D365 solution, and in the Dashboard edit the selected layers configuration.
Figure 67 - Editing layer in D365

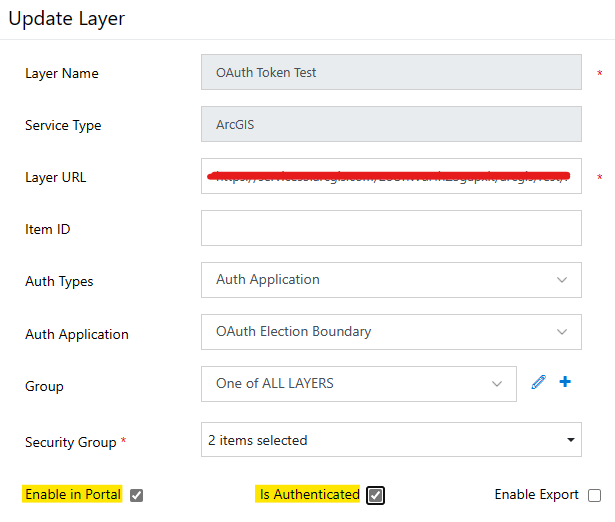
Here you can set the layer to be enabled and authenticated.
Figure 68 - Enabling layer in Portal.
Resulting network calls in Portal control
After configuration of the authenticated layer, you will see a network call out to the endpoint
/layer-group-security-search.
Figure 69 - Token response from the Liquid template.
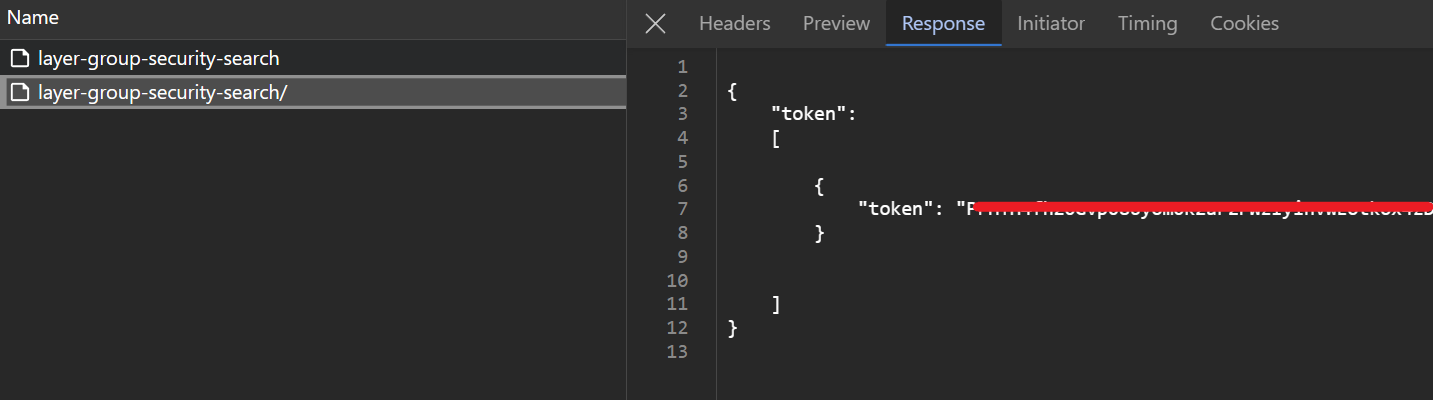
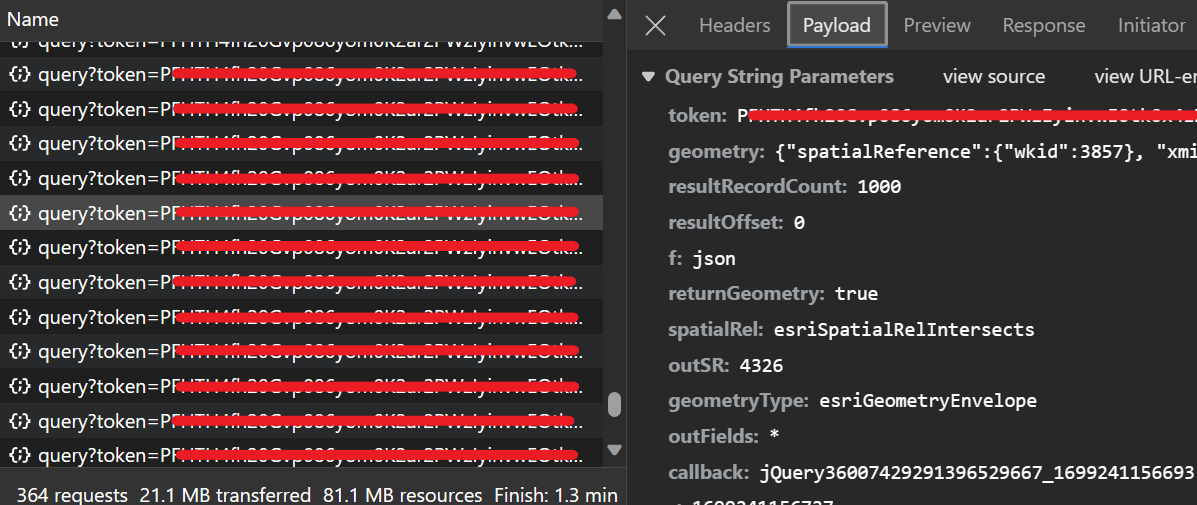
This token is then appended to any calls to layers marked as Is Authenticated in the layer configuration.
Figure 70 - Layer querying with appended token.
Dataverse layers
The Portal solution supports loading Dataverse layers out of the box. The steps below outline the requirements to configure this functionality.
Required Portal/Power Pages Management configuration
You will need to create a Web Template with the name Maptaskr Dataverse Layers. This template will use the content of the Maptaskr Dataverse Layers template from Appendix A: Web Templates
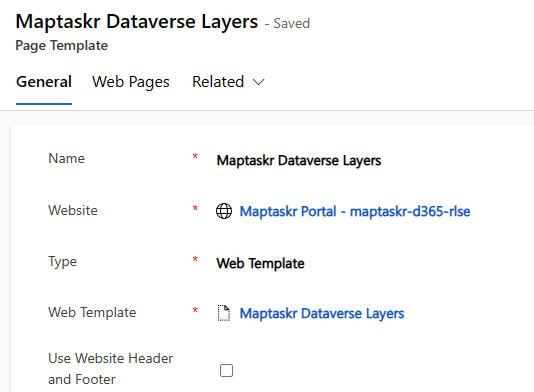
You will need to create a Page template with the name Maptaskr Dataverse Layers that references the aforementioned Web Template as shown below.
Figure 71 - Example dataverse layer template.
The Maptaskr Map control will query the endpoint /maptaskr-dataverse-layers by default and can be configured
to use another endpoint which is covered in PCF Component Settings.
You will need to create a web page that references the page template configured above.
The partial URL can be set to /maptaskr-dataverse-layers if you are using the default endpoint, alternatively, set this to your desired custom endpoint.
Figure 72 - Example dataverse layer web page.
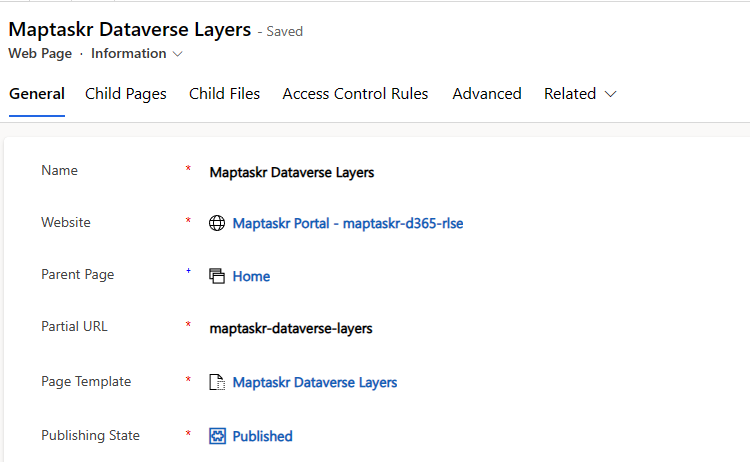
Be sure to assign the page template Maptaskr Dataverse Layers to this web page.
Resulting network calls in Portal control
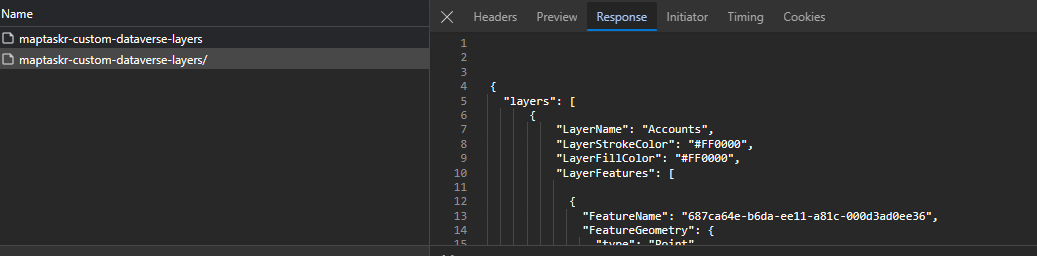
After configuration of the Dataverse layer, you will see a network call out to the endpoint /maptaskr-dataverse-layers.
Figure 73 - Token response from the Liquid template using a custom endpoint.
Static Tokens
ArcGIS layers can also be configured to use a static token on a per layer scope. This allows you to have a specific token for each layer and gives you the flexibility to implement your own flows that regularly refresh these tokens. When used in combination with the token refresh interval it is possible to have rolling tokens for additional security.
To configure a static token head into the D365 solution and edit or create an ArcGIS layer via the dashboard map.
Figure 74 – Configuring Static Tokens
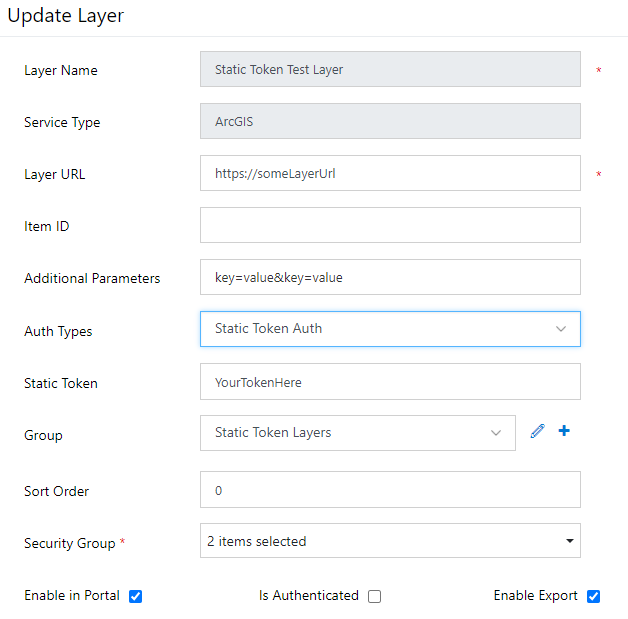
You will need to set Static Token Auth from the Auth Types dropdown. This will enable the Static Token field. Now you can enter your static token. When the portal control finds a layer with Static Token Auth enabled it will append this static token to every request for this layer.
If a layer is configured for Static Token Auth it will attempt to load the static token and use it for all queries regardless of the Is Authenticated field being enabled.
Additional Parameters
ArcGIS layers can additionally be configured to include additional parameters in EVERY request to the Layer URL. For example, this can be useful if you have any security layers the request needs to pass through before going out to the Layer URL.
To configure Additional Parameters head into the D365 solution and edit or create an ArcGIS layer via the dashboard map.
Figure 75 – Configuring Additional Parameters
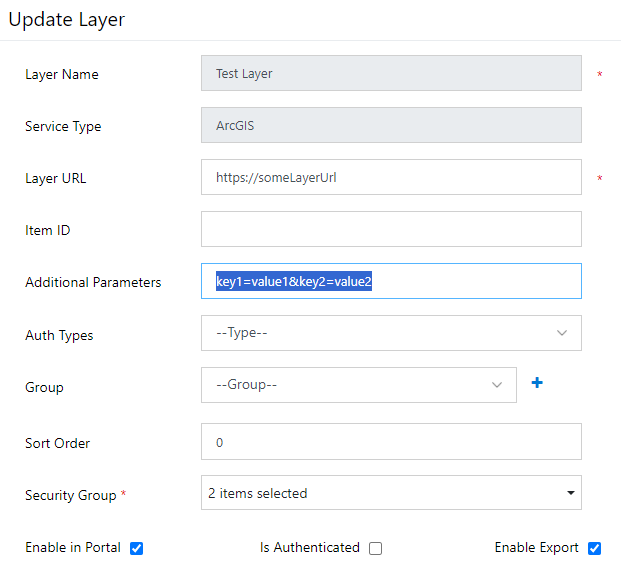
In the Additional Parameters field enter a query string of key/value pairs. These will be appended to every request for the layer. IMPORTANT! Make sure you use correct query string structure, or your layer may not function correctly.
Custom Endpoints to load related table records
As mentioned in PCF Component Settings (if enabled), the PCF component will load shapes that are directly related to the table that's been configured.
In some cases, you may have related (or other) table record that also contain shapes that you'd like to bring into a single map.
To enable this, it is required to generate a Table Permission, Web Template, Page Template and Web Page of your own design. For more details on creating these please refer to Table Permissions, Web Templates, Page Templates and Web Pages.
The naming of these records is independent of Maptaskr and can be set to what is preferred by the D365 administrator.
The FetchXML will need to be developed by the D365 administrator to bring back your desired data and output in the same format as the Maptaskr Shape Search Web Template. Below is a snippet that brings back shapes from related Account or Contact entities. For a full example please see the Maptaskr Related Shape Search template.
Figure 76: Example FetchXML

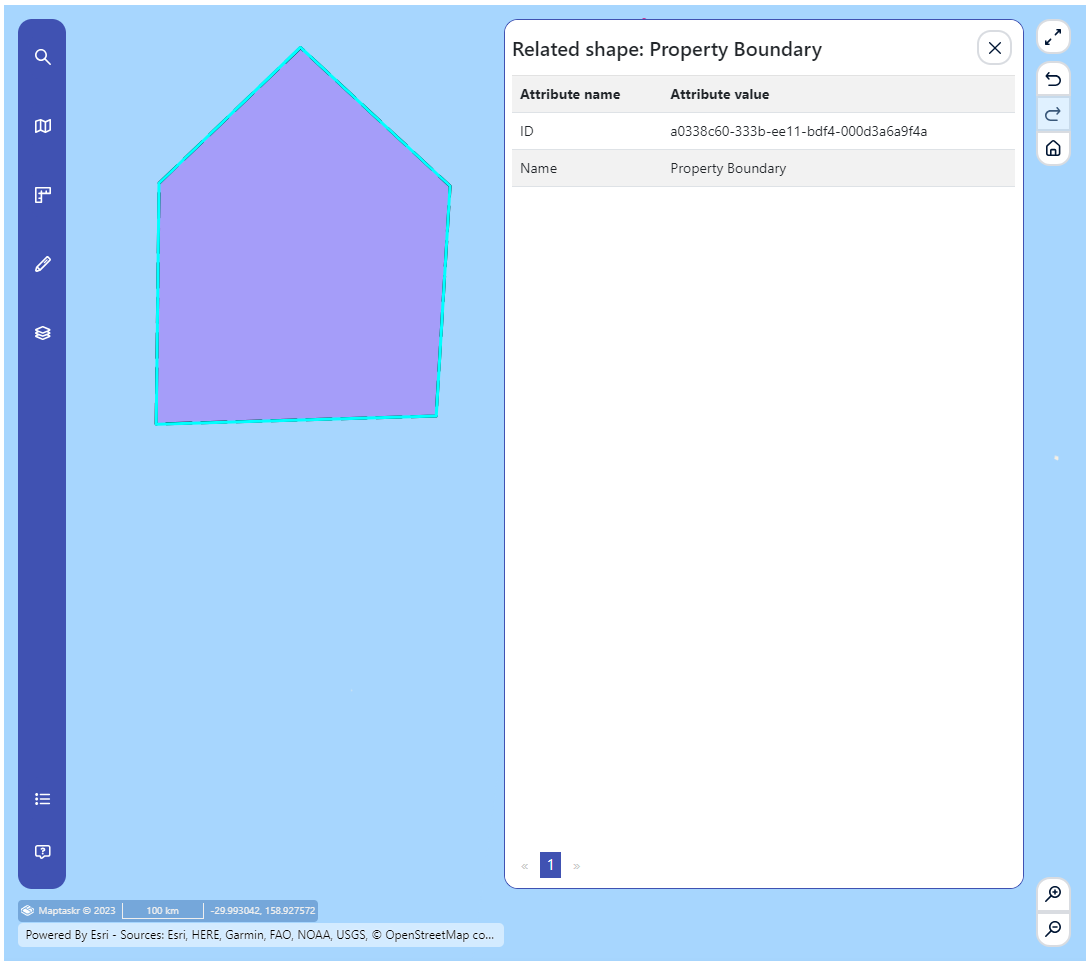
If you would like users to be able to view additional metadata for the record, you can populate the attributes property for each record as demonstrated above. If this property is populated users will be able to click on the related shape and view the configured metadata for that record.
Figure 77: Example related shape attribute popup.
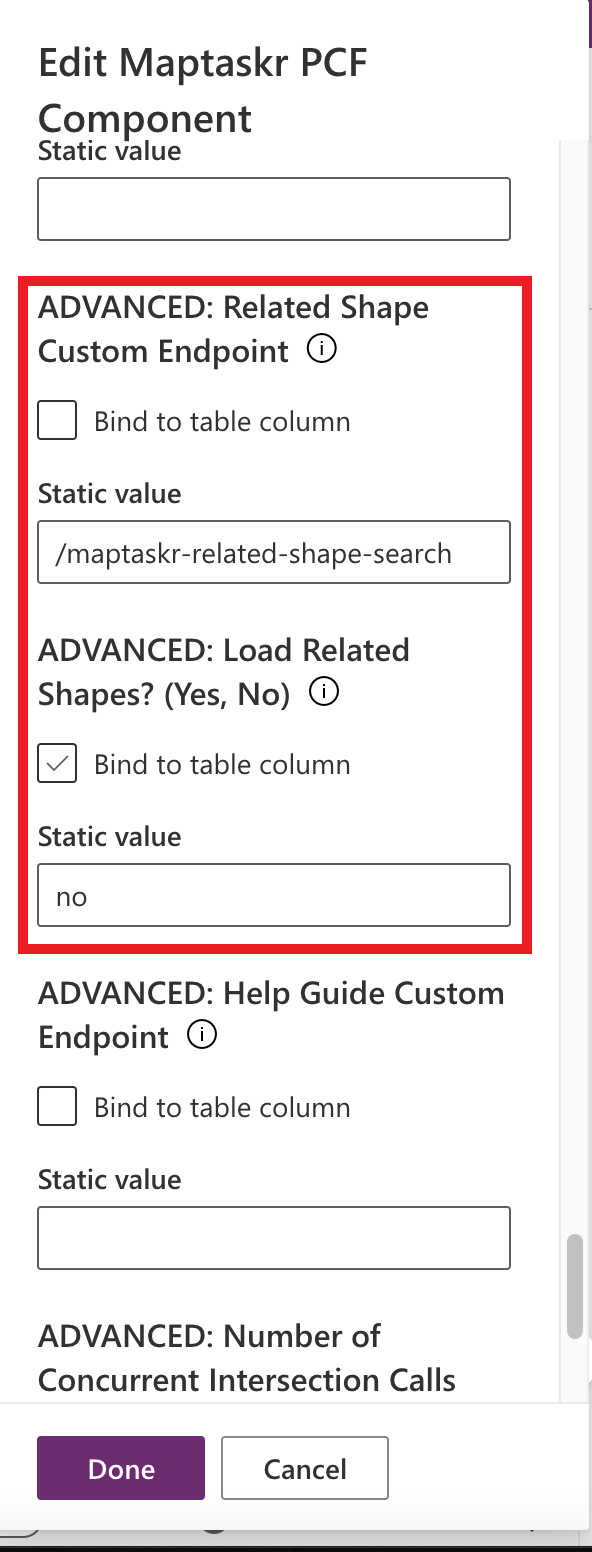
Once the Web Template, Page Template and Web Page are ready you can set Load Related Shapes? parameter to true and pass the partial URL of your web page to the Related Shape Custom Endpoint property in the PCF configuration.
Figure 78: Load related shapes PCF configuration items
Configuring a standalone Map
If there is a requirement to have a map on a standalone page (i.e. not embedded within a form) the Maptaskr PCF control can also be added to a general webpage as needed. The following steps give an example of how to add the PCF control to a webpage.
-
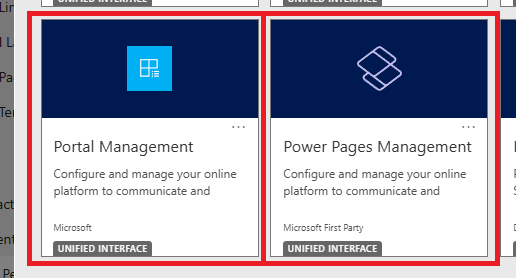
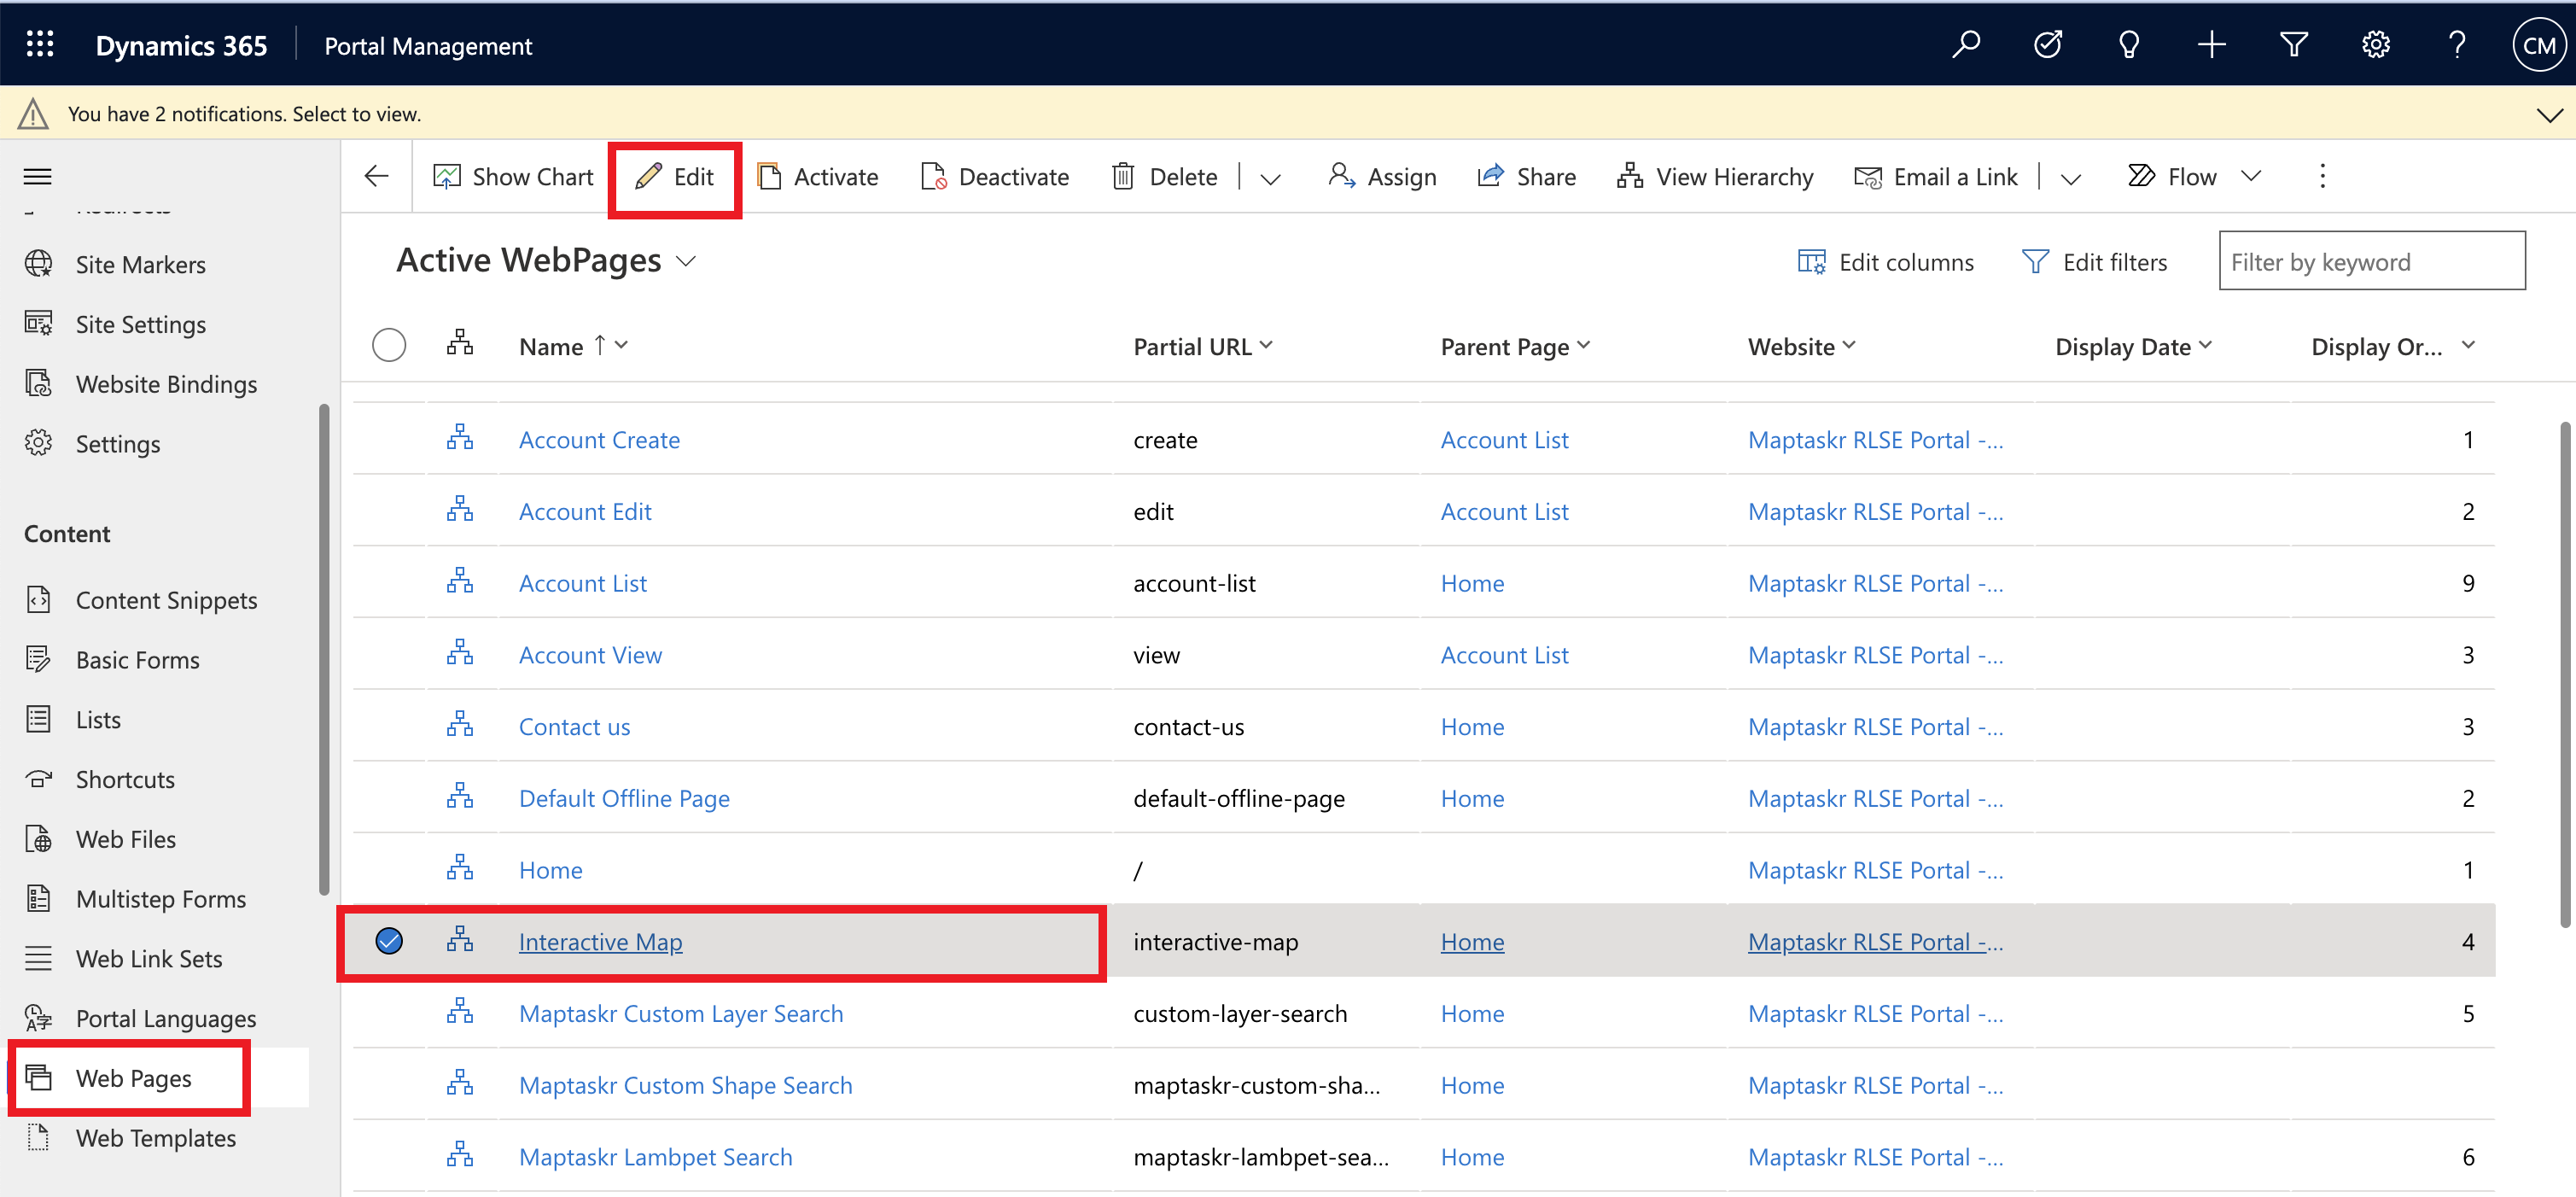
Navigate to the Portal/Power Pages Management app of the relevant environment you wish to setup a standalone Maptaskr map.
Figure 79: Portal/Power Pages Management
-
Navigate to the
Web Pagessection and edit the web page which you wish to add the map to.Note: You will need to create a webpage if it does not yet exist. In the following example we will be using the
Interactive Mapweb page as an example.Figure 80: Edit Web Page
-
Under the
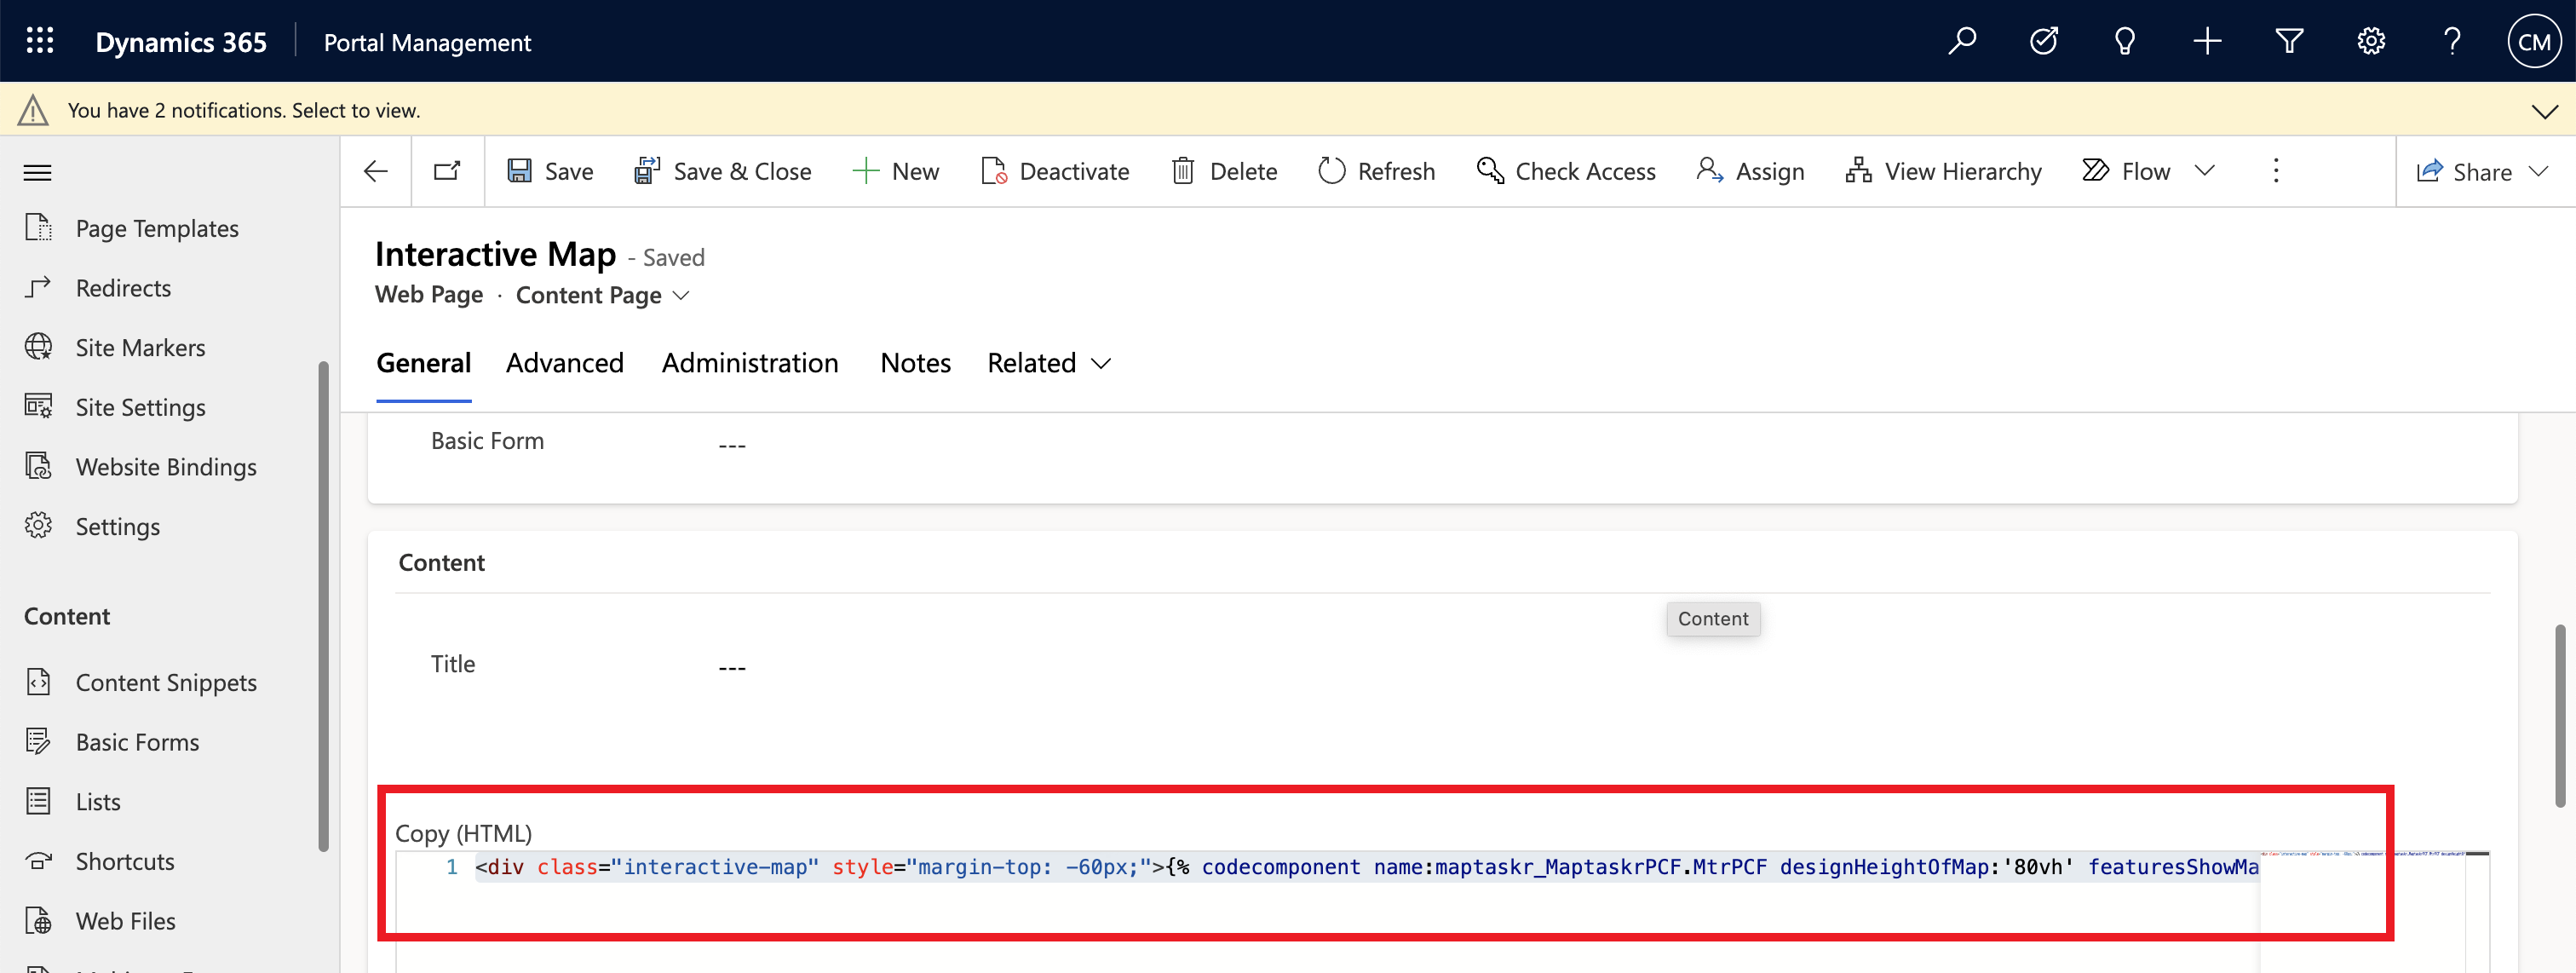
Localized Contentsection, select the page content and selectEdit.
-
Scroll down to the
Contentsection and enter in content including a codecomponent that represents the map implementation required. For the example below we have in <div> tag with the appropriate codecomponent liquid script defining the Maptaskr PCF control, with all the relevant settings.
Please see Appendix A: Web Templates for an example codecomponent. This component has all features enabled and can be modified to your suit your requirements.Figure 81: Example standalone map content HTML
 note
noteAs the control is not bound to a form (i.e. not mapped to a table), the control will not be able to be utilised for shape submission. As such, we would suggest disabling the shape upload or drawing abilities from these types of forms (unless you wish to use the extension methods to provide your own form of saving).
Dynamically setting PCF properties
If there is a requirement to dynamically set one or more of the PCF properties to cater for some business requirements, e.g. dynamically setting the number of shapes users are expected to submit and predefining their names.
To dynamically set a property of the PCF control you will need to add a text field to the form (next to the map). You will need to setup the following for however many properties you wish to dynamically set. Then, to set the PCF property to dynamically bind to that field by naming that field in the property, prefixed with a $. Below is an example.
-
Go to the form step with the Maptaskr PCF control you wish to bind a property to a dynamically set field.
-
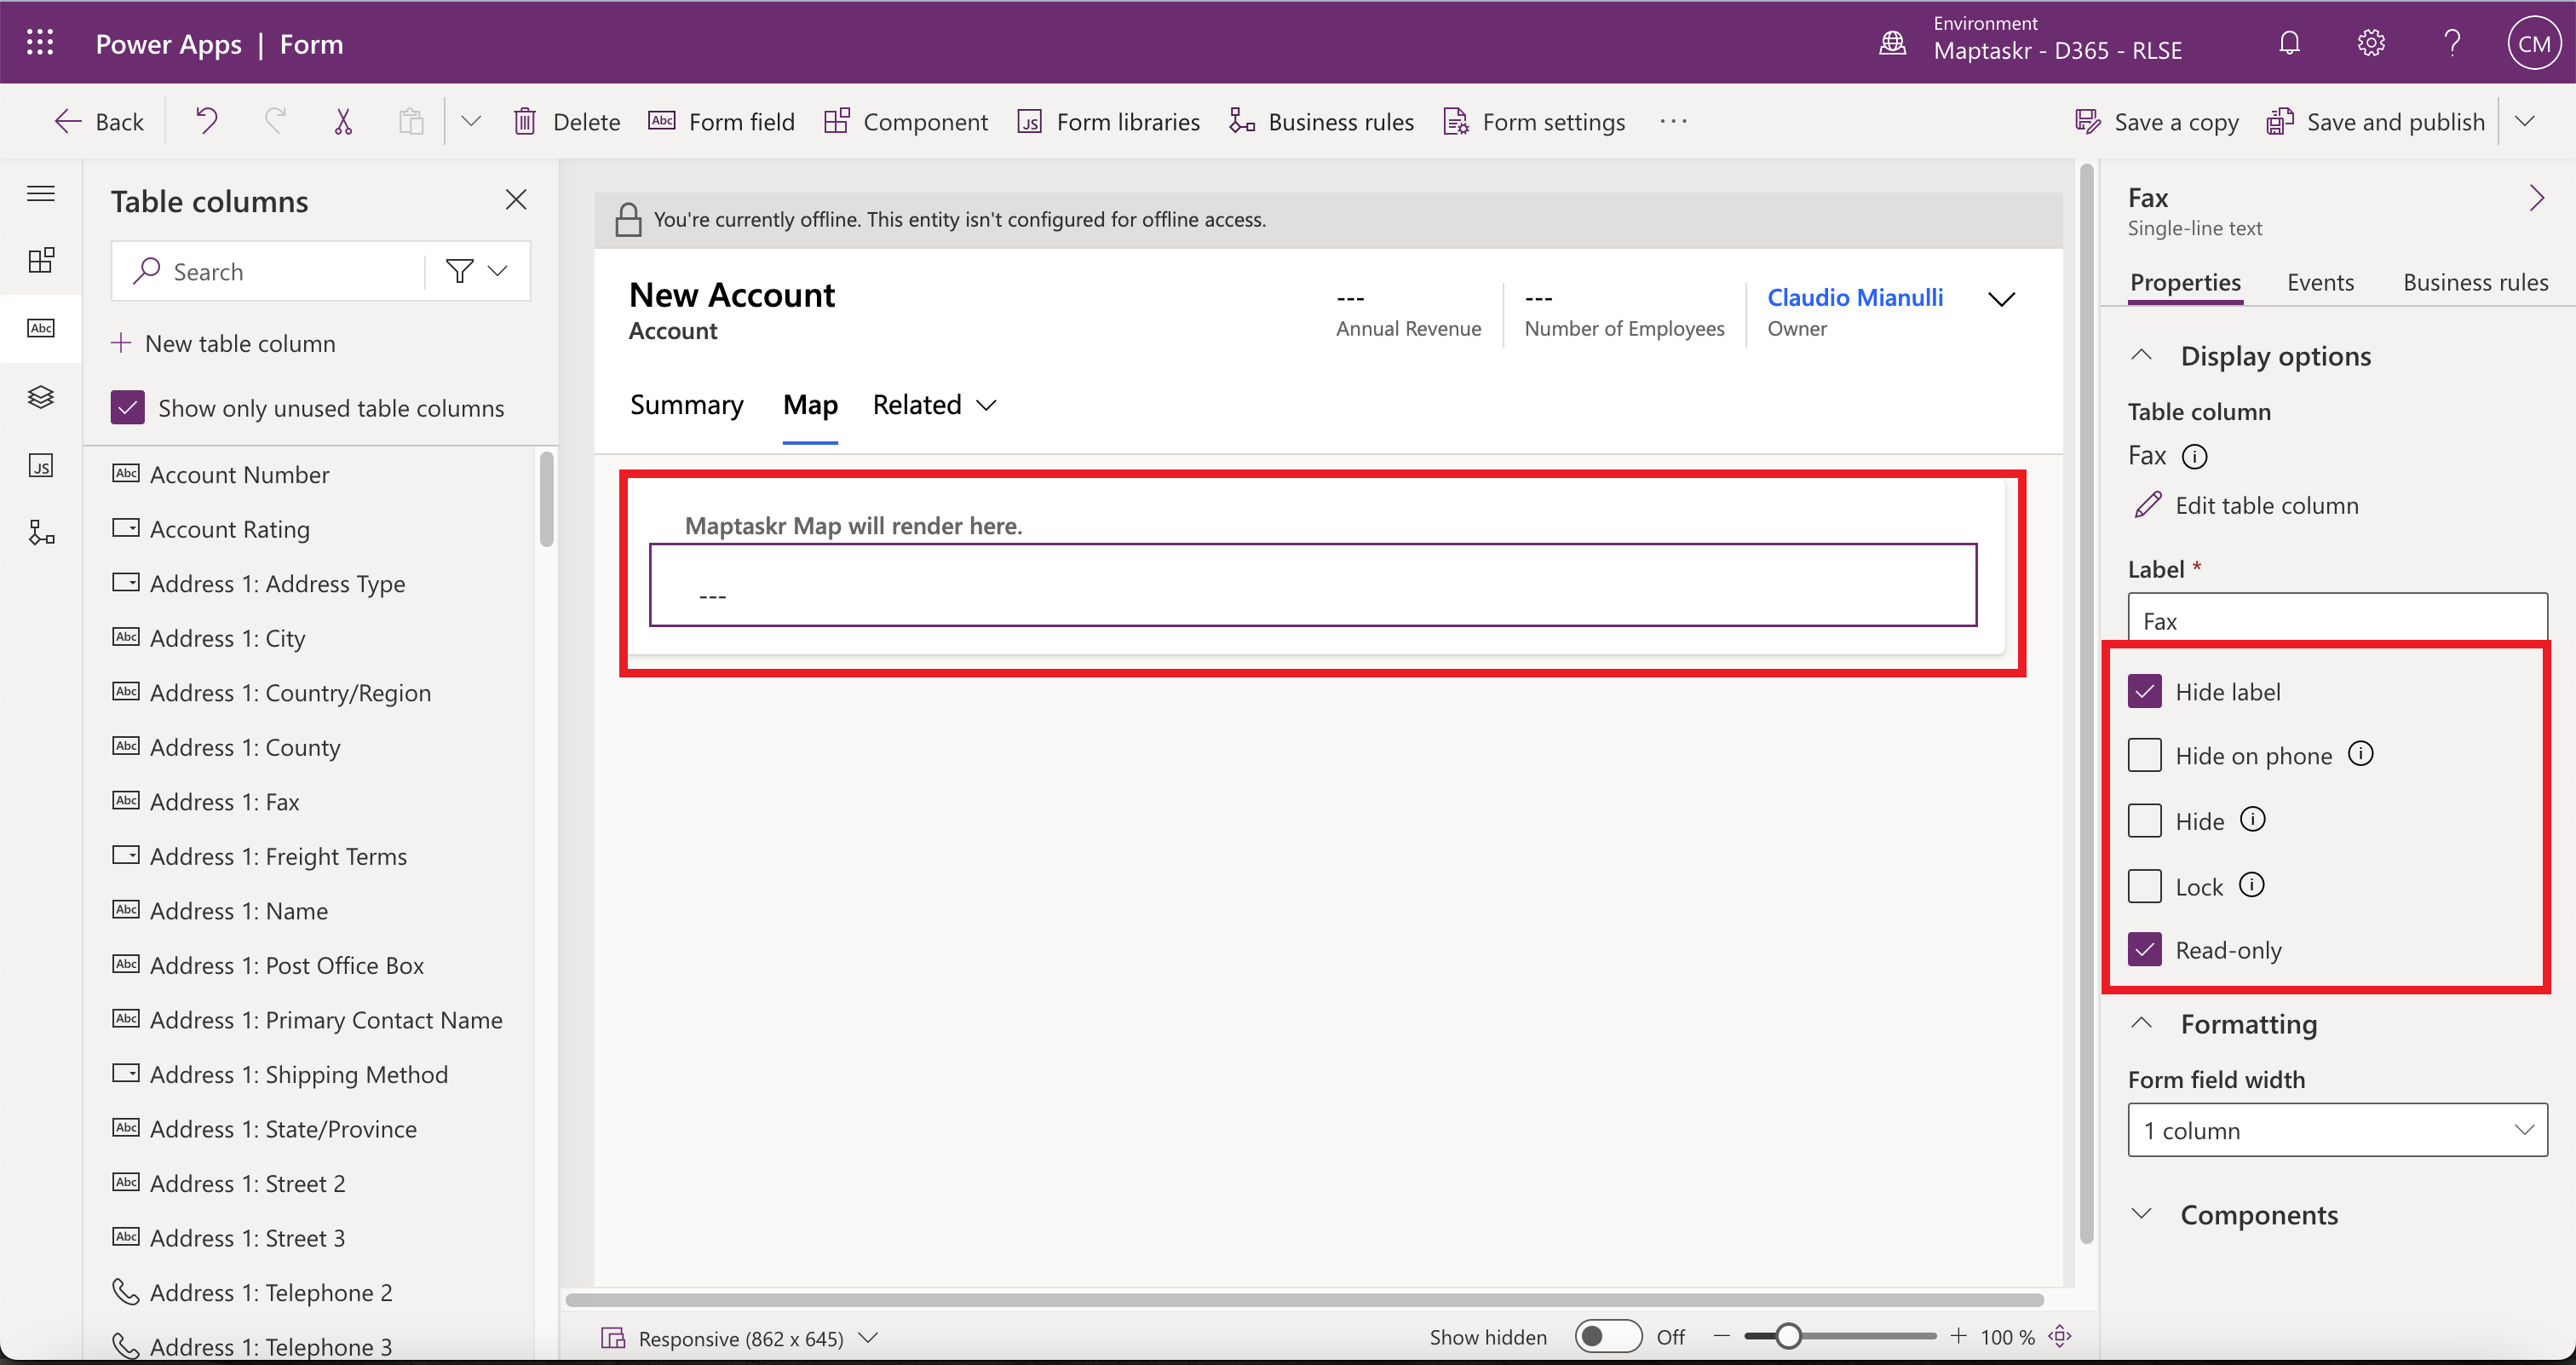
Add a Single-line text field to the form and set
Hide labelandRead-onlyto be active. In the example below we will be binding to theFaxtext field of the New Account map form step.Figure 82: Set hidden read only text field for binding.
-
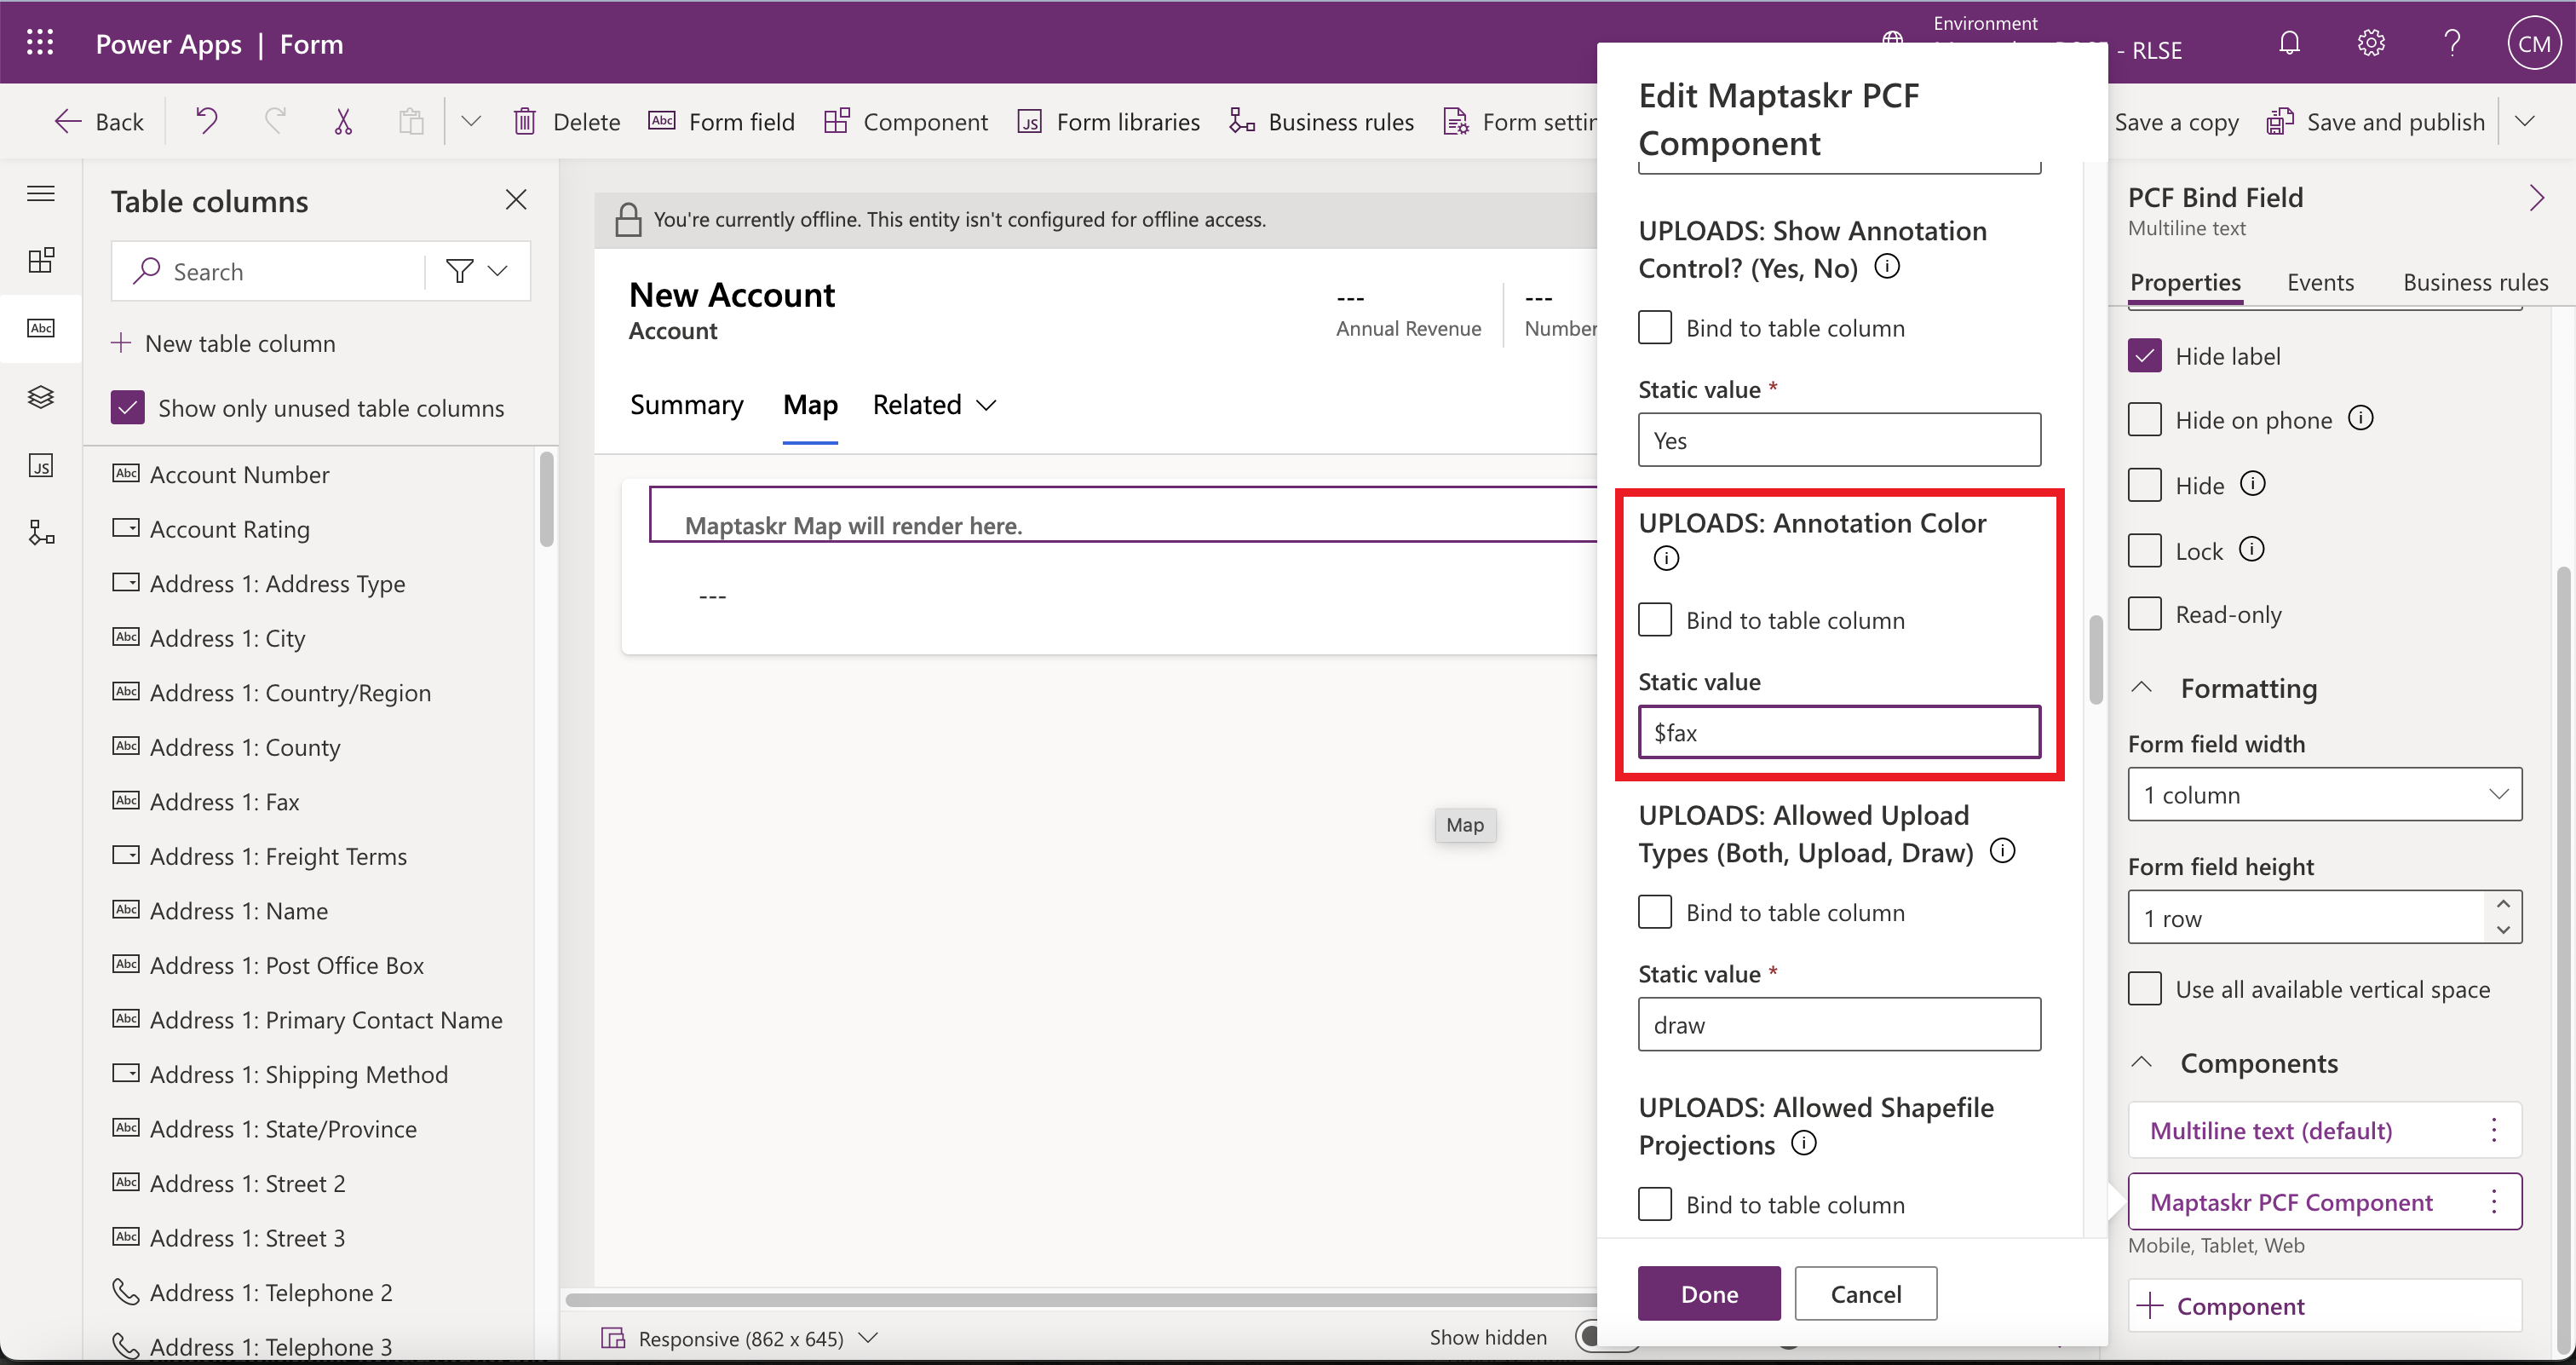
Next go to the properties of the Maptaskr PFC control and navigate to the property you wish to bind to the text field to. Enter in the schema name of the field in the property, prefixed with a
$, in this example we add is$faxas the property value. ClickDoneto save your settings.Figure 83: Set binding field value.
 danger
DO NOT USE the
Bind to table columnoption on the property as this Microsoft PCF capability does not work as expected.You will now find that that when the PCF control loads, it will use the text field value as the input for the property mapped to. Please adopt this capability as needed for your implementation requirements.
Creating a custom help guide
If there is a requirement to inherit or overload the help content, this can be achieved by utilising the Help Guide Custom Endpoint referenced in PCF Component Settings.
Creating the Help Guide endpoint consists of creating a webpage, and a web template to return the JSON objects required to render the help UI.
Creating the web template
First you will need to create a web template to house the custom JSON object. We suggest naming it Custom Help Guide however you can name this what you wish.
Figure 84 - Custom Help Guide
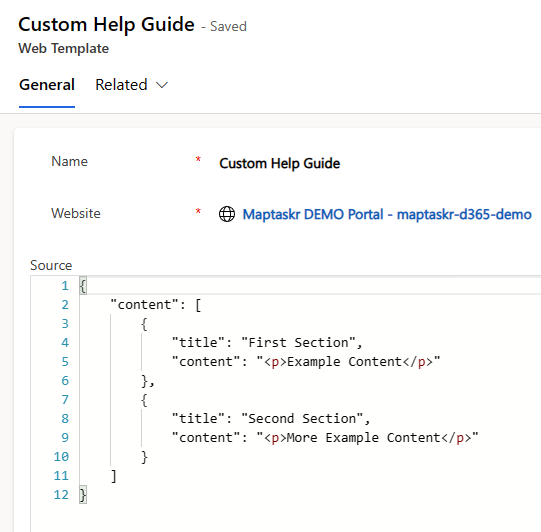
The Source should follow the example:
{

    "content": [

        {

            "title": "First Section",

            "content": "<p>Example Content</p>"

        },
        {

            "title": "Second Section",

            "content": "<p>More Example Content</p>"

        }

    ]

}
The Content can be any HTML content you wish to use. Just be sure to escape any quotes correctly otherwise, the JSON may become malformed.
Creating the page template
After creating the web template, you will need to create the page template.
Figure 85 - Here we have called ours Maptaskr - Custom Help Guide.
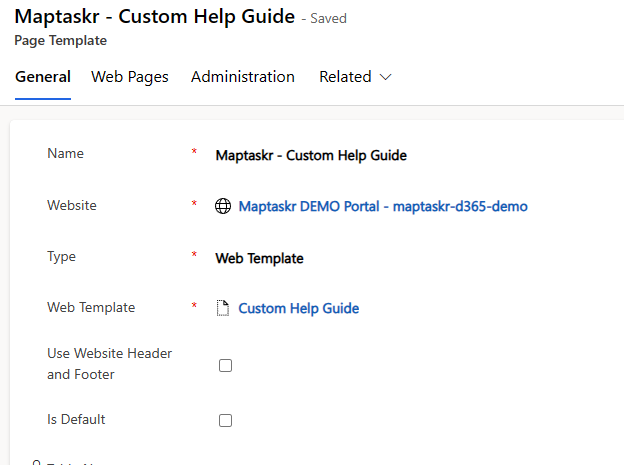
Note the disabling of the Use Website Header and Footer checkbox.
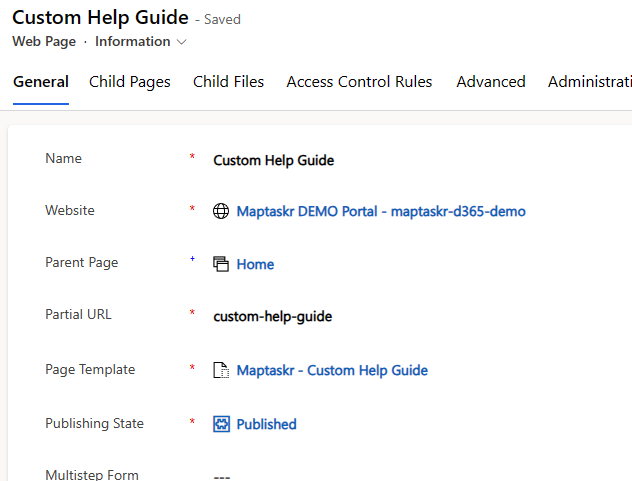
Creating the web page
Once you have created the template, you will need to create a web page to reference in the PCF configuration.
Figure 86 - Here we have created the Custom Help Guide web page and selected the template we just created.
Configuring the PCF control
Once we have created the page, ensure you publish your portal, and test out the endpoint URL.
Figure 87 - Returned JSON object.
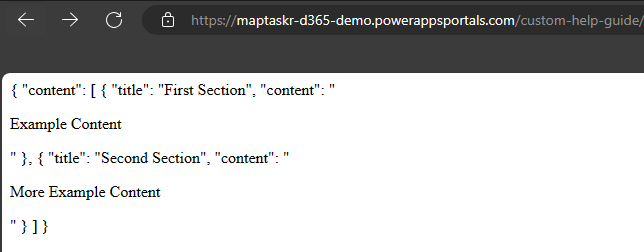
It should return a JSON object as pictured above. Finally, add this URL (as a relative path) to your PCF Configuration.
Figure 88 - Configure your PCF

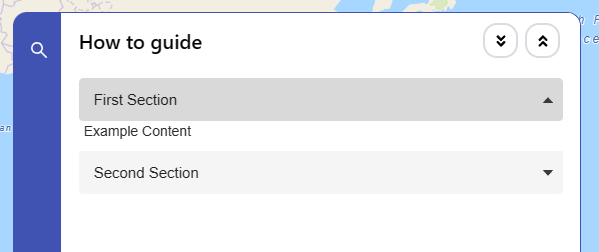
Once published, your new Help Guide should be visible from the PCF form you configured.
Figure 89 - Custom Help Guide content.
Pre-Selected, Exclusion, and Intersection Layer Configuration
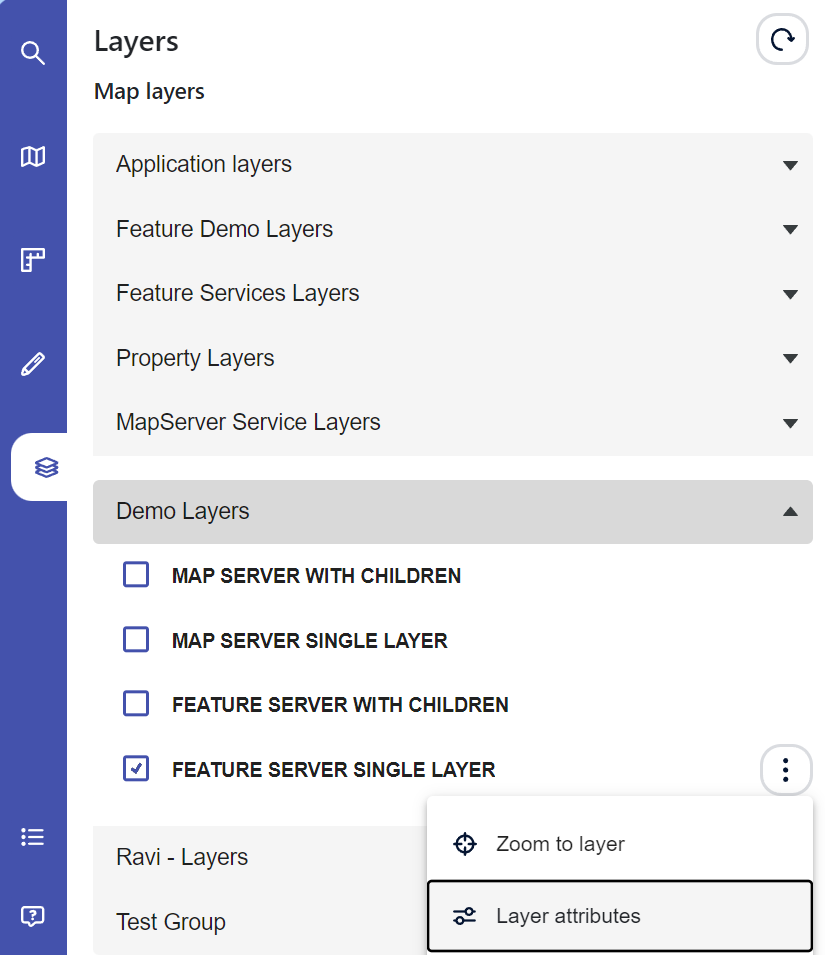
When configuring the PCF control, there are parameters that require the population of a Layer Name / Sub-layer Name. These values can be easily copied from the Portal UI, when selecting layer attributes.
To view the value, navigate to a Portal Map, and select the layer you wish to add to the configuration:
Once the attribute table loads, you will find the layer unique identifier string under the layer title.
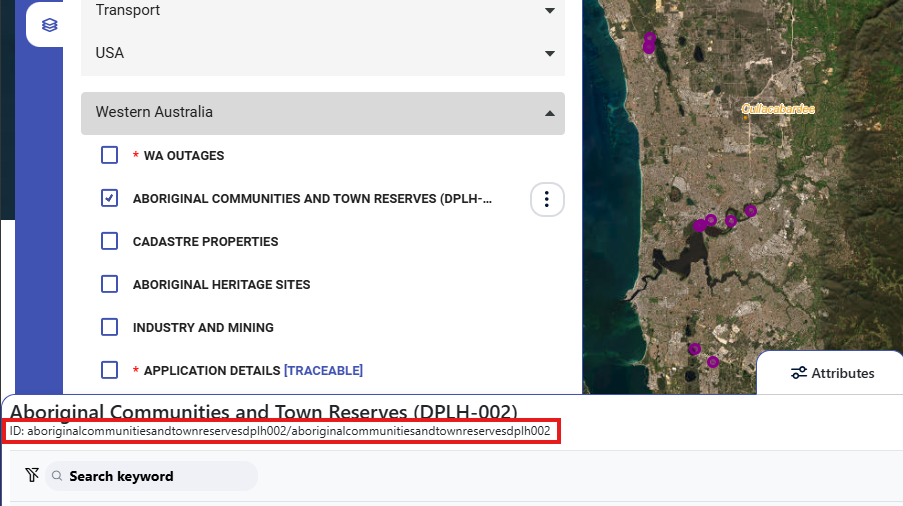
Prior to 2.2.4.72 the Layer and Sublayer were separated with a forward slash character. For backwards compatibility, this will still function. To correctly process layers that may have special characters such as / we have updated the layer ID's to be sanitised of any special characters or white space.
Intersection Detection
This powerful feature introduces a new level of precision and efficiency in handling geographic data, providing users with the ability to detect intersections within their mapped shapes and layers.
- Exclusionary Selected Layers: Administrators can define an ArcGIS Feature Server layer to be loaded and enabled as default. The features provided by the layer are loaded onto the map and will prevent the user from drawing/uploading a shape that intersects with the layer's features.
- Intersection Selected Layers: Users can define specific layers to act as intersect zones when drawing/uploading shapes on the map. This capability is highly versatile, allowing users to set up preselected layers for intersection detection. The layers chosen for intersection detection must be ArcGIS Feature Server layers. After a shape has been drawn or uploaded, users can trigger the intersect detection process with a simple validation button. This feature MUST be used in conjunction with the Intersection Warning and Error Buffers.
- Intersection Warning / Error Buffers: For each layer defined as an Intersection, a Warning and Error Buffer must be defined. These are defined in Metres and will be used to present the user with Warning and Error messages.
- Initmap.js: As part of the Warning and Intersection logic, Maptaskr has preconfigured the
initmap.jsfile to allow users to submit shapes within the warning buffers, but to deny submission when a shape comes within the error buffer. This can be changed by modifying the Initmap.js as per section InitMap.js.
For more information on how to configure the intersection and exclusion layers, please refer to section PCF Component Settings.
Registerable Events and Functions
This feature empowers portal developers to integrate event registration and call on functions directly from the portal applications.
1. Registerable Events: Portal developers can integrate event registration directly into their portal pages, allowing for the programmatic detection of select user driven actions or outcomes as they happen.
2. Data Accessor Functions: Portal developers can call select functions that provide direct access to specific map data, enabling developers to create custom interactions, analyse data, and trigger action-based business rules and requirements.
These features not only allow for the enhancing of user experience, but also open exciting opportunities for portal developers to create dynamic and user-centric mapping applications. It's a powerful tool for organisations looking to foster user engagement, facilitate event coordination, and programmatically detect and respond to events as they unfold on the map.
For a comprehensive list of registerable events and extensible functions, please refer to the Maptaskr for Power Pages - Registerable Events and Functions.